esc-it.org
[!toc] Table of Contents
Welcome to esc-it.org!
esc-it is a collective that creates digital security content in the context of political activism. This site aims to serve as a knowledge base for activists and trainers, documenting current threats, countermeasures and recommendations for tools and best-practices.
Navigation
Think of esc-it like a tiny Wikipedia. You want to look something up? Simply click on the search button and type a related keyword.
The website it is structured in different categories:
- Threats: What kind of threats do activists face? What tools and techniques are used against them?
- Countermeasures: What countermeasures can be taken against those threats? This category is always kept as abstract as possible. You won’t find concrete recommendations or instructions here.
- Recommendations: What specific tools or methods do we recommend to counter specific threats?
- Instructions: Here you will find easy step-by-step instructions on how to use the recommended tools and optimize settings for security, anonymity and privacy.
- Modules: Here you will find scenarios that cover several security-related topics, to give them a bit more context to the various articles.
[!example]
- Threats: What is phishing and how can using SIM cards be dangerous?
- Countermeasures: How to practice good data hygiene?
- Recommendations: Why use GrapheneOS as a secure mobile operating system?
- Instructions: How to encrypt a storage drive with VeraCrypt?
- Modules: What to do when devices were confiscated?
Get involved
Making and maintaining esc-it is a lot of work. Next to covering as many relevant topics as possible, we always try to keep all our content up to date.
Therefore, we don’t have the resources to expand the project as we would like, for example by creating video materials and improving the overall design.
We are happy if you can contribute by:
- Adding or reviewing new content. Have a look at our open issues to see where help is needed, or open a new issue if you have a topic in mind!
- Creating short explainer videos with 2d vector graphics to make the content of esc-it more accessible to people who are not able to read long or complicated texts. An example of what we have in mind can be seen in this EFF video.
- Improving the design and UX of the website, for example by creating interactive elements and animations or improving user workflows. We currently use mdBook for building the site. We are open for improvement within mdBook as well as for suggestions on alternatives!
Further information on how you can contribute can be found in CONTRIBUTING.md.
Contact
You can contact us via mail, preferably encrypted:
E-Mail: esc-it@systemli.org (PGP-Key)
Fingerprint: 0BDB 1EB8 2477 0874 9876 DAE0 B923 BEA9 EAAF 0B15
If you do not know how to encrypt your mail and prefer using Signal, you can send us your signal handle.
Social Media
Check out our social media page to get updates on the project and on current digital security issues.
Currently we are active solely on Mastodon: <@esc_it@systemli.social>
License
The content from esc-it is licensed under the CC0 1.0 Universal License, unless a different license is specified for individual texts, images, files, folders, etc.
This means that the content is in the public domain. Feel free to use and modify it. We would appreciate it if you would cite esc-it as the source and link to it: https://esc-it.org.
If your changes could be relevant to the general public, we would appreciate it if you would contribute them to this project.
FAQ
[!toc] Table of Contents
Passwords and Password Managers
[!question] What is a password manager and how is it used?
Passwords are probably the number one target for attacks, whether from governments or other malicious actors. Using a unique and strong password for each service should be as natural as knowing your own name.
Password managers are the essential tool to make this possible:
- In our general article on passwords, we explain what makes a good password.
- In our recommendations for password managers, we discuss the pros and cons of different tools (like KeePassXC and Bitwarden).
- In our guide to KeePassXC, we make it as easy as possible to get started with this great program.
[!question] Can Online Password Managers Be Hacked?
In theory, anything that is accessible online can be “hacked.” The important question is whether this results in any actual harm.
We explored this question through a example scenario and discussed a possible solution!
[!question] How do I encrypt documents?
In our recommendations, we discuss the pros and cons of the two most well-known programs for file encryption:
- VeraCrypt
- Cryptomator
Those two programs can be used to encrypt single files, folders, or even whole devices, but they each have there pros and cons. See our comparison.
TL;DR
- VeraCrypt is perfect for encrypting whole USB drives or even whole Windows Systems. See our instructions for that.
- Cryptomator is perfect for syncing encrypted files to a cloud. See our instructions for that.
[!question] Do Attackers Know How Many Digits a Phone PIN Has If It’s Not Displayed on the Screen?
- As long as you haven’t fallen victim to Shoulder Surfing and your device doesn’t have any vulnerabilities in this area: No :)
- The risk of such vulnerabilities existing and being exploited on your device can be avoided by keeping your updates up to date.
Data
[!question] How Can Data Be Securely Deleted?
We discuss this question in our article on data hygiene.
In it, we try to explain the technical issue using a metaphor and provide a solution.
Internet & Networks
[!question] Can My Use of Less Legal Streaming Sites Be Tracked?
It depends on how the traffic between your device and the website is encrypted:
- Without encryption (
http): Yes.- With transport encryption (
https): Only the fact that you visited the site is visible, not necessarily what exactly you are doing there.- Over TOR: No.
- With VPN: When using a VPN, the VPN provider can see everything that your internet provider would see without a VPN. This includes:
- Your IP address (which is tied to a mobile or internet contract)
- Which websites are visited
- Whether media is being streamed (can be inferred from data usage)
Malware/Virus/Trojan
[!question] Can you get a virus just by clicking on a link?
Yes. Viruses, or malware are commonly distributed through phishing campaigns, where an attacker tries to trick somebody into clicking a malicious (bad) link or document. If you do happen to fall for phishing, it’s still good to know that you’ve installed all security updates, so the malware might not succeed.
[!question] How realistic is it that a phone could actually be used as a listening device?
This can happen if the phone (or another device with a microphone) is infected with malware (virus/trojan). Some devices and operating systems are particularly well protected against this (see GrapheneOS).
[!question] Can I be eavesdropped on through Bluetooth headphones?
Yes, that it possible. Therefore an attacker would highjack the Bluetooth connection between your headphones and the streaming device, e.g. your phone. A lot of widely used headphones are susceptible to such attacks, which was impressively demonstrated at the 39C3 in Hamburg in 2025.
This attack not only enables the attacker to listen to the music you listen to, but also enables them to highjack calls. This in return could be used to e.g. circumvent 2FA authentication through SMS/calls, like shown in the demonstration linked above.
[!question] How important is it, to get out the phones before a meeting?
This question solely comes down to the threat of spyware. Spyware is the virus, that lets attackers access your microphone, camera or anything else on your device. So the answer to the question depends on your own threat model and the attacker that could be targeting you. Because this analysis of your own threat model might be a bit difficult without experience, it is helpful to look at other cases in your country and similar threat models to yours:
- Have their been reported cases of spyware attacks from your government, or the government you fear surveillance from?
- Had those victims had a similar or even less dangerous threat model than yourself?
- Would you finally say, that it could be likely, that you, or your friends in the meeting could be target of an attack with spyware? If so, then keep the phones out. If not, it might be convenient to have your phone with you, to check your calendar, notes, or anything else you might need it for.
This said, you should rather pay attention to other devices, that might be in the room and listening. E.g. “smart” IoT devices often have microphones for speech recognition, or even cameras. This may include Smart TV’s, fridges, washing machines and so on. If you are unsure, simply look for the name of the model, or it’s serial number and do a quick web search. If it is advertised with something that might see or hear something, then unplug it.
[!question] How can I know, whether my anti-virus program doesn’t secretly spy on my itself?
You can’t really know that, because for those programs to work, they have to be implemented very deep inside your operating system with lot’s of privileges. So in theory, those programs are very much capable of controlling the whole system. Besides that, the time for anti-virus programs is quite over now, because todays operating systems have some pretty good self-defense mechanisms themselves. In the earlier days, this wasn’t always the case and even if there are still some flaws in the OS’s, there is actually no need to install additional anti-virus software.
Messenger
[!question] How can different Messengers be compared to each other?
In our recommendations we discuss some pros and cons of some messengers we think are most relevant for an activist context. For a far more detailed comparison there is the well known messenger-matrix on the Kuketz Blog, which is definitely worth a visit. It compares about ~20 different messengers on a variety of metrics.
[!question] Is there still a sort of encrypted communication, that can’t be sniffed on?
Even though surveillance in the “cyber world” is more relevant than ever and state-sponsored spyware is on the rise, we can confidently say: There is, especially today, very good communication encryption, particularly end-to-end encryption.
However, it’s important that it’s used correctly and consistently. In modern cases where communication is successfully intercepted, it’s usually due to user errors, such as:
[!question] How secure is Signal?
Signal is one of the most secure digital communication options available. The underlying protocol is the “gold standard” among encryption protocols and is adopted by many other messaging apps.
The only criticism of Signal is that you need a phone number to register, which in most countries must be tied to an ID. However, this is an issue of anonymity, not security.
As long as no attacker has access to your device or your contact’s device, it can be assumed that the communication content via Signal is very well protected!
See also our recommended settings for Signal.
[!question] Can you register a Signal account on a laptop without smartphone?
Yes, signal-cli can register new accounts, but it requires some work with a terminal/console to get it working.
Gefährliche Dateien
[!toc] Table of Contents
Note: For a better browsing experience we give the “answer” here at the beginning. See below for a more detailed explanation of this threat.
What file types can be dangerous
Although none of the listed file types are malicious per se, they are often used by attackers to “hide” malware. Most commonly:
- LibreOffice:
.odt: Text documents (Writer).ods: Spreadsheets (Calc).odp: Presentations (Impress).odg: Drawings (Draw).odb: Databases (Base)
- Microsoft Office:
.docx: Word documents.xlsx: Excel spreadsheets.pptx: PowerPoint presentations
.pdf: PDF’s- even image formats like
.gifhave reportedly been exploited, also on mobile devices.
[!tip]
It is recommended to avoid the above “complex” file types if they are not necessary. If you still have to open such a file from an untrusted source, we recommend using Dangerzone.
Use text files and markup languages like markdown if possible instead.
Why this matters
[!note] It is a matter of security culture to reconsider if it’s really necessary to send an invitation text as a PDF or a draft of a press release as Word document. If it is enough to use the possibilities, that safe markup languages like markdown give you, them use just them.
Markdown is even compatible to collaborative tools like e.g. Nextcloud.
In many contexts we see that people are kind of ashamed of sending plain text invitations for example. They feel that they owe their friends some more effort than just text. While this shows a pretty nice property of friendship, we also have to talk about the problems that this brings along and that it might be worth it to break this behavior down towards a more conscious approach.
What is a file type
Different programs expect their files to have a specific format. They expect the files to follow a pattern that the program recognizes to function correctly.
Each file type is typically identified by a specific extension (such as .odf, .pdf, .jpg), which signals to the operating system what program should open it and how it should behave. For example, if you click on a file that ends with .pdf, the operating system knows that is has to open the file with a PDF reader and not with you music player.
How can files be dangerous
Consider a simple text file (not a word document, but a simple plain text file!). A normal text file contains, no surprise, text, which is nothing else than characters, like “A”, “a”, “;”, “/” and so on. Those text file can be read and displayed from simple programs like Gnome’s “gedit”, Windows notepad, and so on. They are not capable of advanced features, such as calculating tables, like Excel, or LibreCalc.
More advanced programs like Excel, PowerPoint, or modern PDF viewers are capable of much more advanced features. PDF viewers for example can display interactive forms, that you can fill out right inside the PDF viewer. They can have drop-down menus and more.
[!caution] This means, that your PDF viewer, PowerPoint, Excel etc. are able to execute additional code, that is delivered inside the file they are processing.
While this is necessary to use the full feature set of the program, the capability to execute additional code can expose severe security risks.
You probably all heard about viruses being distributed through PDFs. This is exactly what is exploited here:
[!note] An attacker can smuggle some malicious code inside the PDF. You open the PDF with your PDF viewer. The PDF viewer detects some code and thinks: “Ah, I have to execute this, so that the user has the full functionality of this file” and executes the code, which can then perform malicious actions such as stealing your data and sending it to the attacker.
Datenspürhunde
[!toc] Table of Contents
[!info] TL;DR {static}
Data dogs, similar to drug detection dogs, are specially trained to sniff out certain metals that are used in electronics and thus in storage media such as USB sticks.
Im folgenden wird dieser Artikel unter der Creative Commons BY-NC-SA 4.0 von Netzpolitik.org wörtlich zitiert, da dieser das Thema ziemlich gut erklärt:
Der unwiderstehliche Geruch von Festplatten
Bei Hausdurchsuchungen kommen immer öfter auch „Datenspeicher-Spürhunde“ zum Einsatz. Sie können Smartphones, Festplatten und sogar SIM-Karten riechen. Bei deren Ausbildung will sich die Polizei allerdings nicht in die Karten schauen lassen.
Von Polizeihunden, die nach Rauschgift oder Sprengstoff suchen, haben alle schon gehört. Auch von Hunden, die nach Banknoten schnüffeln, auf der Suche nach Steuerflüchtlingen. Am Ende der letzten Dekade kam dann eine neue Ausbildung dazu: Hunde, die Datenträger erschnüffeln – und das Land Sachsen war Vorreiter. Im Fall des massenhaften Kindesmissbrauchs auf einem Campingplatz in Lüdge kam Deutschlands bis dahin einziger „Datenspeicher-Spürhund“ zum Einsatz. In der Folge bildete die Polizei von Nordrhein-Westfalen ebenfalls solche Hunde aus und präsentierte „Odin“, „Jupp“ und „Ali Baba“ auch in sozialen Medien.
Auf der Transparenz-Plattform FragdenStaat gibt es gleich mehrere Anfragen zu Datenspeicher-Spürhunden. Dort hätte man also mehr dazu erfahren können, wie die Polizei Hunde trainiert, damit diese CDs, Festplatten, Speicherkarten, USB-Sticks, Smartphones und SIM-Karten finden. Denn ganz offenbar haben Speichermedien einen ganz eigenen Geruch, den Hunde erkennen, wenn sie auf diesen konditioniert werden. Allerdings hat die NRW-Polizei die Ausbildung der Hunde als „Verschlusssache“ eingestuft und großflächig geschwärzt, und so muss man sich stattdessen auf Medien wie zooroyal und deren Berichterstattung über die „Fellnasen“ verlassen.
In einem Bericht der Süddeutschen Zeitung heißt es, dass die Suche nach Datenträgern viel schwieriger sei als nach Drogen, die einfach stärker riechen würden als die handelsübliche Festplatte. Auch die Polizei Sachsen-Anhalt schreibt in einer Präsentation, dass die Datenträger kaum Geruchsmoleküle freisetzten.
Der sächsische Diensthundeführer sagte der Zeitung damals, dass der Hund die Chemikalien rieche, die zur Herstellung der Speichermedien verwendet werden. Er habe sogar den Eindruck, dass sein Hund Lithium-Ionen-Akkus schneller fände als Handys mit Chrom-Nickel-Batterien und gehe davon aus, dass „Artus“ Lithium riechen könne.
Weil die gesuchten Datenträger so wenig Geruch verströmen, verlange die „Spürarbeit“ eine „hohe, ausdauernde und körperlich anstrengende Leistung“ des Diensthundes, heißt es in den Unterlagen aus Sachsen-Anhalt. Deswegen setze diese Ausbildung „ein fokussiertes, sachliches Spürverhalten des DH [Diensthundes] voraus.“
Belohnung: Beißwurst
Die Polizei NRW selbst verrät auf ihrer Webseite, wie die Suche vor sich geht: „Hört Hank [Hund] das Kommando »Spür!«, beginnt er zu suchen. Bleibt er bewegungslos stehen, weiß Peter Baumeister [Hundeführer]: Er hat etwas gefunden. Als Belohnung bekommt Hank dann sein Lieblingsspielzeug: eine Beißwurst.“
According to this, the additional training of a tracking dog to become a data storage tracking dog takes 20 days, which the dog completes together with its handler. After the training, the handler can then call themselves a “data storage tracking dog handler.” A word that could hardly sound more German.
Forensik
[!toc] Table of Contents
Introduction
Forensics is a collective term for fields of work in which “criminal acts” are systematically investigated. In short: when cops try to find evidence.
Relevant subfields
Many forensic measures pose relevant threats to activists. These include:
-
Forensic linguistics: Examines written language to identify the author of a text, for example. Relevant for anonymous letters of confession, instructions, etc..
-
Physical forensics: Examines fiber traces, DNA, tire or shoe prints, and fingerprints, among other things, to identify people who were present at a specific “crime scene” or who used a specific tool, for example. Relevant for anonymous actions.
-
Digital forensics: Examines data on IT systems such as cell phones, PCs, servers, printers, etc.
[!warning] {static}
Digital forensics is almost always a threat, as digital devices store an enormous amount of information!
Digital Forensics
E.g. in the words of the German Federal Police Office:
“In addition to traditional evidence such as files (paper), images, tools, or weapons, digital evidence is playing an increasingly important role in criminal investigations. Evidence includes data carriers in countless formats: PCs, e-book readers, printers, chip cards, optical media, mobile phones/smartphones, and SIM cards.”
There are many things that can unexpectedly become (digital) evidence. Another thing that one should keep in mind is that digital forensic investigators can often restore files that were “deleted” a long time ago, which is why encrypting and securely deleting your stuff is so important.
Look at our countermeasure article about deleting data securely for more information on how to securely delete data and why it is so important.
[!technical] How does a digital forensic investigation work?
A forensic investigation is usually requested by prosecutors or courts and carried out by a “forensic expert.” Usually, the cops carry out the forensic analysis.
Many forensic tools are offered to the authorities by external companies, e.g. Cellebrite for mobile phone forensics.
Laptops and data carriers are usually not examined directly. Instead, an “image,” i.e., a copy, of the data carrier/hard drive is made, which is then examined. This is to ensure that no digital evidence has been falsified or corrupted.
Physical Forensics
We will not go into detail about physical forensics here. In general, classic forensic methods used in criminal investigations may also be relevant for activists. These include tracing:
- Fiber traces
- Shoe prints
- Fingerprints
- DNA
- and more
It is very difficult not to leave any physical traces. Physical forensic analysis is usually very time-consuming and costly. Nevertheless, individual case studies show that confused cops have ordered this even for minor offenses, even for simple ad busting actions.
Loggers
[!toc] Table of Contents
Loggers are devices that can be used to ‘log’ or record something. Two types of loggers are relevant to us here: keyloggers and screen loggers.
Keyloggers
Keyloggers are devices that basically record all keystrokes on your keyboard. They are placed between the keyboard and the computer and look like normal USB adapters:
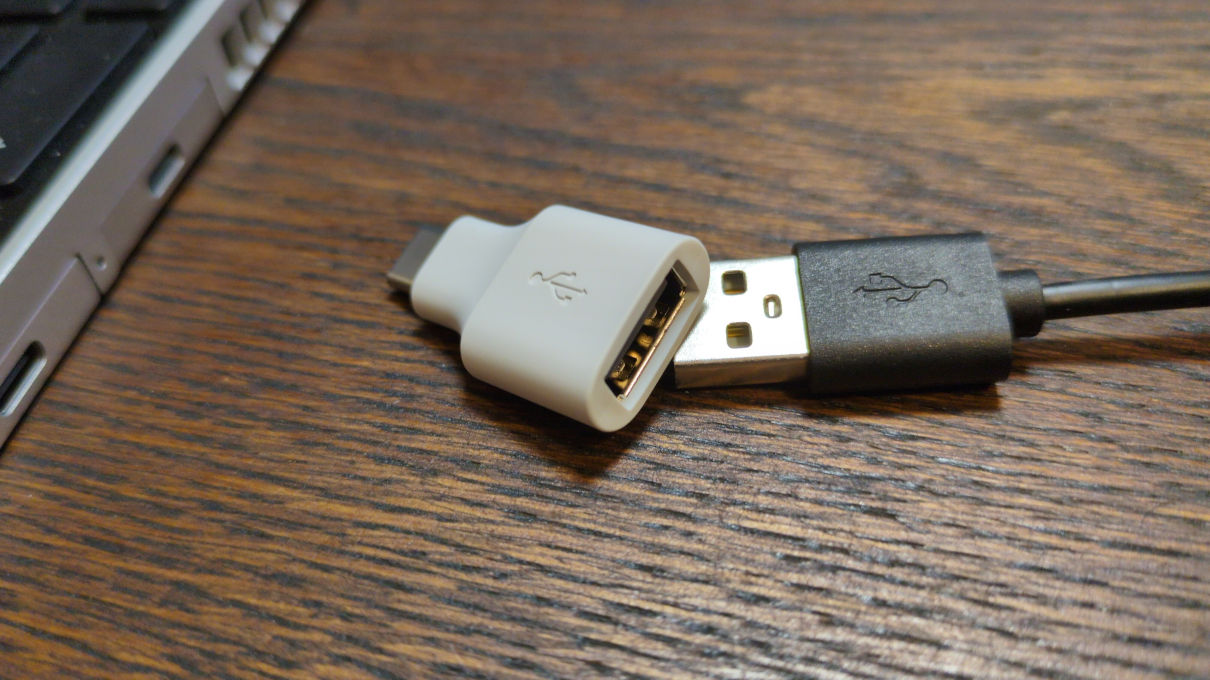

They can send every single keystroke to an attacker in real time via radio/WiFi/LTE. The problem with this is obvious.
These keyloggers are available for very little money and are easy to obtain, making them very simple to use even for amateurs. There are even keyloggers that look like normal cables, see for example the O.MG Cable.
More advanced attackers (e.g., government agencies) can also install keyloggers in the keyboards themselves by unscrewing the keyboard and installing a small keylogger circuit board directly on the keyboard’s electronics. Or they can simply replace the keyboard with a manipulated one. This would not be noticeable on the USB port alone, of course.
Screenloggers
Screen loggers work on the same principle as keyloggers. An adapter-like device is plugged between the display and the PC (depending on the connection used: VGA, HDMI, DisplayPort, etc.) and can then record the entire image transmission and send it to the attacker via radio/WiFi/LTE.
[!warning] {static}
Be careful with
- publicly accessible PCs
- other PCs that are not always under observation (your own office, for example)
It should also be noted that “key loggers” and “screen loggers” can also refer to software loggers. However, these are nothing more than viruses and describe a completely different threat than the ones discussed here.
Metadaten
[!toc] Table of Contents
Here we describe what metadata is and where it can be found. If you just want to know how to clean metadata from files, check out our recommendations.
The data behind the data
Metadata in communication
Imagine you are writing a message to someone or talking to a friend on the phone. You might think, “As long as no one knows the content, everything is fine!” - but that’s not entirely true.
Even without knowing the content, a lot can be found out about you from the metadata.
Metadata is data about your data. In lots of messengers for example, it can reveal:
- Who is communicating with whom
- When and how often you are in contact
- Where you sent a message from
- Which app or device you are using
Metadata can be used to deduce habits and how your everyday life usually looks like.
Contact networks can also be identified in the same way: If person A is in contact with person B, and person B always immediately writes to C after receiving a message from A, then C is also connected to A.
IP addresses and location data also belong to the category of metadata. In 2024, for example, several high-ranking intelligence officials from major NATO countries were identified using a commercially available data set because they had used apps and devices that collected their location data and sold it to so-called data brokers. (Entire series of articles in german on netzpolitik.org)
It is therefore important to avoid metadata wherever possible.
According to Mike Kuketz, Briar is a role model in this regard: “The metadata generated during use is obfuscated in such a way that it is impossible to trace who was in contact with whom.”
Signal is also rather sparing with metadata. Matrix, email, and Delta Chat, on the other hand, require a lot of metadata to function properly. This metadata is then stored on all servers with which communication takes place.
This does not mean that these messengers do not have their advantages, but the disadvantage of metadata should be kept in mind.
[!technical] Details about SMTP metadata
Delta Chat uses the old SMTP email protocol. For those who want to delve deeper into metadata in SMTP, here are a few resources:
Metadata in files
Even simple files often contain metadata. A photo taken with a smartphone, for example, may even contain the location where the photo was taken (if the settings are poorly chosen). In addition, the device model, date, time, and similar information are often included.
PDFs, Word, Excel, and similar files also usually contain a lot of metadata that reveals the device and operating system used for editing, the creation or editing date, user name of editor, and similar information.
This becomes a particular problem when files are uploaded somewhere, as the metadata is also uploaded and can then be viewed by anyone who downloads the file.
[!tip] {static}
- GrapheneOS’s Camera e.g. doesn’t store any meta data on photos you take with it, by default.
- Our recommendations include a list of tools for cleaning metadata.
Metadata on paper
Yes, unfortunately, even printed paper contains metadata, known as printer dots. These are tiny yellow dots that some color laser printers use to leave information about the printer model and print date, which are not visible to the naked eye.
Such dots were presumably used to identify the US whistleblower Reality Winner.
Until 2017, the civil rights organization Electronic Frontier Foundation had compiled and maintained a list of such color printers. However, this has since been discontinued because all color laser printers now leave detectable traces in one form or another.
[!warning] Warning {static}
Therefore, in highly sensitive cases, no (high resolution) photos of original documents should be uploaded. In our recommendations, we describe a possible alternative.
Mobile communications
[!toc] Table of Contents
First, some basic information about threats in the field of mobile communications needs to be explained. This article focuses on how a single cell phone communicates with the mobile network in the form of a cell phone tower (colloquially: antenna mast). The terms IMSI and IMEI (and sometimes TMSI) appear frequently and are also briefly explained here.
Who owns cell phone towers?
Cell phone towers are operated by mobile phone providers. Accordingly, the respective mobile phone providers also control the data traffic passing through these towers. In the image below, the different colors symbolize different providers (in Germany), such as Telekom, Vodafone, O2, etc.

IMSI: SIM identifier
Every SIM card has a unique identifier, the International Mobile Subscriber Identity, or IMSI for short. Due to the registration requirement for SIM cards in most European countries, the SIM card is usually uniquely assigned to an identity. The authorities can easily request this information from mobile phone providers and do so very regularly.
Authorities can ask the providers which phone numbers belong to a certain person. This can also work in the other direction, for example asking who the owner of number 0123456789 is. Those inquiries are very cheap for authorities and are regularly used on a massive scale.
IMEI: Device identifier
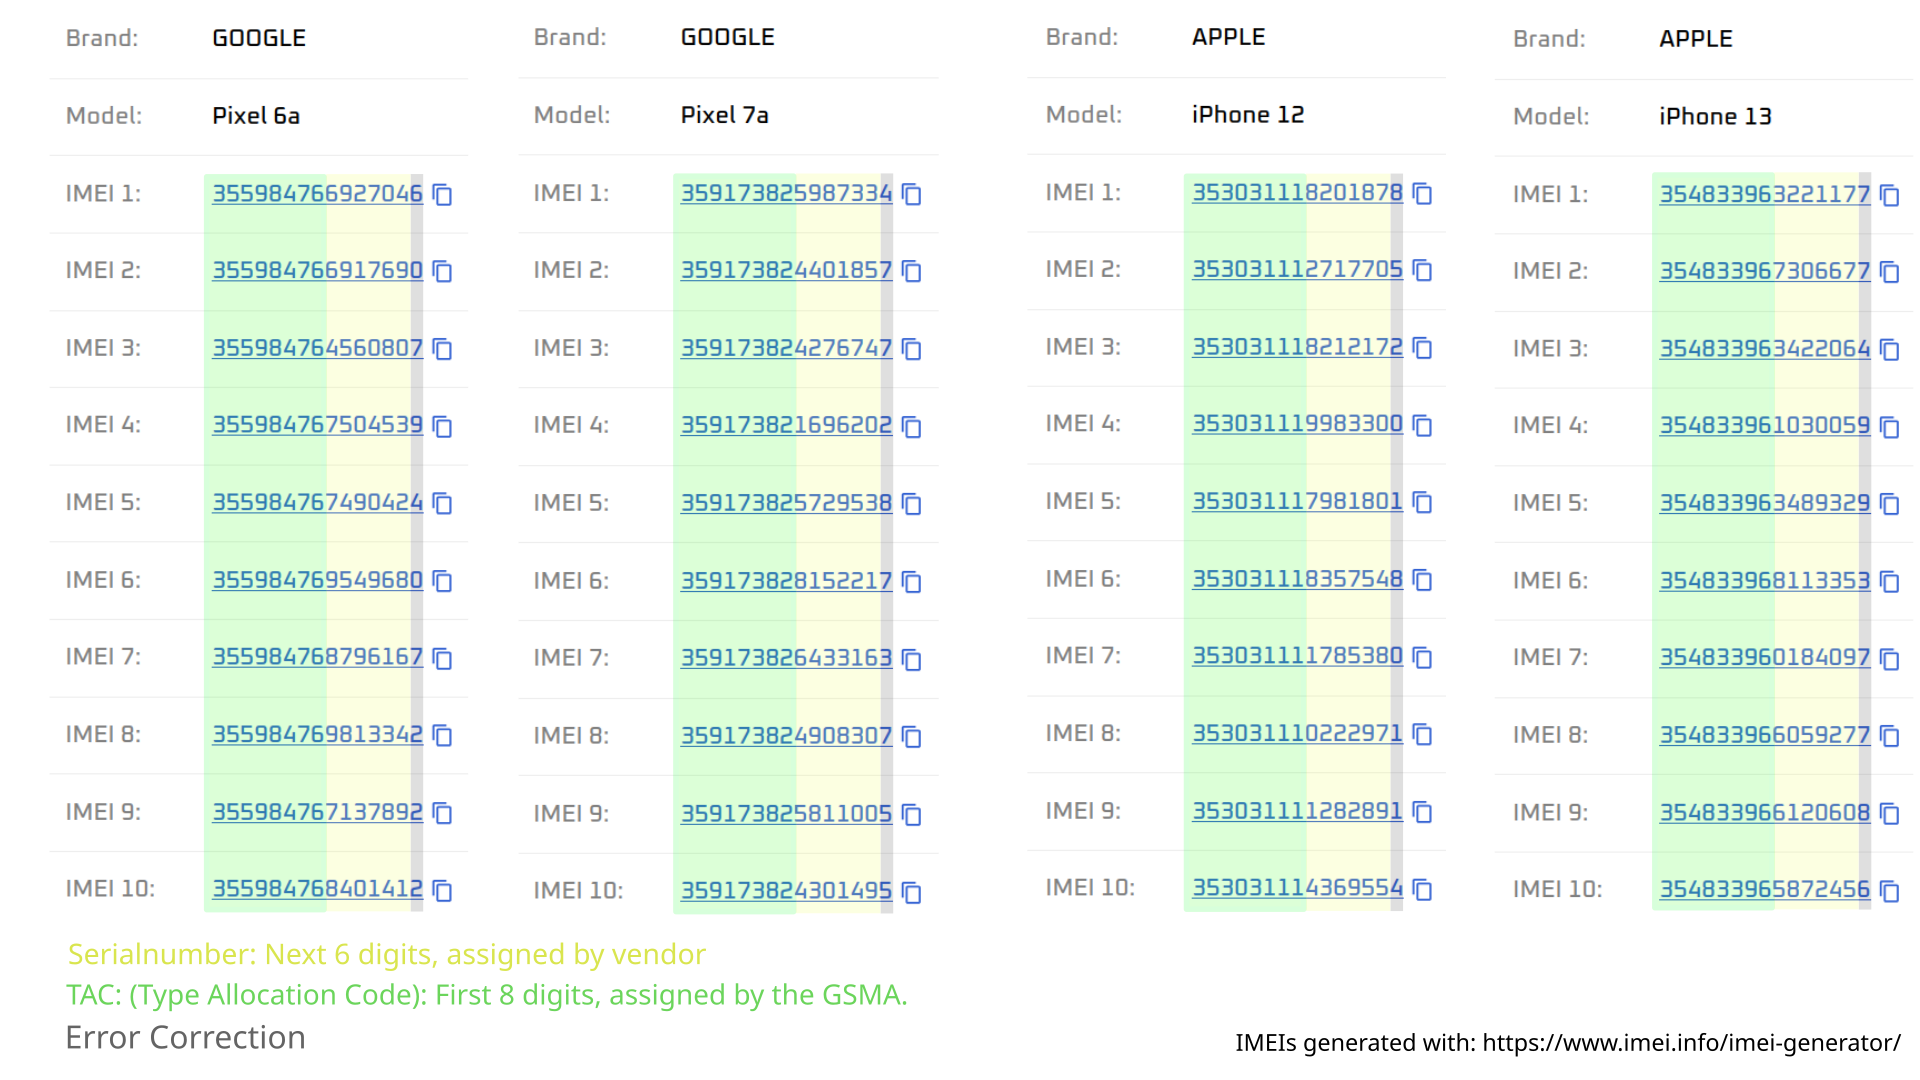
Mobile phone modems (i.e., the chip in your cell phone that can connect to the mobile network) also have a unique number, the International Mobile Equipment Identity, or IMEI for short. These IMEIs are usually 15 digits long and globally unique. The structure is as follows:
-
The first 8 digits are, to put it simply, type-specific. For example, all Google Pixel 7a devices have the following 8 digits: 35917382
-
The next 8 digits are serial numbers
-
Die letzten Ziffer ist für Fehlerkorrektur
[!technical] How is it ensured that these numbers are unique?
Since many different companies produce such mobile communications modems, it is necessary for them to coordinate with each other. Otherwise, with thousands of modems produced every day, numbers would quickly be assigned multiple times.
This is handled by the GSMA (Global System for Mobile Communications Association). The name speaks for itself.
- So if a manufacturer wants to launch a new model, they go to the GSMA and ask for a “number space,” the first 8 digits. They can then name all chips produced for this model with this number space, i.e., assign IMEIs.
- The serial numbers are used to distinguish individual devices of the same model.
- Error correction is a bit of black magic and can really be ignored here.
[!detail] EIR: (Equipment Identity Register)
However, the standard also provides for “whitelists.” This would mean that all IMEIs produced are recorded and only those recorded are allowed to participate in the network. This would then be a significant security risk if a cell phone is purchased with traceable payment methods.
Examples of modem manufacturers: Qualcomm, Huawei, ZTE, Sierra Wireless, Netgear, Alcatel, TP-Link
The IMEI therefore makes every mobile device identifiable.
If a device can be used with multiple SIM cards at the same time (regardless of whether these are two physical SIM cards or one e-SIM and one physical SIM card), it also has the corresponding number of IMEIs.
However, it is often quite easy to establish a connection between these two IMEIs:
- The serial numbers are often simply incremented (except for error correction)
- If two IMEIs are always in the same place, this can be correlated
- The manufacturers and retailers know the correlation between the two IMEIs
- If an EIR is involved, these two IMEIs are also linked to each other in the EIR. So if one of the two IMEIs is known, the second one can also be found in the EIR.
The IMEIs cannot be changed easily. In many countries, manipulating them is a criminal offense. It also requires special hardware, which is most likely to be obtained from China.
[!tip] Tip {static}
There are some mobile routers that can be flashed with a special operating system named blue merle. Blue Merle can be used to change the routers IMEIs and can also be configured to only use TOR.
Problems when buying cell phones
So if you buy a phone in a store and pay with a card, the store will have a link between your card and the IMEI(s) of your phone. As a result, authorities may be able to trace the IMEIs assigned at the factory to specific devices by querying sellers and device manufacturers.
And if the cell phone was purchased using your own identity, this association also may exist. However, we do not yet know whether and how often authorities query this association.
[!abstract] Conclusion: IMEI {static}
- Identifier of a device, not the SIM card
- Globally unique (by factory default)
- Transmitted to mobile network providers when connected to a mobile network (see Authentication)
Authentication

-
If the mobile phone detects the signal of a cell phone tower, it tries to “knock” on it with a kind of “Hello” to see if the tower is even reachable and, if so, tells it that it would like to log into the network: “I want to log in!”
-
If the radio cell receives this message, it first asks for the identity of the mobile phone to ensure that it has the right to log in: “Who are you?”
-
The mobile phone then sends the IMSI of its SIM card to prove that it has the right to connect. At the same time, it also sends the IMEI of its mobile modem (i.e., of the mobile phone).
- A Telekom cell phone tower would therefore reject a Vodafone SIM card and tell it that it does not have the right to use the Telekom network.
-
This completes the authentication process and a connection can be established. The purpose of the TMSI is secondary here and has therefore been removed for simplification.
-
According to the standard, such connections can only be established in “encrypted” form. You can read why this is in missing quota.
[!technical] What is the TMSI?
If a connection were simply established, anyone nearby with the appropriate hardware (e.g., software-defined radios starting at €20) could see which cell phones are currently logged into the network with which SIM cards and how much they are communicating.
To prevent this from happening, the procedure goes one step further: The cell phone tower gives the cell phone a TMSI (Temporary Mobile Subscriber Identifier). From now on, the mobile phone uses this TMSI for identification, but only in this session. If the mobile phone logs out of this tower at some point and logs back in later, the entire procedure starts again and a new TMSI is assigned.
If you are still wondering why the mobile phone needs to identify itself again after the initial authentication: Sent packets always need recipients (and senders), of course. So that your mobile phone can be found again during a connection to a website, for example, in order to present the content to you, “the network” must of course know which device you are.
Both the IMSI and the IMEI are transmitted during authentication with the mobile network. This creates traceable data for mobile phone providers that enable a unique assignment between IMSI and IMEI, i.e., cell phone and SIM card.
Therefore you should be aware of this risk when using a mobile phone that has previously been used with another SIM card, which in turn allows conclusions to be drawn about your own identity. In addition, the mobile phone may also have ended up in a Geofence warrant with another SIM card.
IMSI catcher
[!toc] Table of Contents
An IMSI catcher, also known as Cell-Site Simulator or “Stingray”, is a surveillance device that “masquerade as legitimate cell-phone tower, tricking phones within a certain radius into connecting to the device rather than a tower” 1.
In general, standard telecommunication works as follows:
- End devices, such as your phone, log in to the cell-phone tower with the strongest signal.
- Upon receiving a request from your device, the tower performs an “Identity Request”
- Your device then authenticates themselves with their IMSI + IMEI, and receive a TMSI from the tower.
IMSI catchers abuse the above to track the location of cell phones and gather data from nearby devices without the users’ knowledge.
A rough distinction can be made between passive and active IMSI catchers:
-
Passive IMSI catchers simply wait for clients to attempt to authenticate themselves with their identifiers at the cell-phone tower. This allows detailed information to be collected about who or how many people are present at a demonstration, for example. Clients do not notice the deception due to the GSM protocol.
-
Active IMSI catchers do not just wait for the client’s synchronization request. They instead give your device a TMSI (comparable to a local IP) and establish a legitimate connection to a real cell-phone tower on the device’s behalf. This allows full-fledged ‘machine-in-the-middle attacks’ to be carried out.
What security vulnerability is being exploited here?
The problem lies in the authentication between the phone and the cell-phone tower. The phone must verify itself to the tower (as shown below) with its unique identifiers (IMSI, IMEI) to prove that it has the right to use the mobile network.
However, the cell-phone tower does not authenticate itself to the phone. Therefore, the phone can never know for sure whether it is actually communicating with a normal, commercial cell-tower or with a clone, operated by the authorities.
Active IMSI catcher - system

Why is communication between the phone and the police unencrypted?
The answer can be found in the vulnerability in the communication protocol during authentication described above. By taking certain steps, the IMSI catcher can force the phone to use an old mobile phone standard (usually 2G) during the authentication process. This downgrade is possible in order to use the existing 2G infrastructure in situations where modern standards (3G/4G) do not provide reception. 2G is often somewhat more resistant in terms of territorial coverage than the more modern standards. The 2G standard, on the other hand, has long been obsolete and is not recommended for security reasons. Apart from government agencies, even private individuals can very quickly decrypt 2G “encrypted” communications and read/listen to them. For this reason, we classify this communication as “unencrypted” in practice.
[!technical] Why is communication between police and mobile phone cells encrypted?
To counteract so-called “eavesdropping,” i.e., being listened in on, the cell-phone towers of the new standards only accept communications that have been encrypted with their respective standard. To ensure that your phone does not notice that it is actually connected to a malicious tower, the IMSI catcher must also establish a real working connection to the legitimate mobile network. To do this, it must re-encrypt the connection to the cell-phone tower.
Practical threats
[!warning] This means: {static}
- Cell phones with private SIM cards and IMEI numbers can be identified and located
- “Anonymous” SIM cards and cell phones are not necessarily anonymous
It should be noted that this poses a potential risk if an “anonymous” cell phone is reused. In connection with radio cell inquiries, it may be possible to create and contextualize movement profiles of these devices.
A potential example scenario could look like this:
You use your action cell phone at several actions/demonstrations, preferably in different cities or states. During these demonstrations, you (and therefore your IMSI+IMEI) end up in cell-phone inquiries multiple times. At first, no one can do anything with this information except say that this device was present at all of these events. However, you might walk past IMSI catchers at further demonstrations and be checked or filmed. Over time, this could establish a correlation between you and the device.
Hardware for professional IMSI catchers in Germany and the surrounding area usually comes from Rhode&Schwarz. Their devices are known and popular worldwide, not only with law enforcement agencies. This state-of-the-art technology is also correspondingly expensive, with prices in the 4-5 digit range.
However, simple passive IMSI catchers can also be implemented with ~€25 SDR dongles (software-defined radios). These are only capable of reading existing traffic, but not of setting up a fake radio cell and carrying out actual MITM attacks.
Recommendation
We recommend reading this article from the Electronics Frontier Foundation, which introduces Rayhunter. A software, that can be flashed onto specific types of mobile routers to detect present IMSI-Catchers.
Sources
- https://www.eff.org/wp/gotta-catch-em-all-understanding-how-imsi-catchers-exploit-cell-networks
- SnoopSnitch talk: https://media.ccc.de/v/ber15-5-detecting_imsi-catchers_and_other_mobile_network_attacks, although the app itself does not work.
Radio cell inquiry
[!toc] Table of Contents
To understand this chapter, it is necessary to understand the basic concepts of the mobile network, in particular the connection and authentication process between mobile phones and cell-phone towers. We have attempted to illustrate this in the article Mobile communications.
[!warning] {static}
Cell data is very easily accessible to the authorities and is regularly used in investigations.
Radio cell inquiry is a measure that law enforcement agencies regularly use in their investigations. Thereby, the authorities request phone cell data that is of interest to the case, usually directly from the mobile operators.
How to protect against radio cell inquiries?
Don’t let your phone connect to the radio cells. Ergo, turn your phone of, or at least, put it into airplane mode. With airplane mode, bear two things in mind:
- when you take out your SIM card, but don’t put your phone into airplane mode, it may still try to connect to cell-phone towers for making emergency calls.
- not all devices truly shut off cell-phone communication when put into airplane mode.
[!info] {static}
To be 100% sure that no cell phone data is gathered - don’t take your phone with you.
What is requested in radio cell inquiries?
Radio cell inquiries collect the following data for the period and “location” (i.e., a specific area that may be covered by several mobile phone cells) inquired about:
- Logged-in phone numbers
- Time stamps of:
- Dial-in/dial-out of devices
- Outgoing and incoming calls
- Voicemail messages
- Sent/received text messages
Radio cell inquiries are often made before, during, and after demonstrations. This can reveal which devices were present at the protest and were they were before and after it. This information can be potentially used to identify protesters, especially when their phone numbers are registered to their names or when the route they took to the demonstration can compromise their identity.
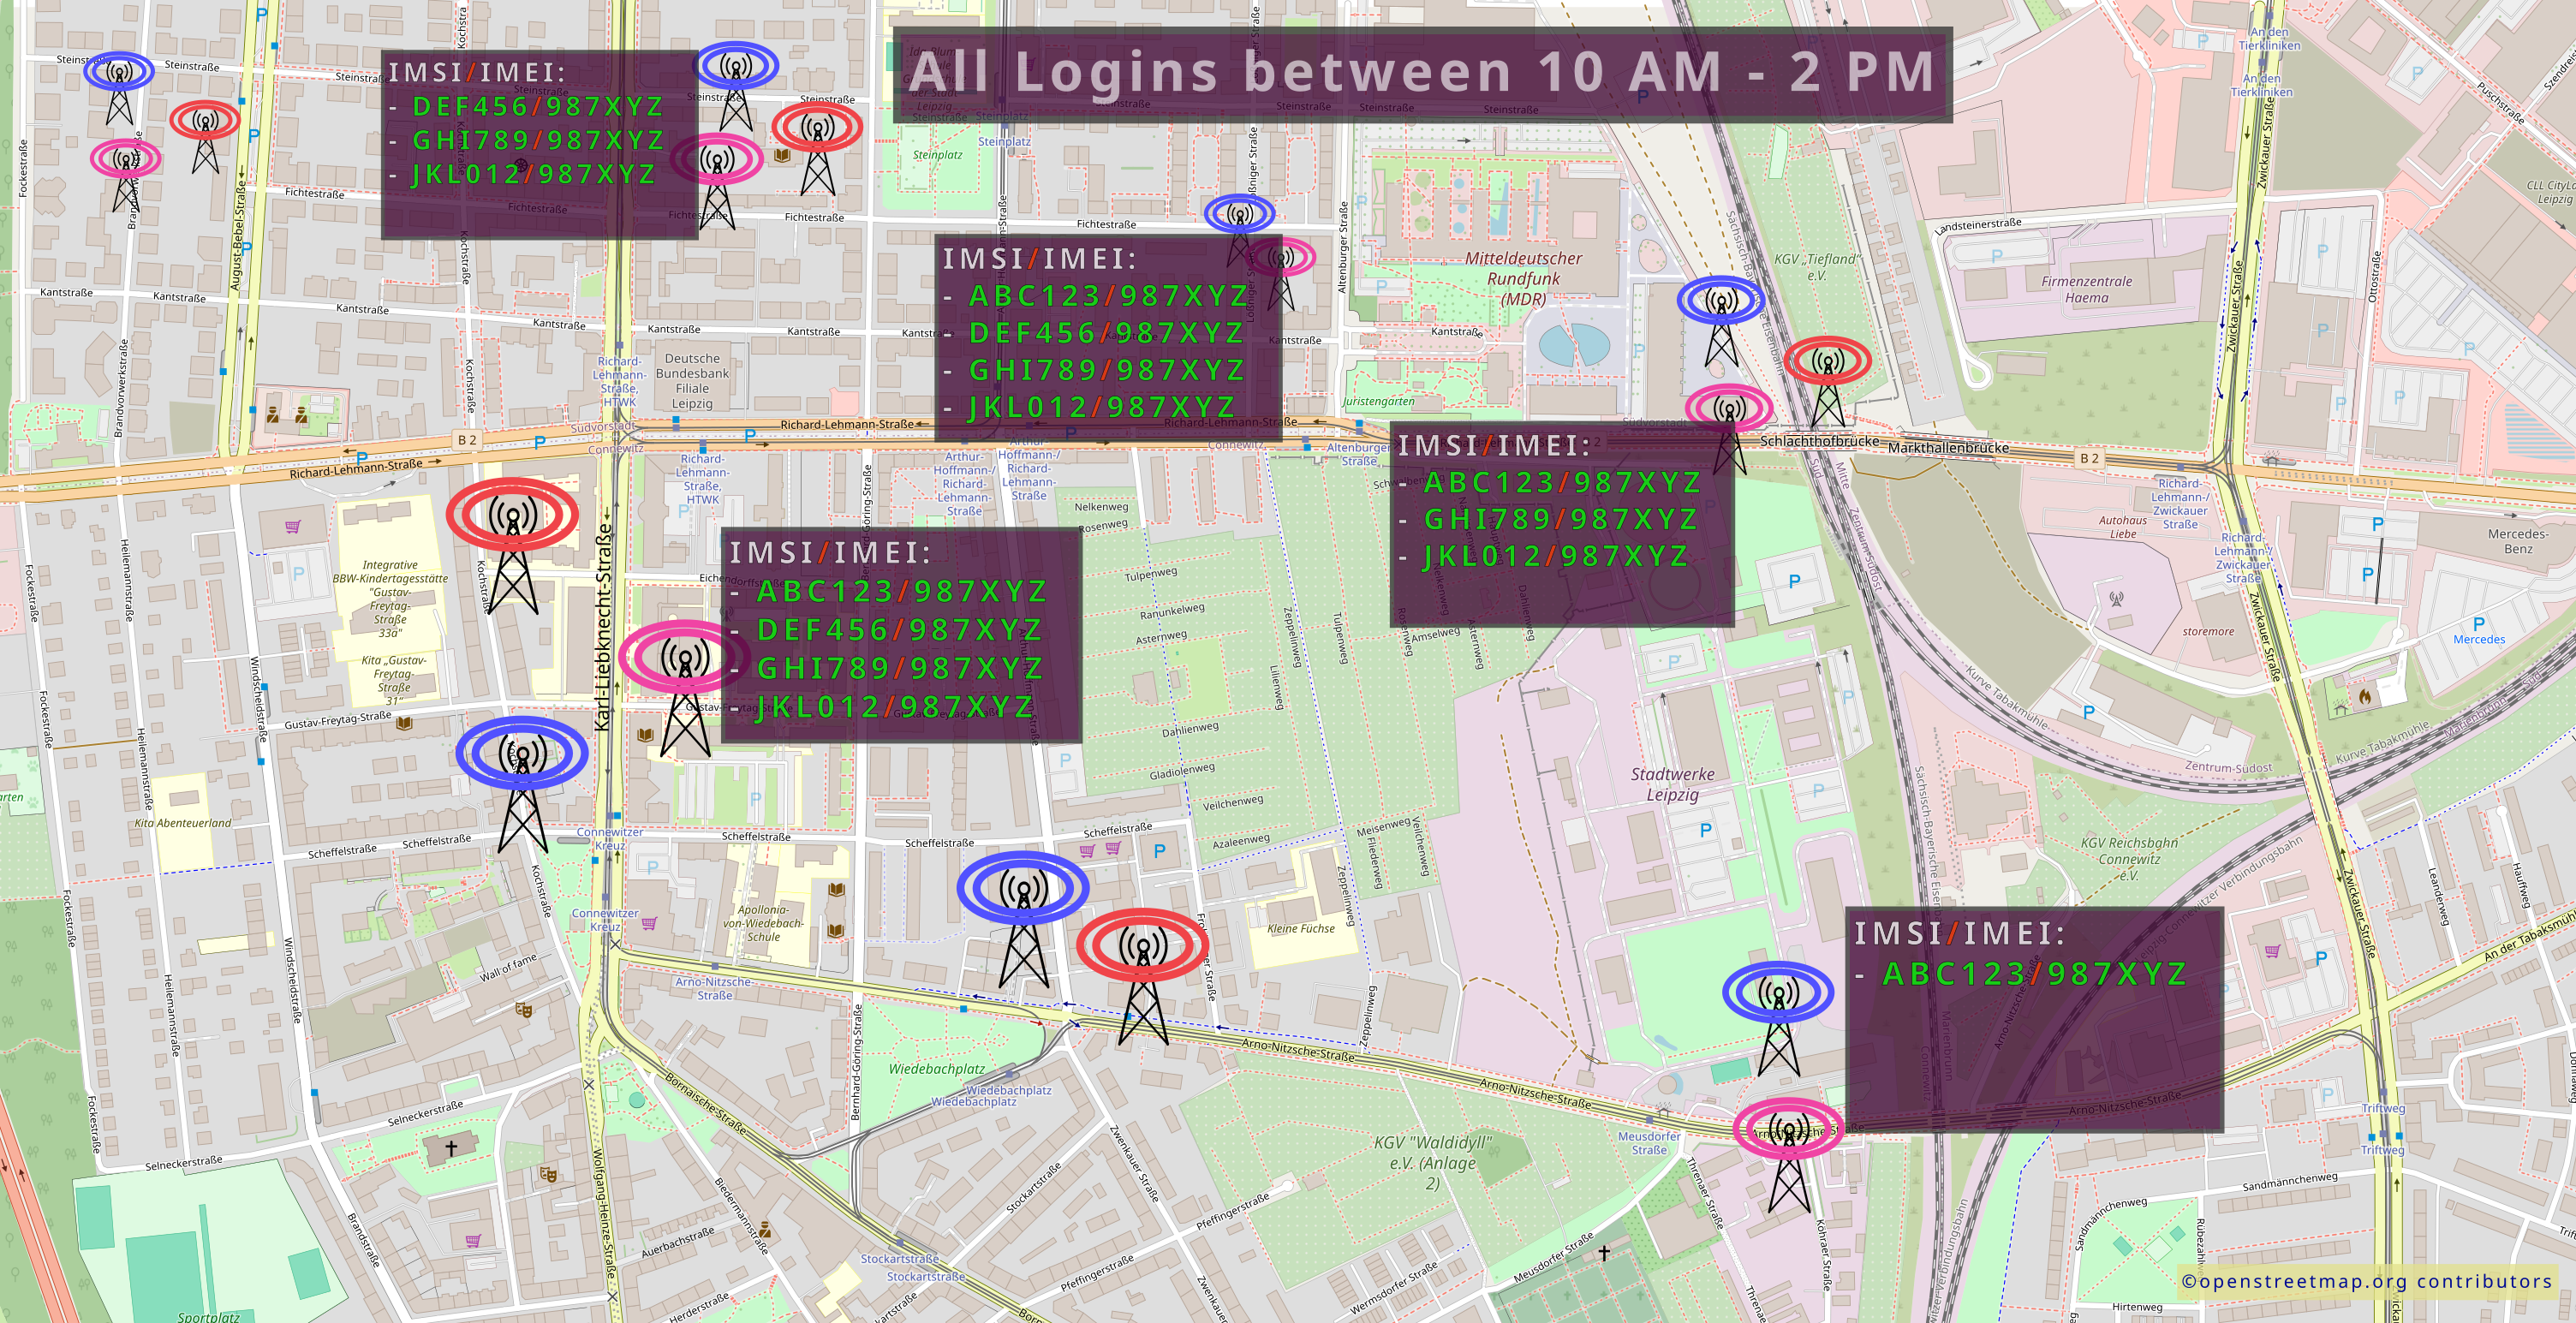
In addition, radio cell inquiries can be used to create movement profiles over a larger area by looking at the entry and exit times of individual devices at the respective mobile phone cells:
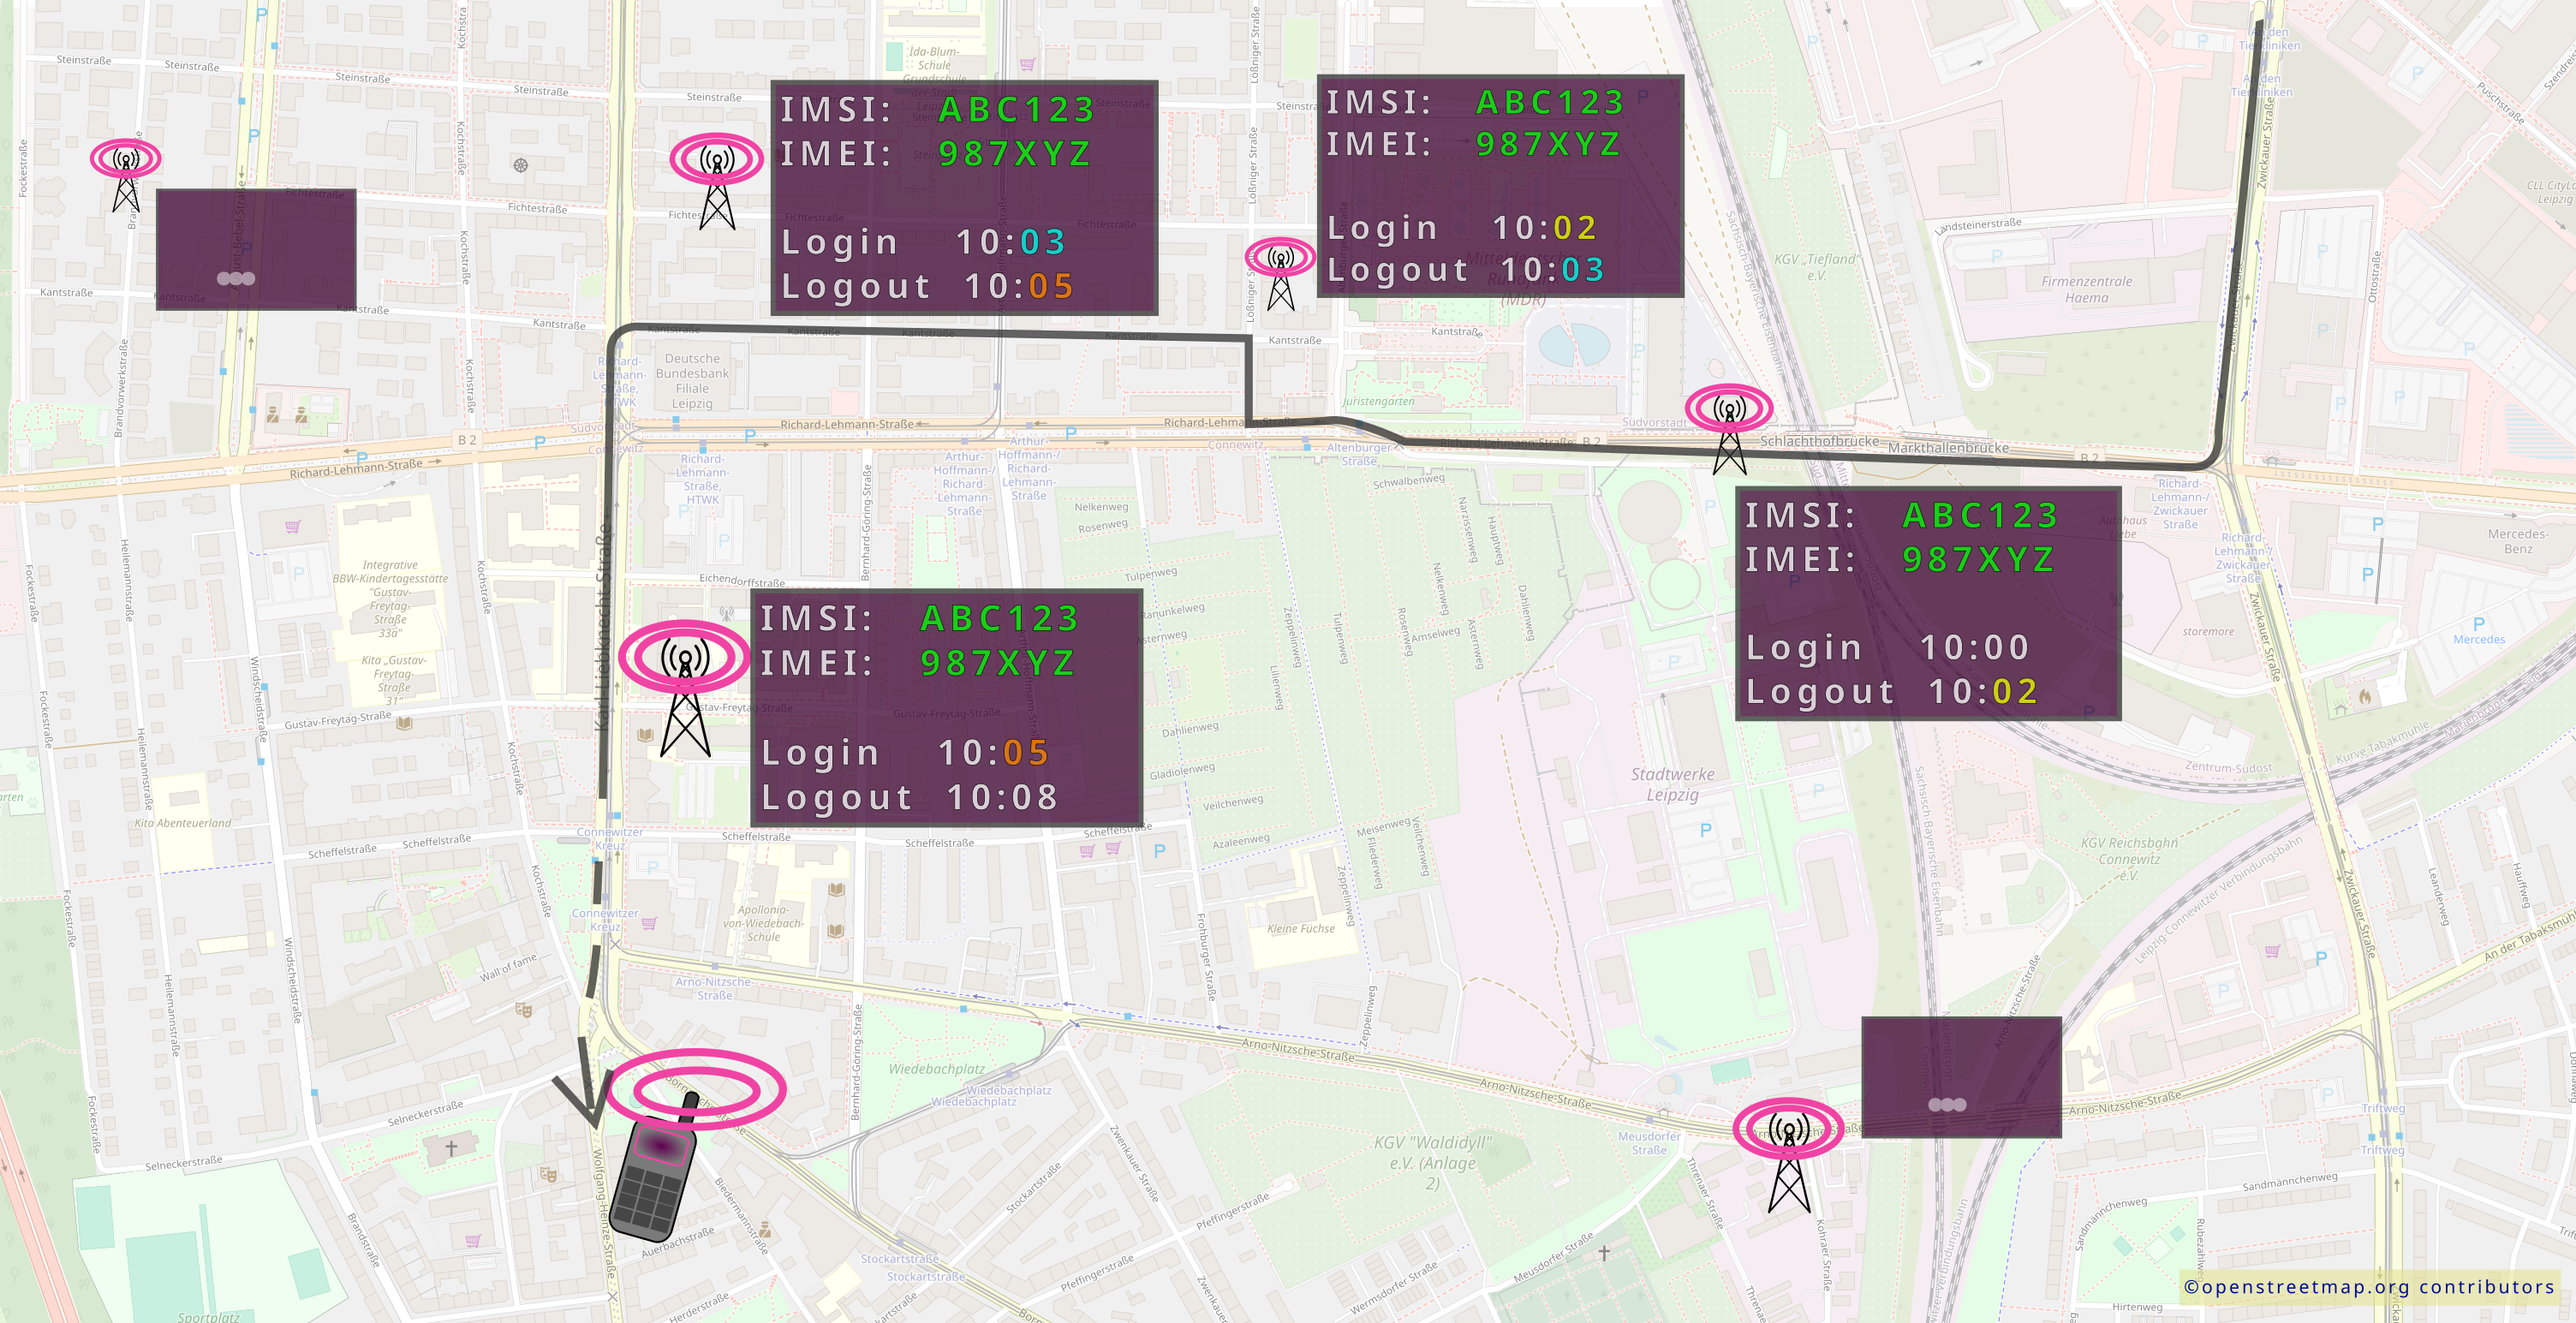
Statistics on radio cell inquiries
For almost all countries in the world we may very well assume that every single phone number ends up in a radio cell inquiry, more or less regularly. Although clear statistics are quite rare the case of the 18th and 19th of February 2011 in Dresden, Germany is a well documented example: Surrounding several public protests on those days, the authorities collected: "96.072 Verkehrsdatensätze, 257.858 Rufnummern und 40.732 Bestandsdaten" .
Stille SMS
[!toc] Table of Contents
SMS is the protocol by which standard text messages are delivered to your cell phone; a “silent” SMS message would deliver a “message” to the phone without you being aware of it 1. In other words, you wouldn’t see a text message or notice anything at all on your phone.
However, this creates traceable data traffic for mobile operators, as the SMS (and later also its confirmation of receipt) is forwarded to its destination via all the necessary mobile phone cells. The path taken by the SMS can then be evaluated by the authorities, allowing locations to be determined with an accuracy of up to a few meters.
[!question] How to protect against it? {static}
Don’t let your phone receive SMS, by either:
- taking out you SIM card
- turning on airplane mode
- shutting your phone off
There have been some apps floating around over time, that promised to detect silent SMS. The problem with those is, that:
- The mobile modems, e.g. the chips that actually receive the SMS, are technical black boxes to the public - we can’t tell what they are really doing.
- For most apps, your phone has to be rooted, which we strongly advice against. While it enables more user freedom, rooting breaks the fundamental security mechanisms of your mobile operating system.
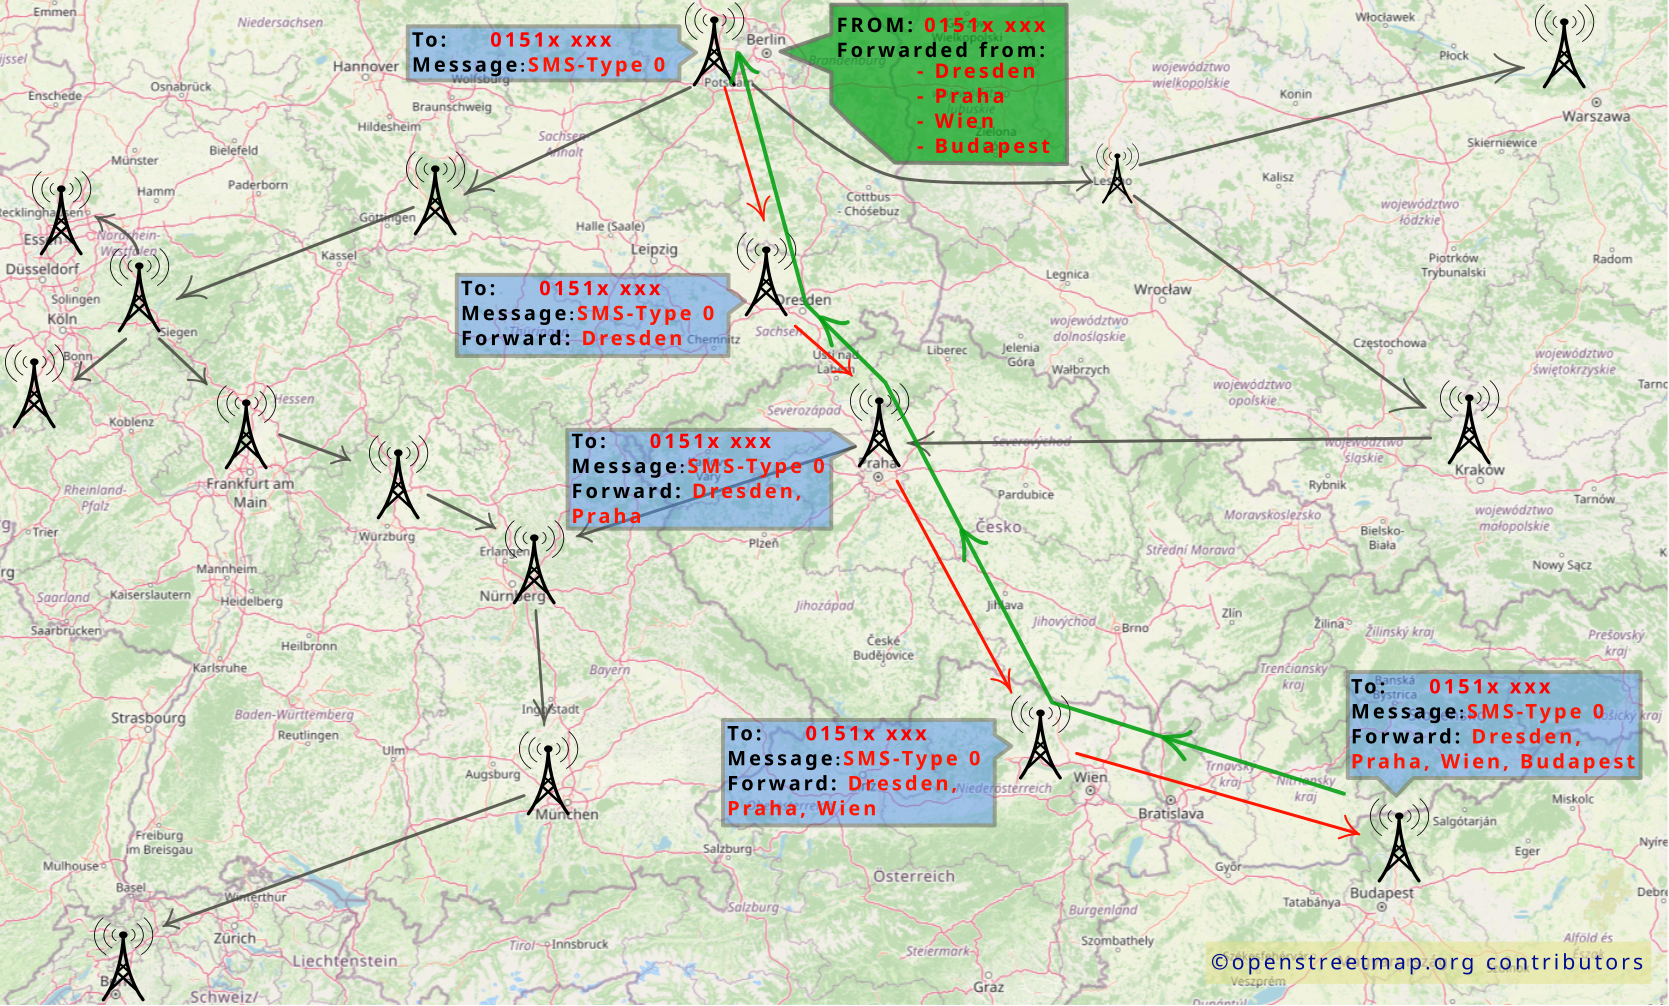
Silent SMS - Application
How often law enforcement uses Silent SMS may very a lot, mostly depending on the country. As with many other threats we describe here, we don’t have a lot of concrete numbers about the usage of those techniques. What is sure is that it’s a very cheap technique, which can be easily used by most authorities without further ado.
In Germany for example, the federal authorities (which don’t include the regional ones) send between 200.000 - 400.000 silent SMS per year.
Telecommunications surveillance
[!toc] Table of Contents
Monitoring of traffic data
This is usually what is meant when people talk about telecommunications surveillance in general. Here, the authorities force service providers to explicitly monitor your connections and to forward all recorded traffic data to the authorities. This requires a court order.
This is possible because normal telephone connections, i.e., landlines, voice calls, text messages, and (last but not least) voicemail messages, are only transport encrypted.
Transportverschlüsselung
With transport encryption, virtually every participant in the chain of transmission of a message is given the right to open and read the message.
For example, if you write a normal email, the email is first sent to the mail server with transport encryption. No one can read it in between. However, the mail server can open and scan the email. They usually do this because how else would your email providers know what belongs in the spam folder? Your mail server then sends the email, again with transport encryption, to the mail server of the email recipient. This server can also unpack and scan the email. The mail server then sends the email again, encrypted, to the recipient.
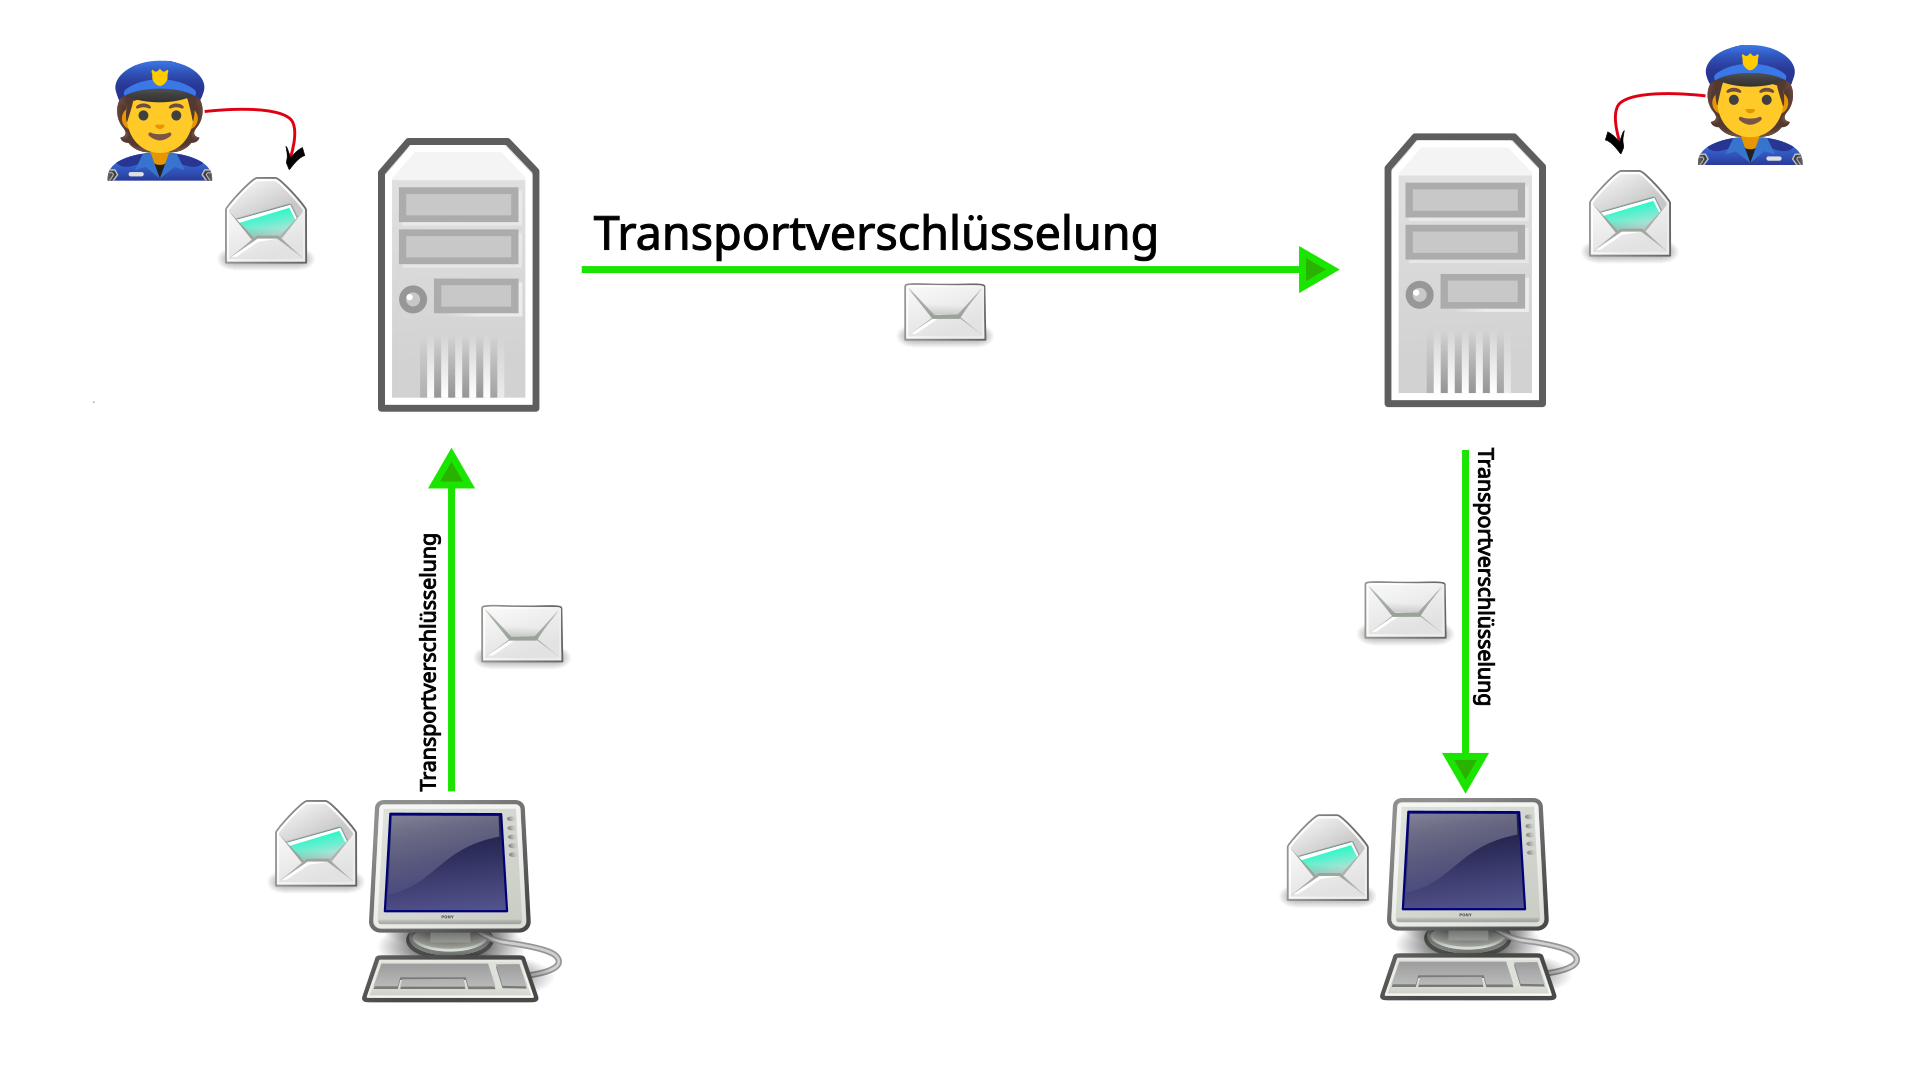
This is basically how it works with voice calls and SMS as well.
This shows that email providers/mobile phone providers, who always have the right to read your traffic, are the ideal point of attack for the authorities. There, they can knock on the door (with a court order) and demand all your data traffic. That is why it is so important to use end-to-end encryption!
Phishing
[!toc] Table of Contents
Phishing via email or text message is generally more commonly associated with scams, but government actors also often use phishing to infect targets with malware.
[!warning] {static}
In fact, phishing is one of the most common reasons for data leakage.
There are a few things to keep in mind here. One-click malware, where users have to proactively click on a link or download something in order for their device to be infected, is much cheaper than zero-click solutions, where devices can be infected without any further action on the part of the user.
In addition, phishing attacks are relatively difficult to trace. If the phishing is discovered, it usually remains unclear who is behind the attack, which puts the attacker in a fairly secure position.
Being caught secretly bugging someone’s home is much riskier and alerts those affected. Phishing, on the other hand, ends up in all of our inboxes all the time and hardly arouses any suspicion.
Here is an example of fake links created through the clever use of Unicode characters. Can you spot the difference between the links? Which link leads to which page?
[!example] Example 1 {static}
As an exception, just for learning purposes, you can now click on the two links to see what happens. Was your guess correct?
The first link does not lead to codeberg.org but to esc-it.org. The @ symbol is used as a username. This should not work if there is a / before the @, but the first link contains Unicode characters that are not “normal” slashes.
Some browsers even display a warning for the incorrect link, as shown here in Firefox:
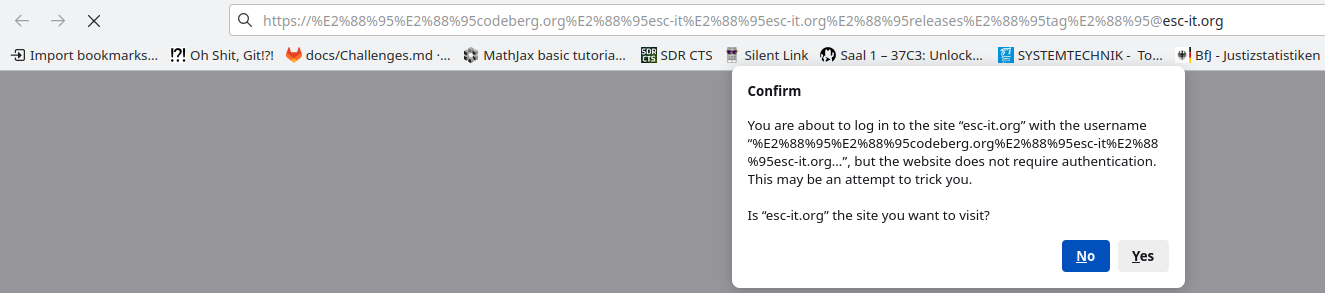
Chromium, for example, does not display such a warning.
What is noticeable about the links is that there is a domain at the end (…@<esc-it.org>). However, this is not a clear sign of a fake and is becoming increasingly difficult to detect with ever-changing top-level domains. Here is an example with a “.zip” extension, so it could be either a .zip file or a .zip domain:
Warning: The first link leads to a domain (1312.zip) that does not belong to us. This means that we do not know what happens there. Therefore, please do not visit this link unless you know exactly what you are doing.
[!example] Example 2 {static}
- https:∕∕codeberg.org∕esc-it∕esc-it.org∕releases∕tag∕@v1312.zip
- https://codeberg.org/esc-it/esc-it.org/releases/tag/v1312.zip
Here, too, the first link does not lead to a zip file on codeberg.org, but the second link does. No warning appears here either, because the domain does not yet exist.
[!info] Conclusion {static}
- Do not click on suspicious links
- Question the origin of the link. Could it be that this “address” is sending me exactly this link?
- Better safe than sorry - search for the page using verifiable methods. Save original links in your password managers, in bookmarks in your browser, or use search engines.
- If in doubt, type the links manually.
- However, this will not help if the link itself is fake. [systeml1.org] for example will again lead you to the wrong website. Refer back to the point above to determine the correct URL.
Public “chargers”
[!toc] Table of Contents
Public “chargers” can be found, for example, in public transportation, cafés, libraries, airports, shopping malls, etc.
Of course, a distinction must be made here between simple power outlets and USB charging ports.
The worst thing that can happen with normal power outlets is that your own charger breaks. Apart from that, your own charger is only good for charging and can’t really do anything else.
It’s a different story with USB charging sockets. For years, there have been increasing cases of manipulated charging sockets that contain not only a power source but also entire microprocessors that attempt to access the connected device. This could allow malware to be installed, memory to be accessed, and so on.
Fortunately, all (mobile) operating systems are now equipped with protective measures and ask users whether the connected “device” should be given access to the mobile phone. If you are charging you phone somewhere and a warning pops up on your device, this should make you suspicious.
[!warning] Attention {static}
A simple USB port with the classic 5 volts power supply is not recognized by any mobile phone as a “device” that should be given any rights!
This can also be prevented by only using USB cables without “data lines” for charging. These are cables that cannot be used to transfer data. You can usually test this yourself on your own computer. If you cannot access your mobile phone with the USB cable, then this USB cable most likely only has two wires: positive and negative. No data can be transferred via these wires.
So, be careful with USB charging sockets, as they may have been tampered with! Unlike tampered power outlets, where your own charger is still plugged in, a tampered power supply can seriously damage your device.
It is therefore advisable to avoid these sockets. If you have to use one, it is best to:
- only use two-wire USB cables
- use sockets where you have seen someone charge a mobile phone before without it being thrown off afterwards.
Push notifications
[!toc] Table of Contents
Deleted messages can be recovered through push notification cache
Push notifications are those nice little messages on your lock screen, that show you previews of the messages you received.
[!warning] Warning {static}
In early 2026 it became public that the FBI could recover signal messages on an activists iPhone through iOS’s own push notifications, although the > activist had self-destructing messages enabled and deleted their entire Signal app before the confiscation.
The problem is that the operating system “caches” the content of the push notification on it’s own storage, meaning it stores your messages outside of the app itself. Thus, deleting messages inside of the messenger itself won’t delete the copies in the operating systems cache.
[!technical] What is caching?
Caching is a technique used in computing to store copies of data temporarily, allowing for faster access to that data in the future. It helps improve performance by reducing the time it takes to retrieve frequently accessed information.
This is also true for self-deleting messages e.g. on Signal, which we recommend as a security feature.
[!tip] Tip {static}
The only way to prevent the operating system from caching your messages, is to stop the app from displaying sensitive content in those push notifications.
Preventing caching can be done per app, as far as the single app provides such settings. See our instructions for disabling sensitive content in signal notifications in Signal.
Information leak through notifications on lock screen
It is also recommended to completely disallow sensitive content showing up on your lock screen for all apps on the operating systems level in you phones settings.
[!tip] See our recommendation on that for GrapheneOS.
Shoulder Surfing
[!toc] Table of Contents
Shoulder surfing is when someone secretly looks over your shoulder to see what you are doing or typing on your cell phone, laptop, notepad etc.
[!warning] Warning {static} Be especially careful when entering passwords!
After all, even the best password is useless if it falls into the wrong hands. First and foremost, it is important to be aware of the increasing use of video surveillance. Do not enter passwords in front of cameras!
If you have ever tried shoulder surfing yourself, you will have noticed that there are places and situations that are particularly conducive to it.
In crowded lecture halls, for example, you can practically see the screens and keyboards of at least three people in front of you.
On public transportation, seats that are not directly behind the target person but diagonally behind them are particularly suitable. If the bus is extremely crowded, it is not even noticeable when someone is leaning over your cell phone while you are typing.
In such situations, it is important to not just mindlessly type your passwords, but to first evaluate the following:
- Is the potential danger of should surfing real, or is it exaggerated?
- Is it worth the risk to type in my password anyway, or can I wait/find a better place?
Backups
[!toc] Table of Contents
Es sind schon viele Zeilen darüber geschrieben worden, warum Backups so enorm wichtig sind und über die Kuriosität, dass das allseits bekannt ist und sie scheinbar trotzdem niemand macht, sind schon bessere und schlechtere Witze gemacht worden.
[!success] Fact is {static} We need backups!
Backups vs. Datenhygiene
Das größte Problem liegt oft darin, dass wir uns gar nicht so bewusst darüber sind, was wir über die Jahre so alles an Daten ansammeln und wie wichtig diese noch für uns sind. Im Artikel zur Datenhygiene beschwören wir das Credo, so wenig Daten wie möglich anzusammeln. Doch das gilt natürlich vor allem für Daten, die nur von temporärem Nutzen sind und die sonst in irgendwelchen Ecken vergessen werden würden, bis sie bei einer Hausdurchsuchung wiedergefunden werden.
So wichtig es ist, mit kompromittierenden Daten so sparsam wie möglich umzugehen, sind wir doch alle Menschen, die in irgendeiner Weise vom Staat und seinen Institutionen abhängig sind:
Amtliche Dokumente, Krankenversicherung, Bankunterlagen, Arbeitsverträge, Zeugnisse und so weiter, sind alles Dinge, die wir im Zweifel immer mal wieder brauchen, um nicht in völliger Armut zu versinken.
Ideell aber noch viel wichtiger sind vielleicht Fotos von unseren Freund*innen, Briefe von ihnen, Tagebücher, Geschenke, Erinnerungsstücke. All das sind Dinge, die unendlich schmerzen könnten, wären sie auf einmal nicht mehr da.
Nicht alles von dem oben Aufgezählten kann einfach digitalisiert werden, doch das meiste davon schon.
Nun laden wir alle dazu ein, sich vorzustellen, dass sämtliche Endgeräte, auf denen all eure Passwörter, Zugänge und Ähnliches gespeichert waren, jetzt kaputt oder weg sind. Könntet ihr das verkraften?
Datenhygiene & Backup Hand in Hand
Im oberen Abschnitt haben wir die Datenhygiene dem Backup gegenübergestellt. Hier möchten wir dafür plädieren, beide Konzepte zusammen zu denken, damit das eine vom andern profitiert.
Besonders langjährig genutzte Geräte und Accounts wie iCloud, Google Drive, WhatsApp, Dropbox usw. quellen oft über vor uralten Datenleichen, von deren Existenz niemand mehr weiß.
Wie viele Daten habt ihr so auf euren Geräten, die ihr mal nicht gelöscht habt, weil ihr dachtet: “Ganz vielleicht brauche ich das doch nochmal”?
Und so haben sich über die Jahre schnell so viele Daten angesammelt, die viel zu umfangreich sind, als dass ihr sie mal schnell sichten und aufräumen könntet.
Hättet ihr jedoch ein verschlüsseltes Backup all eurer Dateien, könntet ihr eure täglich genutzten Geräte viel entspannter aufräumen. Dann würdet ihr nur das Nötigste mit euch herumtragen.
[!success] Success {static}
Es geht also auch darum, Mut zu Datenhygiene zu bekommen, indem gute Backups gemacht werden!
Wie erstellt man Backups?
Wir arbeiten gerade noch an einem Leitfaden für Backups für die Kategorie “Anleitungen”, den wir aber auch hier unten verlinken werden.
Kommunikationsverschlüsselung
[!toc] Table of Contents
Die Verschlüsselung jeglicher Kommunikation spielt in unseren Anwendungsfällen eine essentielle Rolle. In diesem Artikel wollen wir erklären, was mit Kommunikationsverschlüsselung gemeint ist, welche Arten es davon gibt und welche Vor- bzw. Nachteile sie haben.
Wir unterscheiden hier zwischen Transportverschlüsselung und Ende-zu-Ende-Verschlüsselung (E2EE: End-To-End-Encryption).
[!info] TL;DR {static}
Auch wenn Transportverschlüsselung nice-to-have ist, reicht es für uns aber in keiner Weise aus und wir wollen deshalb, wenn möglich, immer E2EE haben.
Transportverschlüsselung
Transportverschlüsselung wird allgemein mit SSL bzw. TLS realisiert. Das kennt ihr zum Beispiel aus eurem Browser, wenn neben der URL ein Vorhängeschloss erscheint und vor der URI https steht. Kommt das nicht zum Einsatz, steht dor nur http (und meistens erscheint eine Warnung, dass die Verbindung nicht gesichert ist).
Um die Transportverschlüsselung zu erklären, nutzen wir unten stehende Grafik.
Beispiel: Email mit Transportverschlüsselung
Anna will Arthur eine Nachricht übermitteln, bspw. per Email. Das Beispiel funktioniert auch mit anderen Diensten ohne E2EE, wie: Telegram, Discord, oder Chats in Spielen. Dabei gäbe es aber nur einen anstatt zwei Servern.
Hier also das Beispiel mit Email:
Anna hat eine Email-Adresse bei dem gelben Server, hier systemli.org. Ihre Mail lautet also anna@systemli.org
Arthur hat eine Email-Adresse beim roten Server, hier riseup.net. Seine Mail lautet also arthur@riseup.net
Weil wir ja von Transportverschlüsselung reden, benutzen beide keine E2EE. Das heißt, weder hat Anna einen PGP-Key von Arthur, noch anders herum!
Die Schlüssel und Schlösser symbolisieren sogenannte Zertifikate (Vorhängeschlösser). Jeder Server hat sein eigenes Zertifikat, mit dem die Kommunikation mit ihm verschlüsselt (also eingeschlossen) werden kann. Nur der Server im Besitz des Zertifikats, hat auch den zugehörigen Schlüssel.
Wenn Anna jetzt eine Mail schreiben will, holt sie sich das Zertifikat von Systemli (gelbes Schloss) und verschlüsselt damit ihre Mail. Völlig unabhängig davon, an wen die Mail am Ende gehen wird! Arthurs Empfangsadresse (mailto:arthur@riseup.net) steht dann draußen auf dem Umschlag, wie bei normaler Post auch. Diese Mail (gelber, verschlossener Umschlag mit Schloss) geht dann zum Systemli-Mailserver (gelber Kasten).
Der Systemli-Mailserver schließt nun, die mit seinem eigenen Zertifikat verschlüsselte Mail auf und scant sie z.B. nach Spam. Vor allem schaut er sich die Empfangsadresse auf dem Umschlag an: arthur@riseup.net. An der Stelle hinter dem @erkennt der Server, an welchen Mailserver er diese Mail nun weiterleiten muss: riseup.net (roter Kasten). Also geht er kurz rüber zu Riseup, schnappt sich eine Kopie des ihres Zertifikats und verschlüsselt damit Annas Email wieder und schickt sie so (roter, verschlossener Umschlag mit Schloss) an den Riseup-Mailserver.
Ab hier wiederholt sich dieser Vorgang so lange, bis die Mail Arthur erreicht. Der Riseup-Server packt die Mail aus und wieder ein und schickt sie schließlich an Arthur.
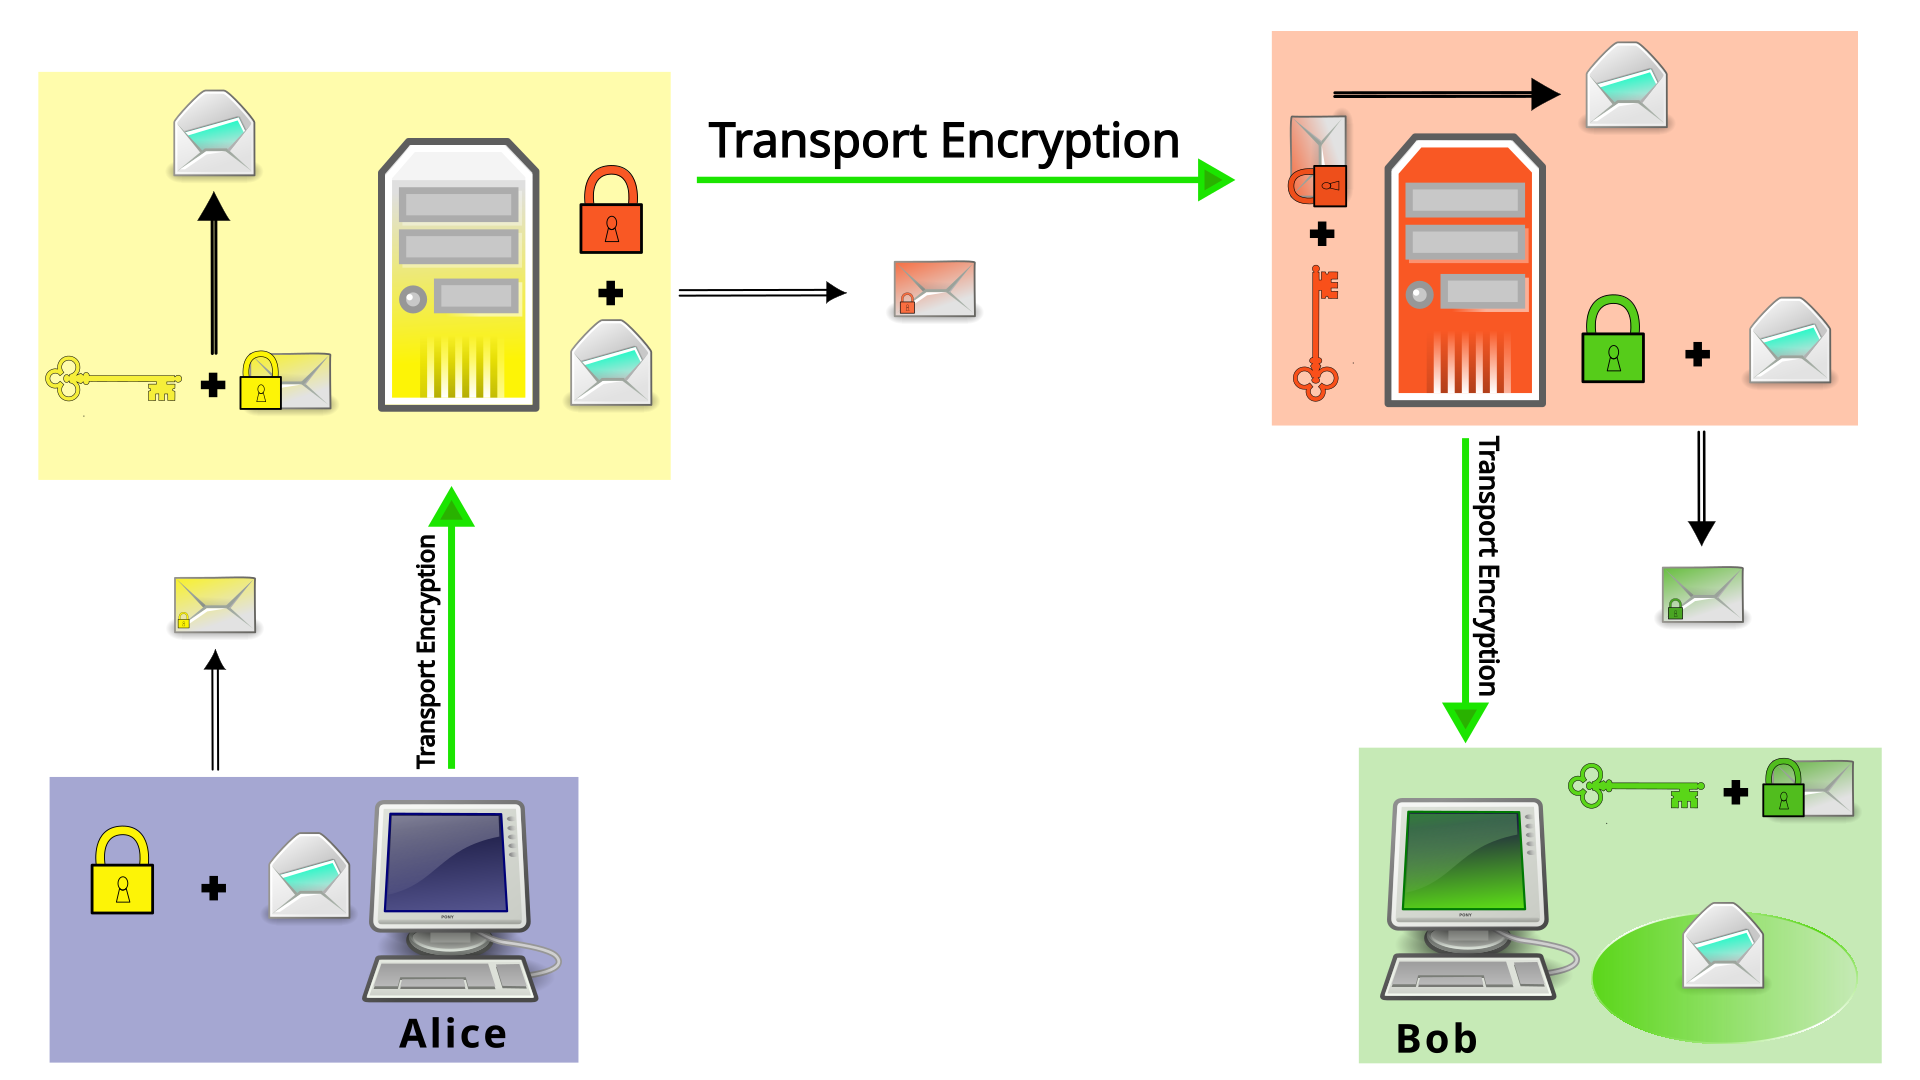
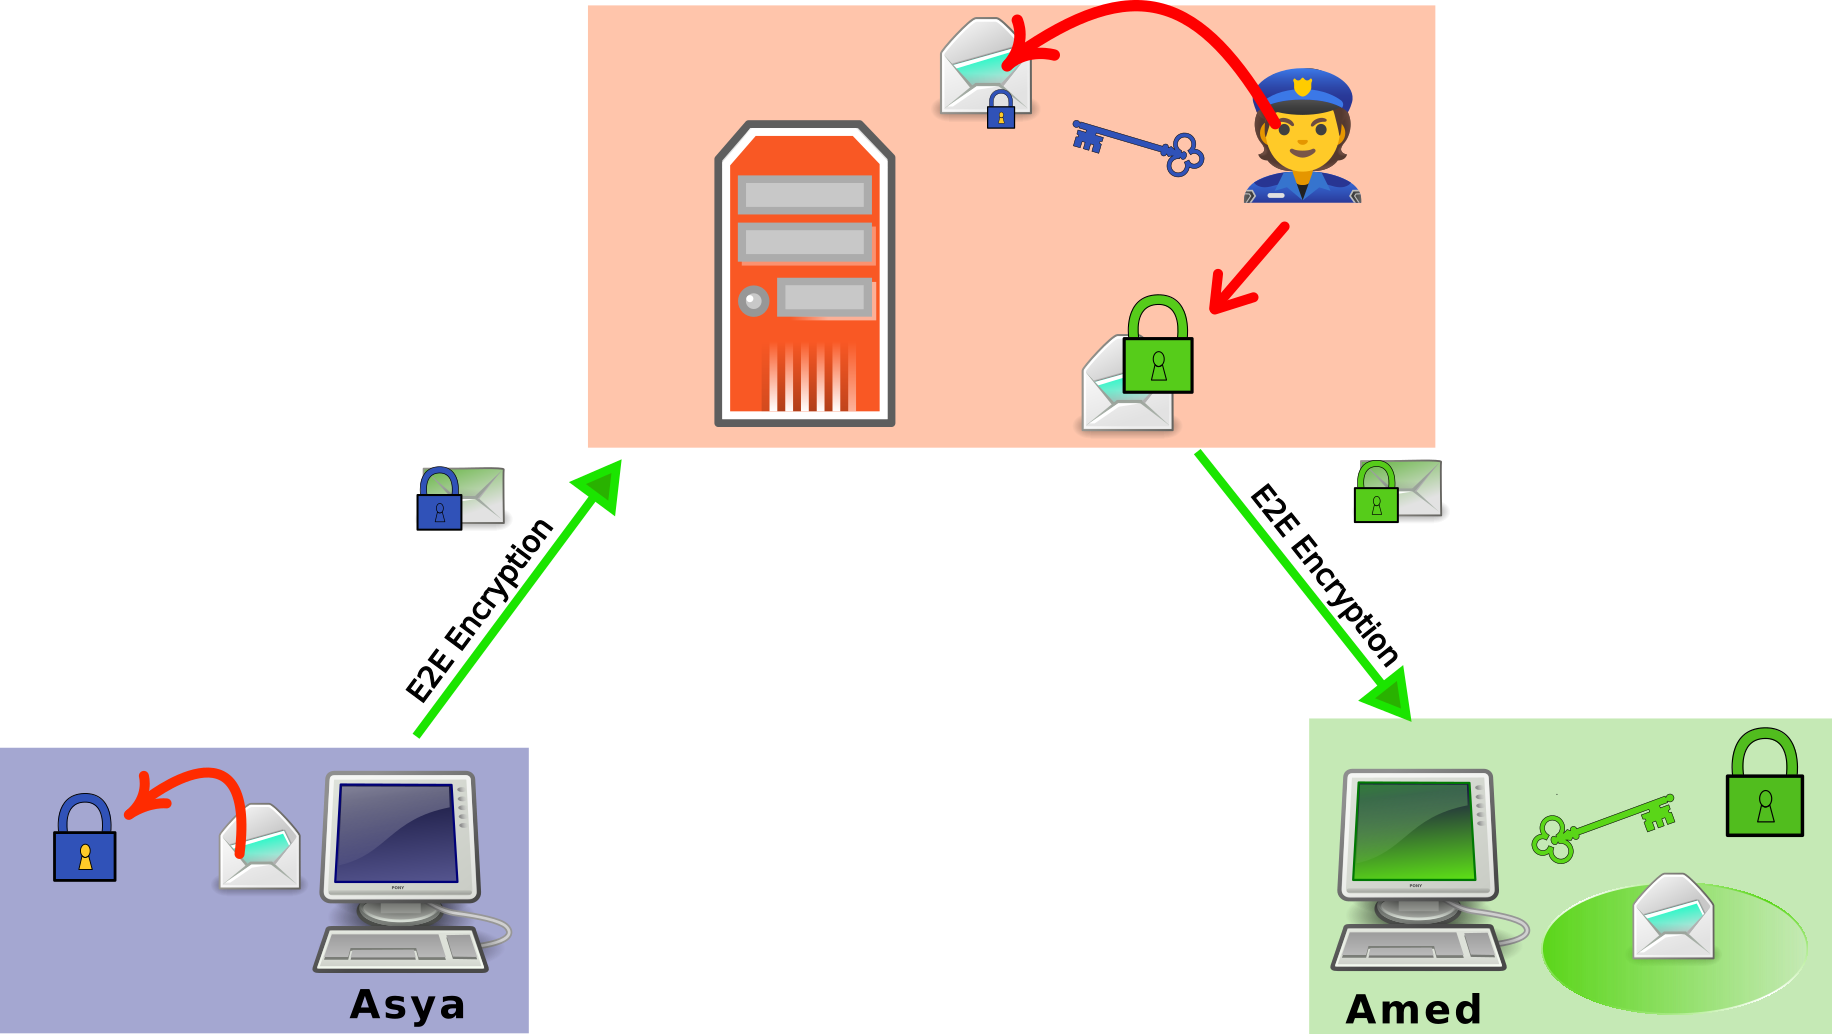
Problem
Das Problem hierbei ist offensichtlich. Jede*r Teilnehmende in der Kommunikationskette kann die Mail einfach öffnen und lesen. Zusätzlich bleiben bei vielen Anwendungen (wie oben aufgezählt) die Nachrichten auf den (Mail)-Severn als Kopie liegen. Sie dir hier zu die Bedrohung Verkehrsdatenüberwachung an
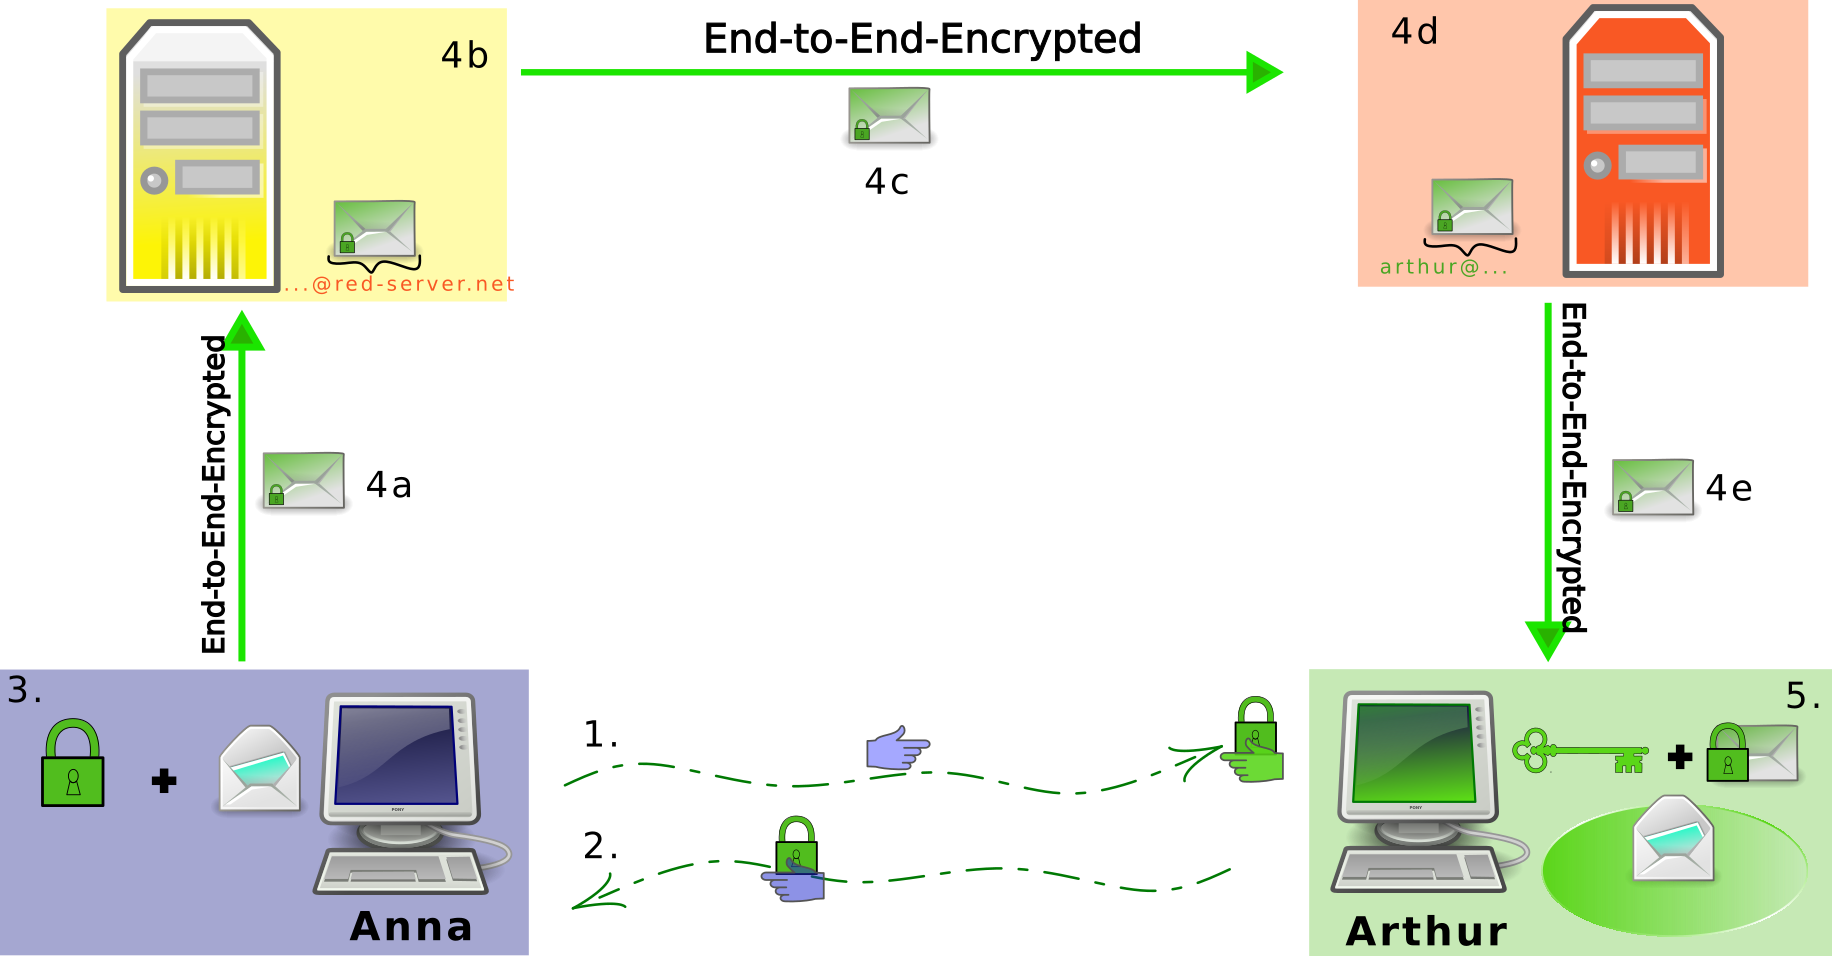
Ende-zu-Ende Verschlüsselung
Wenn ihr die Bedrohung durch Transportverschlüsselung verstanden habt, ergibt sich die Ende-zu-Ende-Verschlüsselung schon fast von selbst.
- Anna besorgt sich das Schloss (public-key) von Arthur. Dieser Punkt ist sehr wichtig, beachtet dazu den Absatz [TOFU]!
- Genau so wie in 1.
- Anna verschlüsselt ihre Nachricht mit Arthurs public key (öffentlicher Schlüssel kann als Vorhängeschloss gedacht werden).
- Die Nachricht bleibt in allen Teilschritten von 4 (a-e) verschlüsselt. Lediglich die Metadaten (bspw. Absende-/Empfangsadresse) darauf sind (an allen möglichen Stellen, also auch beim Transport!) sichtbar und werden von den Servern gelesen, um die Mail weiter zu leiten.
- Arthur empfängt seine Nachricht. Weil die Nachricht mit seinem Vorhängeschloss verschlüsselt wurde und er gut auf seinen Schlüssel (private-key) aufgepasst hat, kann nur er die Nachricht mit seinem Schlüssel wieder entschlüsseln.
TOFU ist schlecht
TOFU: Trust On First Use
Schlüssel muss “out of band” verifiziert werden. Eine unverschlüsselte (also transportverschlüsselte) Mail ermöglicht das Austauschen der öffentlichen Keys.
Zu den Gefahren von Transportverschlüsselung siehe Verkehrsdatenüberwachung.
Datenhygiene
[!toc] Table of contents
- How Files are “deleted” - Anna & Arthur’s shared apartment
- Special characteristics
- Deleting encrypted data
Egal ob bei Verkehrsdatenüberwachung, digitaler Forensik oder Hausdurchsuchungen: Es geht immer um Daten, aus denen euch potentiell ein Strick gedreht werden soll. Deshalb ist es wichtig sich regelmäßig zu fragen, welche Daten wirklich notwendig sind:
- Brauchen wir für dieses Treffen ein Protokoll?
- Wenn alle auf dem Treffen waren, braucht es vielleicht auch keine Notizen davon.
- Muss ich mein Handy mitbringen?
- Muss ich Freund*innen schreiben, welche coole Aktion ich gerade gemacht habe?
- Selbstdarstellung ist schon vielen zum Verhängnis geworden!
Wenn es keine Daten gibt, kommt auch niemand dran. Allerdings kann die Einschätzung einiger weniger, dass die Recherche-Unterlagen jetzt veraltet sind und vernichtet werden können, ein paar Jahre später schwer bereut werden. Der berühmte Aktenordner unter dem Bett wäre aber vielleicht zu riskant gewesen. Wie also Daten sicher aufbewahren? Auf Papier auf jeden Fall nur in den wenigsten Fällen!
[!warning] Warning {static}
If you have created “incriminating material” - Get rid of it ASAP!
Den meisten dürfte jedoch bekannt sein, dass das einfache Löschen von Dateien keineswegs heißt, dass Daten unwiderruflich verschwunden sind. Noch nicht einmal wenn Windows euch warnt, dass mit dem leeren des Papierkorbs aber nun wirklich alles für immer in einem schwarzen Loch verschwindet.
Daten sicher löschen
[!tip] TL;DR {static}
Der sicherste Weg Daten zu löschen, ist den Datenträger selber zu verschlüsseln.
In diesem Falle brächte ein Forenikprogramm immer noch das Passwort nd eine Portion Glück, bevor es überhaupt etwas lesen könnte - selbst wenn die Dateien nur “normal” gelöscht wurden.
To illustrate what happens when files are deleted “normally,” here is a metaphor:
[!technical] SSDs vs HDDs
The following scenario only applies to a limited extent to
common types of storage, such as classic HDD hard drives! There are additional things to consider for flash storage such as SD cards, USB sticks, or SSDs. More on this under “Special features” below.
How Files are “deleted” - Anna & Arthur’s shared apartment
Anna & Arthur live in a shared apartment. Their names and addresses are listed in the address book (unlike a phone book, everything is sorted by address here). The apartment is the storage medium (hard drive, USB stick, SD card, etc.) and Anna & Arthur are the data on that storage medium. The good old paper phone book (these huge books, where every ones landline number and home address could be looked up at) is the so called address management system of the storage medium.
If you want to find Arthur, you enter Arthur’s address. The computer then goes to the address, fetches Arthur from his apartment, and displays him on the screen. This is normal operation when data is stored in memory and is being used.
Unfortunately, during the last action, Arthur’s mask slipped down over his nose, he was identified, and now he has to leave quickly: The data must be deleted.
If you now click on “delete,” this file will be moved to the recycle bin. Nothing is really deleted when moved to the recycle bin; just think of it as a “files to be deleted” folder.
So you empty the trash can too. What has happened now? Has Arthur disappeared?
No, you have only deleted Arthur’s name from the address book. Arthur himself is still sitting on his couch waiting for something to happen: The data is still physically on the storage medium. It is just no longer indexed in the memory’s address directory.
If the cops look in the address book, they won’t find Arthur’s name anymore. But if they simply search street by street, door by door, they will eventually come across Anna & Arthur’s shared apartment, where Arthur is still sitting.
The solution? Overwriting the data: Anna & Arthur need random new tenants.
[!tip] Overwrite data! {static}
In summary: Data is only truly deleted when the addresses in the memory where it was stored have been overwritten by other random data.
However, this process is not standard in any common operating system (whether PC or mobile phone), as these only delete the address entries for the files. This therefore requires additional actions.
Besonderheiten
- Adressierung: Bei Flashspeichern wie SD-Karten, USB Sticks oder SSDs weiß das Betriebssystem nicht genau, auf welchen exakten Bits die Daten eigentlich liegen. Eine eindeutige Verbindung zwischen physischen Bits und von außen adressierbaren Sektoradressen existiert so nicht. Deshalb können diese Bits auch nicht einfach überschrieben werden, weil gar nicht klar ist, welche denn überschrieben werden sollen.
- Overprovisioning: Noch dazu blockieren diese Arten von Speicher bestimmte Adressblöcke vor externem Schreibzugriff, sogenannte “Reserveblöcke”. Dieses Overprovisioning hat drei Hauptfunktionen: Fehlerkorrektur, Optimierung von Schreibgeschwindigkeit und schont die Lebensdauer des Speichermediums.
[!technical] Technical Details - Overprovisioning
- Fehlerkorrektur: Wenn einzelne Speicherzellen fehlerhaft werden (zum bsp. durch Verschleiß), kann der Controller auf diese Reserve zurückgreifen, um zu vermeiden, dass die Daten “kaputt” abgelegt werden.
- Schreibgeschwindigkeit: Da die Reserveblöcke bereits “leer” zur Verfügung stehen, müssen nicht immer erst Zellen gelöscht werden, um sie neu zu beschreiben. Der Controller kann so direkt auf leere Zellen zurückgreifen und sie sofort beschreiben.
- Lebensdauer: Overprovisioning vermeidet durch Rotieren der Daten auf den Speicherzellen, dass einzelne Zellen über eine sehr lange Zeit im immer gleichen Zustand bleiben. Das führt klassischerweise dazu, dass diese Zellen bezüglich ihres “an”- und “aus”-Zustandes asymmetrisch werden. Sie tendieren also eher in die eine, oder die andere Richtung zu kippen. Bei Schreibvorgängen kommt es dann zu Fehlern, weil einem Transistor, der bspw. über Jahre “an” war, nun mit einem extrem kurzen Impuls gesagt wird, dass er nun mal “aus” werden soll. Das passiert aber eventuell nicht, weil er sich schon so lange an “an” gewöhnt hat.
Deshalb reicht es hier nicht aus, mit gängigen Methoden Speicherzellen mit random Bits zu überschreiben. Damit bleiben die Reserveblöcke unangetastet, aus denen aber im Zweifel alte Daten rekonstruiert werden können. Die ATA Spezifikation bietet dafür zwei Befehle: SECURITY ERASE UNIT und ENHANCED SECURITY ERASE UNIT. Ersteres überschreibt nur mit Nullen, zweiteres mit random Bytes. Werden diese Befehle auf eine SSD angewandt, werden auch besagte Reserveblöcke überschrieben. Sowohl unter Linux als auch unter Windows finden sich dafür Kommandozeilen-Tools, die jedoch etwas hacky sein können. Die meisten SSD Hersteller wie Samsung, Kingston, Western Digital und Co. liefern extra dafür eigene Tools an, derer sich bedient werden kann.
Diese Tools machen im Prinzip nichts anderes als diese Befehle auf SSDs mit ihrer eigenen (proprietären) Firmware anzuwenden.
Verschlüsselte Daten löschen
Eine effizientere Methode ist die Verschlüsselung. Das folgende gilt für sowohl für rotierende Platten (HDDs) als auch für SSDs:
Wird der Datenträger verschlüsselt, wird ein Key generiert, der im Header (~Kopfzeile) des Speichers abgelegt wird. Dabei werdet ihr aufgefordert ein Passwort für die Verschlüsselung festzulegen. Mit diesem Passwort wiederum wird der im Header liegende Key verschlüsselt - nicht die Daten selbst.
Jede Datenlese- oder Schreiboperation der Daten wird symmetrisch mit dem Key ent-, oder verschlüsselt.
Die Bit-Zustände auf dem physischen Datenträger können auf Grund der mathematischen Eigenschaften moderner Verschlüsselungsalgorithmen nicht von random Bits unterschieden werden. Ein verschlüsselter Datenträger sieht also forensisch genau so aus wie ein zufällig beschriebener.
Um diese Daten nun wieder sicher zu löschen, muss daher nur der Key im Header des Datenträgers gelöscht und überschrieben werden. Das spart nicht nur enorm viel Zeit (dauert nur ein paar Minuten), das schont auch die Lebensdauer des Datenträgers. Ein vollständiges Überschreiben von einer 1TB HDD kann gut und gerne mal mehr als 5 Stunden dauern.
Detailliertere Infos findet ihr beispielsweise hier.
[!info] Summary {static}
- Daten auf unverschlüsseltem Datenträger: gelöschte Daten lassen Spuren zurück, die wiederhergestellt werden können. Deshalb müssen Daten beim Löschen mit zufälligen (random) Bits überschrieben werden (am besten mehrfach).
- Daten auf verschlüsseltem Datenträger: Diese sind höchstens durch den Key in ihrem Header entschlüsselbar. Dieser Key ist mit einem Passwort gesichert. Wird nur dieser Key gelöscht und überschrieben, können Daten nicht mehr hergestellt werden.
Passwort Sicherheit
[!toc] Table of Contents
Prinzipiell sind gute Passwörter natürlich unvermeidbar. Was ein gutes Passwort ist, behandeln wir weiter unten.
- Passwörter sichern verschlüsselte Daten zB auf Festplatten oder Passwortdatenbanken
- Passwörter schützen Online-Accounts gegen unbefugte Zugriffe (nicht staatlicher Akteure!)
- Passwörter hindern Behörden fast nie davor, in ungesicherte Social-Media Accounts wie Instagram, Twitter, Reddit, Tiktok und so weiter, hinein zu kommen. Dafür reicht ihnen ein richterlicher Beschluss, denn dort liegen eure Daten unverschlüsselt und deshalb brauchen sie dafür euer Passwort nicht.
[!success] General rules {static}
- Passwörter nicht wiederverwenden
- Starke Passwörter verwenden
- 2-Faktor-Authentifizierung nutzen
Deshalb ist es für uns als moderne Aktivist*innen eine regelrechte Pflicht einen Passwort Manager zu benutzen. Denn der hilft uns dabei, all diese Anforderungen ohne große Schwierigkeiten umzusetzen. Damit schützen wir nicht nur unsere eigenen Zugänge, sondern auch die dahinter liegenden Informationen, die mit unseren Genoss*innen verknüpft sind!
In diesem Artikel erklären wir:
- Was ein Passwortmanager so kann
- Was ein gutes Passwort ist
- Was 2 Faktor Athentifizierung bedeutet und warum wir es empfehlen
Passwortmanager
Ein Passwortmanager speichert alle Passwörter in einer, mit einem Hauptpasswort, verschlüsselten Datenbank (das ist auch nur eine Datei). Dadurch liegen eure Passwörter nicht einfach in Klartext auf eurem System, oder auf Papier in eurer Wohnung und ihr müsst sie euch nicht alle selber merken.
Da ihr euch Passwörter nicht mehr selbst merken müsst, ist es kein Problem und auch empfohlen, dass ihr für jeden Account ein eigenes, starkes Passwort generiert. Das ist mit dem Passwortmanager selbst sehr einfach zu machen.
Der Passwortmanager speichert auch die Zuordnung zu Webseiten & Apps, für die ihr das jeweilige Passwort generiert habt. Das erschwert so auch Phishing, weil das Passwort auf einer falschen URL nicht als Vorschlag angezeigt wird.
Wie oben schon erwähnt ist der Passwortmanager selbst durch ein starkes Hauptpasswort, und/oder andere Faktoren geschützt (s. unten 2-Faktor-Authentifizierung). Dies ist damit (neben dem der Festplattenverschlüsselung) das einzige Passwort, das ihr euch wirklich merken müsst und kann dementsprechend auch etwas komplexer sein. Es gilt nämlich: lieber ein starkes Passwort merken, als viele unsichere Passwörter.
[!tip] Which password manager? {static}
Schau in unsere Empfehlungen zu Passwortmanagern.
Starke Passwörter
Okay, aber zumindest ein starkes Passwort für den Passwortmanager braucht ihr ja trotzdem. Aber ab wann ist ein Passwort denn stark?
Eine Wichtige Grundvoraussetzung ist, dass das Passwort zufällig generiert ist. Alles was du dir ausdenkst, egal wie clever dein System sein mag, ist als unsicher zu betrachten.
Optimierte Algorithmen ermöglichen es Behörden gezielt nach möglichen Passwörtern für Aktivist*innen zu suchen, in dem vor allem Vokabeln, Zitate aus revolutionären Schriften und Liedern usw gezielt durchprobiert werden, während dort zB an faschistischem Vokabular und damit an Zeit und Energie gespart werden kann.
“Die Geschichte ist eine Geschichte von Klassenkämpfen” hat zwar 7 Wörter, ist aber aus den genannten Gründen ein denkbar schlechtes Passwort!
Hier erkennt ihr aber schon, dass es bei dem Begriff Passwörter auch um Passphrasen geht. Passphrasen sind zufällig generierte Wörterketten. Sie haben den Vorteil, dass Menschen sich dadurch viel Längere Zeichenketten im Kopf merken können.
[!tip] A good password is {static}
- Ein gutes Passwort sollte mindestens eine Entropie von 120 bits haben. Das ist ein bisschen mehr als die übliche Empfehlung von 80-100 bits, aber das sollte die Passwörter gegenüber zukünftigen Fortschritten der Hardware wappnen, mit der sie mal versucht werden zu knacken.
- Passphrasen sollten mindestens 5, besser 8 Wörter lang sein.
- Passwörter und Passphrasen sollten mittels Passwortmanagern oder Diceware (Wrfel und einer Liste) erstellt werden.
We explain below where the numbers 5 and 8 come from. There, we look at how long it would theoretically take to crack a randomly generated password or passphrase. However, these tables are always subject to many ifs and buts.
2-factor authentication
2FA ensures that simply entering a password is not sufficient for complete authorization, as it is assumed that passwords may be corrupted. Therefore, a second instance is requested for complete authorization.
The recommendations for password managers include an example scenario showing how a KeePassXC database can be secured with a second factor.
The second factor can be based on various characteristics:
2nd factor: Possession
You need a special device that either displays a number or must be plugged into the computer via USB. If the attacker does not have this “device,” authorization will not be granted. (Hardware tokens, 2FA apps, SMS)
TOTP software
TOTP stands for time-based one-time password and can be set up with all common password managers such as KeePassXC. The login process then consists of entering your username and password, after which you will be asked for the TOTP (e.g., a 6-digit PIN), which changes every ~30 seconds.
USB hardware tokens
These look like normal USB sticks. If a service/hard drive or similar configured with this token is to be unlocked, the stick must also be inserted into the device being used. These tokens are often protected with a PIN, so stealing them is not enough. The number of PIN attempts is limited.
Since all of this is implemented and protected at the hardware level, it is a very secure method of authentication. (The relevant standard for security tokens of this type is called FIDO2, the old standard is U2F.)
TOTP hardware tokens
Similar to TOTP software, but not in an app such as a password manager, but as a thumb-sized device. They have a small screen that displays the 4-6 digit TOTP, which changes every ~30 seconds.
When logging in, the code displayed at that moment must always be entered as 2FA. However, the standards for tokens of this type are usually not open source, which is why we do not recommend using them.
SMS
Probably the better-known method. To verify the identity of the user, the respective service sends an SMS to the phone number registered with the account. Since the mobile network cannot be considered secure, we do not recommend this method.
2-factor biometrics
Unique biometric characteristics must be verified during registration (fingerprint, facial recognition, iris scan). Biometric authentication is particularly widespread for smartphones.
However, biometric authentication poses a problem for us in that the authorities can simply use our biometric characteristics under duress and by force. We therefore advise against biometric unlocking methods such as fingerprint and Face ID as a matter of principle.
[!technical] Technical
Bio-metrics such as fingerprints or facial recognition have been proven to be falsifiable. Starbug from the CCC has already demonstrated how easy this is for fingerprints, faces, iris and vein recognition. The most important point here, however, is that you can never change your bio-metric characteristics. A corrupted password can be reset. A fingerprint or face, however, cannot.
The only exception to this is GrapheneOS, which offers a PIN as a second factor limited to twenty attempts for fingerprint recognition and otherwise meets the highest security standards.
2nd factor: Knowledge
For example, the security questions that were common in the past, such as “What is your place of birth?” However, these “security questions” usually imply answers that someone who knows you well could easily find out for themselves. We therefore don’t recommend them.
Time to crack
In reality, how long it takes to crack a password depends very much on the exact circumstances. The calculations here assume a very specific scenario. The scenario shown here assumes very favorable conditions for the attackers. This means that in practice, it will take even longer.
Time to crack a password
It should also be noted that these times are for one password from one person. All of the hardware is busy with this task, so no other passwords can be cracked during this time.
[!technical] Technical
We assume an MD5-hashed password and that the attackers have access to the hardware used to train ChatGPT: 10,000 NVIDIA A100 GPUs. Purchase price: approx. $9,000 per unit (2024) for the cheaper version with 40GB of memory. That’s a total of $90 million. Even renting this amount of hardware is not cheaper in the long run. Further details on the scenario can be found at hive-systems, who performed the calculations.
Important prerequisite: The password must have been generated randomly! This means that this is purely character brute forcing. So, for example, you start with 0000 and try:
0001,0002,...,AAAA,AAAB,...,A-A-A-B-B,R€70lut10n,- …
etc. without word lists optimized for the target person.
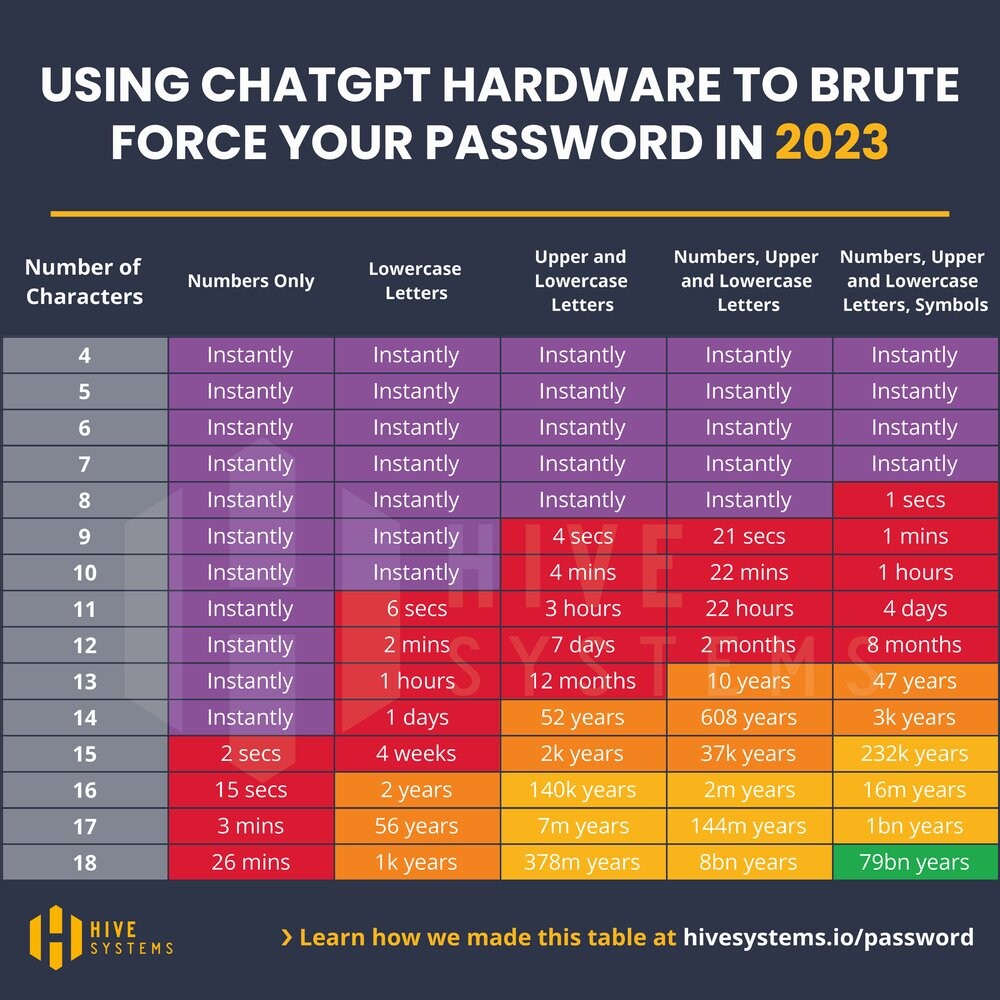
Time to crack a passphrase
However, a random password that is sufficiently long and contains letters, numbers, and special characters is difficult for humans to remember. That’s why we recommend using passphrases for passwords that you need to remember, such as those for your password manager and the hard drive of your computer and phone. These consist of words instead of individual letters. They are much easier for humans to remember, but are no less secure than passwords. See also: xkcd 936
[!technical] Technical
In information theory, it must always be assumed that the attacker knows how we created the password in order to evaluate its security. Therefore, the attacker uses a word list attack here. Otherwise, everything remains the same.
For example, the word case is assumed below, namely that the attackers know exactly how many words from which language and in which format (i.e., upper/lower case, which characters between words) were used for the password and that they use (in the left column) the hardware used to train ChatGPT to crack it. Therefore, these graphics should not be taken at face value.

As already mentioned, random passphrases can be created using password managers or, in a similar way, with dice and a word list that is as large as possible.
WiFi SD cards
[!toc] Table of Contents
Photographers in particular often face the problem that their newly captured images are stored unencrypted on their camera’s SD cards until they can transfer them to encrypted hard drives once they are back at their laptops. Added to this is the problem that storage media such as SD cards, USB sticks, and SSDs are very unreliable or even impossible to delete securely if the data on them was unencrypted.
So-called Wi-Fi SD cards can help in solving this issue. Like normal SD cards, they are simply inserted into the camera’s SD card slot. However, they do not actually store any images. Instead, they are connected to a mobile phone via Wi-Fi (direct) using an app and send every image taken immediately to the mobile phone. Since your phone is (ideally) encrypted, the data is then better protected.
Clean up metadata
[!toc] Table of Contents
[!tip] Tip {static}
If you don’t know exactly what metadata is, read the
article about this threat.
The following is mostly taken from the entry on metadata in the Systemli Wiki.
Exifcleaner
Platform: Linux, Mac, Windows Exifcleaner is an application for removing metadata from files.
Metadata Cleaner
Platform: Linux Metadata Cleaner is a popular program for deleting all metadata from various file formats with a single click. It supports all common file formats and is very easy to use. It is based on Mat2, which is presented here. Mat2 is particularly interesting to us because of its web application, which can be a good alternative for on the go.
Mat2
Platform: Web browser (online, all systems) and file manager (offline, Linux)
Mat2 is pre-installed on the anonymous operating system Tails and can be installed on other Linux systems. Instead of being a standalone program, mat2 is installed as an extension for the file browser and used by right-clicking on the file to be cleaned up. 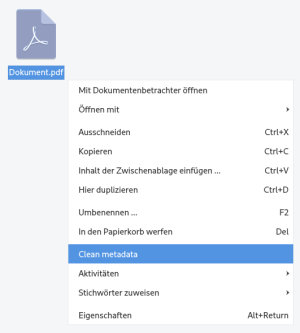
Web application
You can also use mat2 without installation as a web application at https://metadata.systemli.org. The files are uploaded to the Systemli server, cleaned up there, and then you can download them again. The web application is therefore an alternative for when you are on the go.
Scrambled Exif
Platform: Android
Scrambled Exif is an open-source app for cleaning up image files. You can download the app from the Google Play Store or F-Droid. After installation, you need to open the app once and give it permission to access your storage in order to set it up. Then, every time you want to share an image, you can share it via Scrambled Exif. It will clean up the file and ask you which app you want to share the cleaned file with.
Printerdots
As described at HacksAndLeaks: Instead of uploading original documents whose printer dots could reveal your identity, it is better to type or reproduce the originals by hand, print them on an “anonymous” printer, and publish them that way.
Anonymize scanned documents
Okular
Platform: Linux, Windows, (MacOS officially only with unstable version, but works quite well according to experience)
Okular is a PDF viewer that can also be used to black out documents.
Obfuscate
Platform: Linux
With Obfuscate, image files can be reliably pixelated/blacked out.
Libre Office
Documents can also be blacked out with Libre Office. However, most people find the above methods much more intuitive and simpler. An older but very good English-language guide can be found here.
Dangerzone
[!toc] Table of Contents
Dangerzone is a very useful tool to securely open potentially dangerous files.
It supports more than 20 file types, including PDFs, all major office-suite formats, and the most common image types, which it can convert to safe PDFs.
[!tip] Tip {static} If you are in doubt whether you can safely open a file - just open it with Dangerzone!
Instructions on how to install Dangerzone can be found on their website. They support all major operating systems.
How does it work?
Dangerzone destroys malware by rendering your document into pixels in a secure sandbox and reconstructing it locally as a PDF. Documents are sanitized in a sandbox with no network access, so if a malicious document can compromise the sandbox, it can’t “phone home”. The sandbox is based on container technology.
[!info] Info {static}
Dangerzone is a free and open source project, maintained by Freedom of the Press Foundation (FPF), a nonprofit organization that protects and defends press freedom.
In case you are not satisfied with the above explanation:
[!technical] Dangerzone “under-the-hood”
This information is from the project’s “about” page. Dangerzone uses Linux containers, which are isolated application environments that share the Linux kernel with their > host. On Windows and macOS, it uses Podman under the hood, which spins containers in a dedicated virtual machine. Since > Dangerzone 0.10.0, all this complexity is hidden from the user. First, the sandbox:
- Reads the original document from standard input
- Uses LibreOffice or PyMuPDF to convert original document to a PDF
- Uses PyMuPDF to split PDF into individual pages, and to convert those into RGB pixel data
- Writes the number of pages and the RGB pixel data to its standard output Then that sandbox quits. The host reads the RGB pixel data from the container’s standard output and:
- If OCR is enabled, uses PyMuPDF to convert RGB pixel data into a compressed, searchable PDF
- Otherwise uses PyMuPDF to convert RGB pixel data into a compressed, flat PDF
- Stores the safe PDF in the specified directory with the -safe.pdf suffix, and archives the original one
Encryption Programs
[!toc] Table of Contents
There are several ways to encrypt files or entire folders. However, in most cases, the same underlying methods are used.
Here, we’ll introduce two tools that allow you to securely and reliably encrypt files locally on your device. If you need some help deciding:
- Cryptomator is the go-to solution when you use Nextcloud and want to synchronize your encrypted files with your group.
- VeraCrypt is the go-to solution for encrypting storage devices (e.g USB drives) and creating encrypted folders.
VeraCrypt
- VeraCrypt can either create an encrypted container (a container is essentially just a file) that can then be opened like a folder. Encrypted containers offer a second layer of protection but should not be considered a replacement to fully encrypting the disk.
- VeraCrypt can be used to encrypt entire storage devices (USB drives, internal and external hard drives, etc.).
- With VeraCrypt you can also fully encrypt your Windows systems, making it an open-source alternative to BitLocker, Windows’ less secure native disk encryption software.
[!tip]
In our guide to VeraCrypt, you’ll find step-by-step instructions for installation and the most important features.
Cryptomator
- Cryptomator was primarily developed for end-to-end encryption of files in the cloud.
- Unlike VeraCrypt, Cryptomator doesn’t simply create a single “file” as a volume. Instead, it divides this volume into many small parts. This enables much more efficient synchronization because the entire volume doesn’t always have to be uploaded or downloaded when editing or adding files.
- Cryptomator also has a mobile app, which makes E2E-encrypted file synchronization via the cloud very easy to use. At the same time, it can also be used to easily encrypt files locally on your device.
[!tip]
See our instructions on Cryptomator and syncing files with Nextcloud.
GrapheneOS
[!toc] Table of Contents
GrapheneOS is a mobile operating system based on Android. It is often recommended as an alternative to pre-installed (OEM) operating systems, as it can be used entirely without Google services. In addition to this feature, which protects user privacy, GrapheneOS, in combination with supported devices, offers state-of-the-art security features, which is why we strongly recommend its use here.
Empfohlene Apps
GrapheneOS comes as a very blank operating systems, with just the very necessary tools installed. Because app installations are crucial to security, we would like to give a recommendation on how to install apps from which sources/app stores.
We consider the following apps as part of most activists standard installations. The following list, as far as necessary, contains links to our instructions on how to install those apps securely, on a fresh GrapheneOS installation. We:
- Accrescent App Store: `Accrescent is a trusted app store that can be installed by the default GrapheneOS app store
- Signal messenger
- F-Droid: F-Droid provides apps, that Accrescent does not
- Orbot: Orbot routs all your phones network traffic through the Tor network
- Tor Browser
- CoMaps: is an offline map. Simply install it from F-Droid
[!technical] What about Organic Maps?
CoMaps is a community fork of the well known
Organic Maps, which unfortunately upset their own community, by making private profit from community contributions
Recommended settings
Confidential profile
For many, data-hungry apps such as WhatsApp and the like are still a must-have in their digital repertoire. As a result, separate work profiles are often set up to use these apps. The “private space” feature can be a welcome alternative here:
[!quote] Quote {static}
Android 15 introduces the ability to install apps in a completely isolated area, separate from the rest of the system. […] Unlike the previous work profile, which required a separate user login, Private Space is integrated directly into the system, making it much easier to use and more accessible.
The GrapheneOS team has written this feature announcement, which gives further details on how the private space feature can be used.
It is important to note that the confidential profile has its own network settings. This means that if you use TOR or VPNs, you have to set this up again in the confidential profile, as the settings from the normal owner profile do not apply here. This can also be seen a privacy feature, since exit IPs can be separate.
Data protection & security
Exploit protection
In the settings under Security and Privacy > Exploit protection:
- auto reboot: This option defines when your phone auto-reboot, measured by the time since last unlock. The auto reboot time should be as low as possible, but still comfortable for users. After rebooting, no signal messages/calls will be received without first unlocking the device, for example. However, a lower reboot time can possibly protect your data from physical extraction in cases where it was confiscated. It puts a limit on how long attackers have to try to exploit the device while the user is still logged in, since it’s going to reboot automatically if it’s not successfully unlocked in the defined timeframe1.
- USB - C Port: This option controls the behavior of the USB-c Port. It should optimally be set at least to “Charging only”. The “Charging only when locked” option is one level stricter and thus potentially more secure, but it means that the phone cannot be charged when it is used at the same time.
- Turn off WiFi & Bluetooth automatically: Turning of WiFi and Bluetooth when not needed is good not only for your battery life, but also for security and privacy. A convenient time period should be selected for both.
[!technical] WiFi privacy risks
When your WiFi is activated, your phone constantly checks for any known previous WiFi connections nearby. It thereby reveals information on your saved WiFi networks, which can be a significant privacy risk. Combined with other resources, it may be used by advanced adversaries to identify you or to track your location. As an example, the WIGLE map can be potentially used by anyone to track certain devices 2.
More Security and Privacy
In the settings under Security and Privacy > More security and privacy:
- Notifications on lock screen:
Show sensitive contentshould be turned off. In case you phone gets stolen, the thief can see all incoming messages, including the names of the persons who sent them. This is a major security and privacy risk. At least prevent the notifications from showing sensitive content. - Allow Sensors permissions by default: This should be turned off. This way, you will be asked about the sensor permissions you want to give an app, every time you install one. By this, you will have more consciousness about what different apps are capable of.
Duress Password
- Duress password: A duress password ensures that when it is entered, the phone is completely reset to factory settings. This is very useful if you are ever coerced or forced to unlock your phone. This also works if an attacker tries to guess your password using brute force. Of course, having regular backups of your phone or at least of your critical data is needed to ensure the reset does not lead to data loss.
It is best to choose a Duress Password that:
- you can remember immediately also in stressful situations. this is important so you can quickly type the duress password when needed
- that the police or your adversary would likely guess, so your data would be wiped if an unlock is attempted
- one that you would never choose as your real password, so that people who know you would not accidentally wipe your data if they try to unlock your phone
WiFi
For all WiFis that you do not have full control over:
- In the settings for the respective connection (gear icon next to the WiFi name): activate non-persistent MAC address randomization for this connection. This is a privacy feature which makes it harder to track or identify you via WiFi.
2FA for fingerprint
It has recently become possible to use a second factor for unlocking your phone via fingerprint. This represents a huge step forward in the conflict between usability and security!
What was the problem before?
Normally, biometric unlocking methods should be used with extreme caution for the simple reason that they can be forced by others. In case of doubt, the police can force your finger onto your phone and unlock it This means that, until now, the use of biometric unlocking has always been accompanied by the risk of being taken by surprise and forced to unlock your phone before it can be turned off.
What is the solution?
The 2FA option offers the possibility of setting up a minimum 4-digit (6 digits are recommended) PIN number, which must be entered each time after the fingerprint to unlock the phone.
You still have to type something, but a 6-digit PIN on the large number pad is much easier and faster to type than a 7-word passphrase on the small keyboard. In addition, the PIN can be changed much more easily when necessary, as you don’t have to worry about learning a new long password.
Your password should still follow the recommended passphrase guidelines, but using this feature means that the cell phone can be encrypted with a very strong password without having to type it several times a day, since the long password is only required when the phone is first unlocked.
Can the PIN be brute-forced?
Only to a very limited extent:
- The entire fingerprint method is only available for 48 hours after the last entry of the primary (long) password.
- A maximum of 4 * 5 failed attempts are allowed. There is a 30-second timeout between every 5th failed attempt. This means that there are a maximum of 20 failed attempts. [1].
- As long as your PIN is truly random and thus hard to guess (not your birthday, for example), it can be considered secure.
PIN scrambling
PIN scrambling is pretty nerdy, but it does have its use cases:
Depending on whether you already have enabled the 2. factor pin for fingerprints, the locations are different from each other. See here in our instructions.
Instead of the digits always being displayed in numerical order on the screen, the digits are displayed in random positions on the screen when the PIN is entered. This means that if an attacker has been watching you entering your PIN from a short distance and has only been able to see the direction of your thumb on the screen, for example, they will not be able to reconstruct your PIN. The same applies to CCTV / surveillance cameras.
PIN scrambling is also available for the fingerprint 2FA.
Apps
In the settings under Apps > Special app access:
Install unknown apps: Here are all apps listed that could potentially be able to install other programs on your phone. Check this list, so that only the app stores you use, are allowed to install other apps, such as:Accrescent,App Store,F-Droid,Aurora Storeand so on …
[!tip] Tip {static}
Also allow Signal to install apps! Although this seems counter intuitive, this enables signal to update it self!
Messenger
[!toc] Table of Contents
While emails are still regularly used for digital communication, messengers have become more popular in recent years.
One advantage of (good) messengers over emails is that encryption and secure communication are part of their initial design, while email is unencrypted and rather insecure by default.
Some criteria for what constitutes a good messenger can be found at PrivacyGuides. For activists, depending on the threat model, it is particularly important to have secure and anonymous communication.
Two messengers that are widely used in activist circles and can be recommended are Signal, Matrix and Delta Chat.
[!example] TL;DR {static}
Signal sets the highest standards for it’s encryption and data protection and is probably the easiest to use. The disadvantage: it requires a phone number for registration.
Matrix also uses modern encryption, but can be less intuitive to use. It is decentralized, meaning you can choose a server you like for registration and don’t need a phone number.
Delta Chat relies on old email protocols uses PGP for encryption. PGP is still considered secure. However, if your private key is stolen by an attacker, the whole communication history can be leaked. The advantage of Delta Chat is it’s decentralized and that you just need a working email account to get started.
Signal
Signal was developed by the anarchist Moxie Marlinspike and is one of the best-known alternatives to the monopolist messenger WhatsApp.
Advantages of Signal
- Easy to use: Signal is simple to install and everything “just works.” There isn’t much you can do wrong that would compromise security.
- Widespread use: As of January 2025, the platform had approximately 70 million monthly active users. While this is still far behind WhatsApp’s 2 billion users, it is nevertheless widespread, in contrast to some other Messengers in this list.
- Secure encryption: Signal has its own communication protocol that is open source and regularly audited. Some other messengers, such as WhatsApp, have also adopted the protocol, meaning that it is used daily by billions of users. Communication in Signal is therefore securely end-to-end encrypted.
- Data minimization: Signal stores as little as possible about its users and can therefore only disclose very little information when forced by authorities to hand over user data. The only data that Signal was able to disclose in past court cases was the date the account was created and the date the account was last used. When legally forced to provide information to government or law enforcement agencies, Signal discloses the transcripts of that communication here.
- Option for automatic deletion: Chats can be set to automatically delete messages after a certain period of time. This means that they are secure even if the police gains access to the device (but only after this period).
Disadvantages of Signal
- Anonymity: Signal was not designed to be anonymous, but to provide secure encryption. As of today (2026), a phone number is required to register. In many countries, phone numbers must (legally) be registered to a real person. The phone number used to be visible to everyone you communicate with, but Signal now enables users to hide their phone number from other users. When using a phone number that is not linked to your identity for registration, Signal can therefore be considered as anonymous as the other messengers in this list.
- Based in the US: The Signal Foundation is based in the US and can therefore be forced to to hand over data to intelligence agencies. However, Signal has very little data that can be handed over.
- Centrality: Signal only runs on its own infrastructure (which is located at Amazon, Microsoft, Google, and Cloudflare) and cannot be self-hosted. This means that users must trust Signal to some extent to do its job well. On the other hand, a compromised signal server does not mean that all your chats are also compromised, as long as your security numbers stay verified. But, it does mean that there is a central point of failure: If signal gets shut down one day, you may need another channel of communication to your contacts.
- Censorship: Since Signal is centralized, it is possible for governments to try to block connections to Signal servers. While Signal introduced proxies that can bypass censorship, it makes the bar-of-entry higher. Statistics from other projects such as the Tor project show that usage of a technology significantly declines when it is censored, even if there are ways to circumvent it. The plans of the EU to possibly introduce “Chat Control” and Signal’s response that they may will exit the European market if the proposed regulation is passed highlight this issue. If the law passes, EU users may need to rely on proxies to connect to Signal or fallback on alternative messengers
[!tip] See our recommendations about how to purchase phone numbers online anonymously. (The crypto currency Monero is required)
Signal groups
Signal groups are popular and frequently used for communication in larger groups (up to ~150 contacts). In general, Signal chats offer automatic deletion of messages after a set period of time, which should also be set for groups that have a higher risk potential.
Unfortunately, there is no function yet that automatically deletes entire groups after a set period of time. Therefore, especially when devices are confiscated, it is important to consider which contacts are connected in which groups (or which group names!) and could also be compromised.
We therefore recommend (for all group chats, not just on Signal): Based on the principle of plausible deniability, give your groups names that are as inconspicuous as possible and that cannot be used against you! In case of doubt, the chat history will only show that the group name has been changed, but not what the group was called before.
[!danger] Attention {static}
In the event of confiscation, the affected account should also be removed from all groups immediately!
[!tip] {static}
You can read our instructions on how to use Signal as anonymously and securely as possible.
Matrix
Matrix is a communication protocol. There are various client apps for this protocol, the best known being Element.
Matrix has become increasingly popular in activist and hacker circles, especially in recent times.
How it works
The most important difference between Matrix and other messengers, such as Signal, is its decentralization, or federation. Similar to email, there are many different servers (“home servers”) (such as matrix.org or matrix.systemli.org). If an activist with a Matrix account at matrix.org communicates with an activist with a Matrix account at matrix.systemli.org, the (encrypted) messages must be synchronized between the two servers.
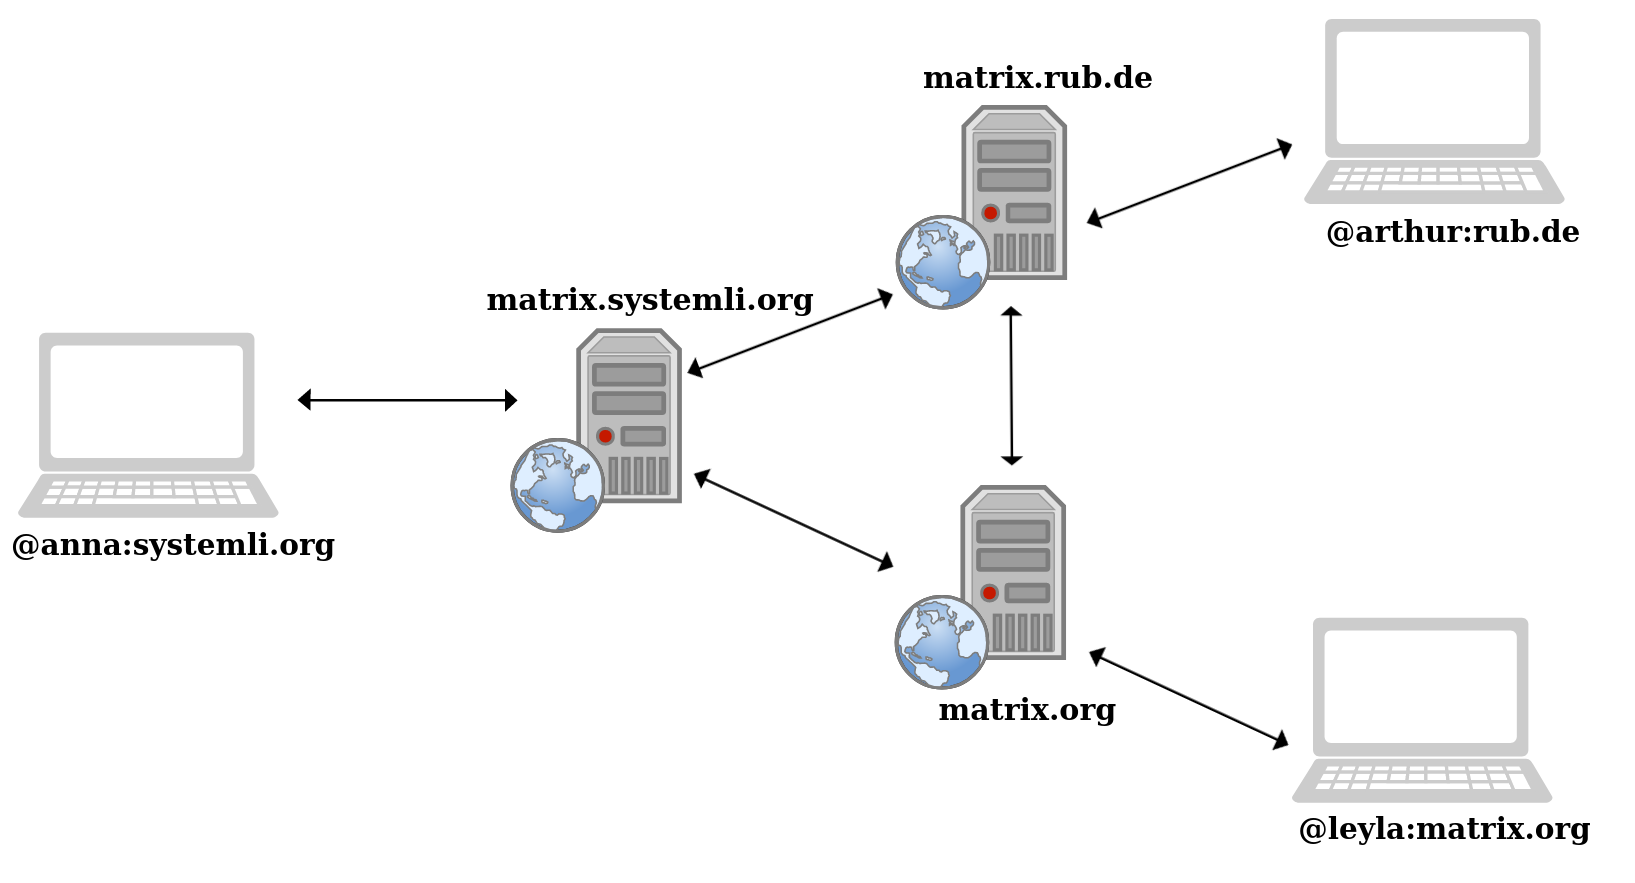
Advantages of Matrix
- Secure encryption: Matrix uses its own implementation of the Signal protocol. It has some disadvantages compared to the Signal protocol, but is still similarly secure.
- Decentralization: Matrix is federated and therefore decentralized. There are many different servers that communicate with each other, so there are many points that would have to be attacked to completely paralyze Matrix. It is therefore more resistant to censorship then Signal, both legally and technically.
- Anonymity: Some servers do not require any personal information to create an account. This makes it possible, in principle, to use Matrix anonymously.
- Openness: The source code of Matrix and Element is open source and can be audited for security.
Disadvantages of Matrix
- Complicated to use: Matrix can be complicated to use at times. The principle of federation is counterintuitive for non-technical people, there are many different clients to choose from (which be overwhelming), and some things do not work smoothly yet.
- Not yet widely used: People often need to be persuaded to set up a Matrix account.
- Lack of data minimization: Because Matrix is federated, all data must be synchronized across all federated servers. This also means that it is practically impossible to delete data. By default, the Matrix ID, personal information, usage data, IP addresses, device information, other servers with which communication takes place, and room IDs 1 are stored on all servers by default.
[!info] {static}
Overall, choosing the right messenger depends on the threats you face, the people you want to communicate with and personal preference. From a technical and security perspective, the above, especially Signal, are most recommended.
[1]: The source refers to an older version of Matrix. It is unclear to what extent the amount of data stored by default and the deletion behavior are transferable to current versions.
Password manager
[!toc] Table of Contents
[!info] Info {static}
A password manager is an essential tool for ensuring that you take the necessary precautions to keep your passwords secure. Here you can find out what makes a good password and how you should handle them: Countermeasure: Strong Passwords
KeePassXC and Bitwarden are both open source and have applications for all common operating systems/browsers.
KeePassXC works offline, Bitwarden online. However, KeePassXC can also be synchronized across multiple devices using external services.
Practical password managers for PCs:
- KeePassXC: Linux, Windows, MacOS
- Bitwarden: Linux, Windows, MacOS
- Keep in mind, that for using Bitwarden, you will need a provider that runs a Bitwarden service and that you trust. Don’t use untrusted providers.
The password managers integrated into browsers and operating systems are not necessarily recommended, as they are often proprietary and designed primarily for convenience. This regularly leads to security vulnerabilities. Browsers in particular are always a target for attackers and offer many attack vectors.
KeePass for mobile devices
Recommendation from the official KeePassXC documentation:
- Android: keepassDX, Keepass2Android
- iOS: Strongbox, KeePassium
KeePassXC
KeePassXC is one of the best-known and most widely used password managers. It is open source, regularly checked for vulnerabilities by experts, and offers a variety of very practical features. These enable us to bridge the gap between security and convenience.
Browserintegration
There are plugins for KeePassXC for all common browsers (except Safari) to conveniently use the auto-fill function. This automatically suggests the correct login details on every website for which passwords have been saved.
This prevents you from accidentally entering your password when you click on a phishing link, because the plugin recognizes that you have landed on the wrong URL.
Schlüsseldatei
It is recommended to secure a password database with both: a password and a second factor. The easiest way to do this is with a key file. (See below for an example scenario.)
Key file as second factor
It is possible to encrypt the database with a separate key file in addition to the password. This means that you always need both the password and the key file to access the passwords.
Instructions for doing this can be found here.
Key file as master key
You can also encrypt your password database with just a key file, without a password. Then you must always select the key file when opening the database in KeePassXC.
Key file as master key with 2nd factor password
A common use case for this is to store the key file on an encrypted USB stick, which you always carry with you, e.g. on your key ring. This also ensures 2-factor authentication. The following is required:
- factor: the password for the stick
- factor: the stick (with the key file)
to access the passwords. It is essential to ensure that there is a backup USB stick in case the actual stick is lost!
Generate new passwords
One of the core features of a password manager is that it can generate strong passwords or passphrases according to your own specifications. This ensures that you don’t reuse the same password out of convenience.
Synchronize and back up passwords in the cloud
Isn’t that dangerous?
The password database is always encrypted, at all times. It is never decrypted in the cloud, so the cloud operators cannot read it. However, the police could potentially steal a copy of your database, as described in the following example scenario.
Example scenario
Let’s assume that your password database is “only” protected with a (strong) password. If the police have access to your cloud (or obtain your database in some other way), they will only have the encrypted file and will not be able to do anything with it.
However, if they find out your password in the future (e.g., by secretly watching you type it in), they can retrieve the encrypted database and decrypt it.
If the database were also encrypted with a key file, it would not be enough to know the password; the key file would also be needed. If you were to destroy this key file, there would be no way to decrypt the stolen database.
How To
For example, you could store your database in the cloud and access it from all your devices.
The key file is stored only locally on your devices.
If you suspect that the authorities have obtained a copy of your password database
- make a copy of your database
- create a new password
- and a new key file
- and then delete the old key file from all your devices.
This will render the compromised database useless forever.
[!warning] Warning {static}
Before you delete your old key file, make sure:
- that the new database works with the new key file
- that you don’t forget the new password!
In both cases, all your passwords would be irretrievably lost.
KeePassXC as a 2-factor app
KeePassXC can also be used as a 2FA app with TOTP. This even works on the apps for mobile phones.
Anleitungen
Here you will find instructions with further references.
Note
We consistently refer to KeePassXC here.
Older versions such as KeePassX and KeePass should no longer be used.
Online SIMs
Some services, such as Signal, require a phone number to setup a new account. In most countries it became really difficult to purchase new SIM cards anonymously. Therefore services that offer online SIMs are a good alternative to that, e.g https://smspool.net or https://smsplaza.io.
[!warning]
We do not know any of the operators of those sites and we don’t know what their political or moral stances are.
Just by paying with anonymous methods, such as Monero, you can be sure to stay anonymous when purchasing a SIM, or SMS.
In most cases, those web services offer a wide range of countries, from which you can select your number. You can either purchase a one-time SMS for just a few cents, or you can permanently rent a number for a few Euros/Dollars per month. While using one-time SIMs may appear attractive, keep in mind that numbers may be re-distributed. It may happen that the one-time number you used will be assigned to another customer, who could then technically “push you out” of the service when re-registering at the same service again.
While this is technically possible and there have been reported cases of people losing their accounts because of this, it seems this rarely happens.
Generally, the method for registering an online SIM is the same everywhere:
- Create an account for an online SMS service.
- Add Monero to your account.
- Decide if you want to have a one-time SMS or if you prefer to rent a SIM for a period of time.
- Choose a country of origin.
- Purchase/rent the SIM. This will display your new phone number.
- Use the phone number to register a new account.
- The registration PIN may occur at the web interface of the online sms service.
[!note]
It is common that purchased numbers don’t work for registering new accounts at the first time. Usually the success rate is somewhere between 30-60%. So, if even after a few minutes no registration PIN arrived at you online SMS account, just buy another new SIM/SMS until it works.
Auto Reboot
[!toc] Table of Contents
Because all encrypted devices store their encryption keys in their RAM after you first entered the device password during the start up, bad actors could try to read your encryption keys out of the RAM, even when your device is just screen locked.
[!technical] What is RAM?
In very short, the RAM is a very fast memory device, that has one important feature for us: it loses all data, when the power is turned off!
Because of this, we want to automatically turn off our devices to clear our encryption keys from the RAM.
Automatic reboot can be configured on all PC platforms and some Android devices. Instructions for the native functions of the various platforms are provided below. No additional programs need to be installed.
Mobile devices
Android
An automatic restart can also be set on common Android devices. GrapheneOS even offers the option to restart the device whenever it has been unlocked for X hours.
A restart at a fixed time can be set as follows:
EinstellungenUtilitiesScheduled power on and off
Here you can now specify when the device should always shut down and when it should restart.
iOS
Unfortunately, iOS does not currently offer a function for scheduled restarts. In November 2024 iOS introduced an auto reboot after 3 days of inactivity. This means that you iPhone will reboot automatically, if it won’t get unlocked for 3 days in a row.
While this is still good to have, 3 days should be considered as plenty of time for law enforcement to bring this device to a professional forensics facility.
Anyways, if you want to see this reboot happen in action, you can watch jiska’s video and especially read their great write-up on how this works technically.
PC
Linux
On Linux, you can use crontab for automatic jobs such as auto reboot. For example, to set the PC to restart every morning at 4 a.m.:
- Open Terminal (
Command Line) - Enter this command in the terminal:
sudo crontab -e
An editor will now open (or you will need to select one, TIP: select nano)
- Paste the following line at the bottom:
0 4 * * * /sbin/shutdown -r- To do this, copy the line above
- Go back to the command line in the editor
Right-click > Paste- First press
Control+Sfor “safe”- then press
Control+Xfor “exit”
- then press
- Done
[!technical] Explanation of the cron command
0 4 * * * /sbin/shutdown -rFrom left to right:
- zero minutes
- fourth hour
- *th day of the month
- *th month
- *th day of the week
- Execute the terminal command
/sbin/shutdown -rThe asterisks mean “all possible values.” This means that the complete line reads:
Execute the command
/sbin/shutdown -revery month on every day at hour 4 at minute 0.The
-rat the end of/sbin/shutdown -rstands forreboot. If you simply omit this-r, the PC will not restart automatically, but will simply remain off.
Additional settings when using suspend mode
Especially on laptops suspend mode is used often when people close the lid. This leads to the situation where the above cronjob is not sufficient, because it does not work while in suspend. This leads to the system being vulnerable to attacks. Therefore we need to introduce another automated action to ensure the device will shut down securely. This is done by waking up the system from suspend 5 minutes before it shall be shut down by using the Linux module (systemd)
- Open Terminal (
Command Line) - Enter this command in the terminal:
sudo nano /etc/systemd/system/set-wakealarm.service - Past the following content into the file:
[Unit]
Description=Daily wake up from suspend

[Service]
Type=oneshot
ExecStart=/bin/bash -c "/usr/sbin/rtcwake -a -m no -t $(date -d 'tomorrow 03:55' +%%s)"
[Install]
WantedBy=multi-user.target
[!technical] Explanation of the systemd job
[Unit]just contains the description
[Service]contains the job which shall be executed in which mode.
Type=oneshotmeans it will be executed once
ExecStartis the command which shall be executed.
/bin/bash -cjust tells systemd to run a new bash console and execute the command in"..."
/usr/sbin/rtcwakewill execute the programm rtcwake which will set a wake up alarm in the devices hardware timer
-auses automatic clock detection
-m notells the programm to not do any direct action, only set the RTC wakeup time.
-t $(date -d 'tomorrow 03:55' +%%s)is a complicated way of setting the wakeup time to 3:55
- After that, the following two commands will advise systemd to directly make use of the new wakeup command
sudo systemctl daemon-reload
sudo systemctl enable set-wakealarm.service
- To test if everything is setup correctly this command can be used:
sudo systemctl start set-wakealarm.service - In case the command finishes without any output, it’s set up correctly.
- After that, you can check if the wakeup time was set correctly in the devices hardware timer:
cat /proc/driver/rtcThere you should see the following values:
[...]
alrm_time : 02:55:01 (Attention, this is UTC, which might have an offset to your local timezone)
alrm_date : <date of the next day>
alarm_IRQ : yes
[...]
- It is highly recommended to test if this works the next couple of nights. So put your device in suspend in the evening and check if it is shut down the next morning. With
journalctl --list-bootsyou can check when your PC was running, which includes times in suspend mode.
MacOS
- Click on the
Apple logoin the menu bar. System PreferencesEnergy SaverSchedule
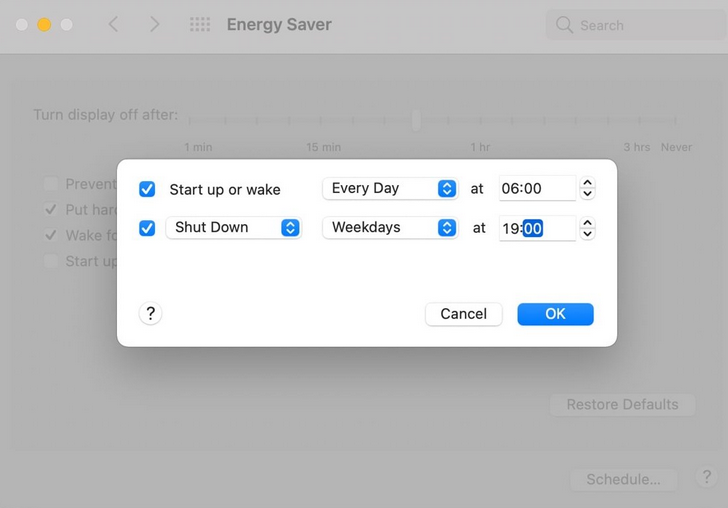
The top checkbox can be used to specify when the PC should be restarted when it is turned off. We are not interested in this. We want to automatically turn off the PC to clear the RAM.
- So we select the bottom checkbox
Every day- Choosing the reboot time is up to you, but we would recommend a time at night (e.g., 2 a.m.), as this is when we usually do not use the computer. Additionally, house searches are often conducted in the morning, so rebooting our computer beforehand makes sense.
Windows
We can use the Task Scheduler to shut down the computer, restart it, or perform any action once or at regular intervals.
If you prefer to follow a video tutorial, there is also YouTube video on this topic.
- Enter
taskschd.mscin the Start search and open Task Scheduler. - In the right-hand bar, click on
Create basic task- Give the task a name, e.g.
Auto Reboot Execute whether the user is logged on or not
- Give the task a name, e.g.
- Go to the next tab and select
TriggersDaily- Set the restart time (e.g. 2 a.m.).
- Start date and start time: Select the current time i.e. valid from now
OKand go to the next tabAction. Here, selectStart a program- Now enter
shutdownin theProgram/scriptfield - Now enter
/r /fin theAdd argumentsfield - The
\rstands forreboot. If you only enter/fthere, the PC will not restart automatically, but will simply remain off.
- Now enter
Nextand go to the next tabConditions- Make sure that under the “Power” section:
- the top two checkboxes are unchecked, i.e. off
- and the last one, “Wake the computer to run this program,” is checked.
- Click
Nextto check everything and then click “Finish.” - Finally, you will probably have to enter your password.
Backups
[!toc] Table of Contents
In the article on backups in the countermeasures section, we described why backups are so important. Here we want to show how backups can be made.
Backup of what?
Of course, everyone has to think for themselves about what needs to be backed up. Here are a few common examples:
- Passwörter
- Contact details (phone numbers, email addresses, etc.)
- Official documents
- Texts you have written yourself (or others have written)
- Logs (if necessary)
- Chats (if necessary)
- Images (photos, etc.)
How to back up
There are, of course, many ways to make backups. From simple copying and operating system functions to powerful programs such as borg/rsync, Kopia, or others.
[!tip] Important {static}
Only back up to encrypted data carriers!
Copy manually
The simplest way to back up is, of course, to simply insert a USB stick into the computer and copy your important files (user folder) to it, or to copy all folders from the file manager on your mobile phone to it. However, this can be very inefficient, as new data that needs to be backed up is constantly being created. Then you have to evaluate each time which files and folders need to be copied again.
[!success] Advantages {static}
- No technical knowledge or extra tools needed
[!fail] Disadvantages {static}
- Evaluate what needs to be backed up each time
- Not automated (you have to remember to do it yourself)
- All data must be copied over each time (takes a long time)
Native backup functions
MacOS
MacOS makes it very easy for users to make regular backups. The in-house tool is called Time Machine. Apple’s own instructions are very easy to understand.
All you need is a storage medium that is large enough. In this case, large enough means at least twice the size of the data to be backed up.
[!success] Advantages {static}
- Configure once, then just connect the storage medium each time
- Fast: Files that were already in the previous backup and are still unchanged are skipped.
- Depending on your settings,
Time Machinecan keep multiple backups, so you can restore different versions of you files (yesterday, last month, and last year, for example). Again, the point above applies here: nothing is stored twice.- Automatically deletes old backups that are replaced in the new run
[!fail] Disadvantages {static}
- You have to remember to connect the storage medium regularly
Cryptomator
[!toc] Table of Contents
In this article we will describe how to set up Cryptomator. We highly recommend Cryptomator if you want to synchronize encrypted files to/from the cloud, as it is much faster than using VeraCrypt containers.
Installation
First install Cryptomator. If you use anything other than Linux, simply follow the instructions for your operating system. If you are using Linux you may want to use the Cryptomator flatpak package. Depending on your distribution, you could also use your package manager repository, such as apt on Ubuntu/Debian or download the AppImage.
Setup
[!tip] Cryptomator has pretty good documentation! Go ahead and check it out for more detailed instructions on lots of other functionalities.
Follow these steps to create your first vault:
- Click the
+symbol in the lower-left corner and selectCreate New Vaultif you don’t have one already.

- Choose a name for the new vault and click
Next - Choose the location where your vault should be stored. This will be the place where you will access all your files later. Click
Next - Don’t change the “expert settings”, just click
Next - Enter your new password. It is important to choose a strong password to have solid encryption.
[!warning] Recovery Key
A recovery key can decrypt your data, without knowing your password. This raises the question where to store the recovery key. As you hopefully know, passwords should be stored in a good password manager. As long as your password is stored in a password manager and you have backups of your cryptomator vault and password database, you won’t need a recovery key.
We often experienced that people simply stored the recovery key file on their desktop, although they secured all their passwords in a password manager. Doing this defeats the purpose of the password manager, so if you don’t have a good strategy for securing your recovery key - just don’t save it and make regular backups.
- Finish creating your new vault.
Usage
After opening Cryptomator, press Unlock and enter your password. It also asks you whether to remember your password. If you use one of the built-in password managers of your operating system you can check that. Otherwise, leave it blank.
Now you see the general interface. With Reveal Drive you can directly open your decrypted vault, just as you can find it with your file manager.
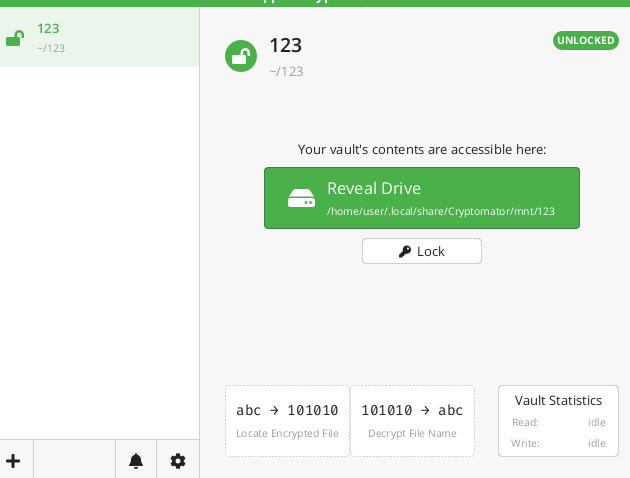
With Lockyou will “close” the vault again, so that you will have to enter your password again.
Use Cryptomator in the Cloud
The huge benefit of Cryptomator is, that it can sync your encrypted vault to a cloud very efficiently.
[!tip] To do this, simply move your vault into your sync cloud directory. See our example on setting up the sync client for Nextcloud.
GrapheneOS
[!toc] Table of Contents
- Install Accrescent
- Install Signal
- Install F-Droid
- Install Orbot and Tor Browser from F-Droid
- Recommended Settings
Empfohlene Apps
Install Accrescent
Download the Accrescent App Store from the default App Store, that comes preinstalled with GrapheneOS From Accrescent install App Verifier and Inter Profile Sharing, if you plan to share files between different Android Profiles.
Signal installieren
- Lade die Signal-APK von der offiziellen Signal-Website herunter: https://signal.org/android/apk/. Überprüfe die APK nach dem Herunterladen mit dem
App Verifier. Wähle dazu die heruntergeladene APK in deinem Ordner „Downloads“ aus und teile sie mit demApp Verifier. Oben wird dann SUCCESS angezeigt. Unten kann UNKNOWN stehen, das ist in Ordnung. Wenn oben ebenfalls UNKNOWN steht, ist etwas schiefgelaufen und es wurde eine falsche APK heruntergeladen! - Gehe nun zurück zum
DownloadsOrdner und klicke auf die APK, um die Installation zu starten. - Falls die Warnmeldung
Zu Ihrer Sicherheit ist es Ihrem Smartphone derzeit nicht gestattet, unbekannte Apps aus dieser Quelle zu installierenerscheint, ist dies korrekt. Du musst deinerDateien-App die Berechtigung zum Installieren von Apps erteilen. Klicke aufEinstellungenund aktiviereAus dieser Quelle zulassen.
[!warning] Warning {static}
For security reasons, eg. preventing yourself from unintentionally installing some malicious APK you downloaded from the internet, remove this permission after successfully installing signal, by turning it off again under:
Settings,Apps,Files,Install unknown apps
Nur für sehr hohe Bedrohungsmodelle:
Wenn du zu Hause bist, mit deinem eigenen WLAN verbunden bist und dein Signal anonym aktivieren möchtest, warte mit der Aktivierung deines Kontos, bis du Orbot von F-Droid installiert hast. Befolge einfach die nachstehende Anleitung.
F-Droid installieren
- Wie bei Signal, lade die APK von der offiziellen Webseite herunter: https://f-droid.org
Dein Browser Vanadium zeigt dir möglicherweise eine Warnung an, wie „Diese Datei ist möglicherweise schädlich is“. Das ist eine berechtigte Warnung, da man APK-Dateien normalerweise nicht einfach aus dem Internet herunterladen sollte, sondern stattdessen aus einem App-Store wie F-Droid. Da wir noch keinen App-Store haben, über den wir die gewünschten Apps installieren können, müssen wir dies einmalig tun: Trotzdem herunterladen
-
Teile die heruntergeladene APK mit dem
App Verifierund kontrolliere, ob dieser oben “SUCCESS” anzeigt -
Gehe nun zurück zum
DownloadsOrdner und klicke auf die APK, um die Installation zu starten. -
Falls die Warnmeldung
Zu Ihrer Sicherheit ist es Ihrem Smartphone derzeit nicht gestattet, unbekannte Apps aus dieser Quelle zu installierenerscheint, ist dies korrekt. Du musst deinerDateien-App die Berechtigung zum Installieren von Apps erteilen. Klicke aufEinstellungenund aktiviereAus dieser Quelle zulassen.
[!warning] Warning {static}
For security reasons, eg. preventing yourself from unintentionally installing some malicious APK you downloaded from the internet, remove this permission after successfully installing f-droid, by turning it off again under:
Settings,Apps,Files,Install unknown apps
Installiere Orbot und den Tor Browser aus F-Droid
Orbot kann all deinen Netzwerkverkehr durch das Tor Netzwerk leiten.
Zuerst brauchst du den Link zum F-Droid Repository des Guardian Projects auf ihrer Webseite. Der oberste Link sollte funktionieren.
-
Füge das Repository des Guardian Projects in F-Droid als Quelle hinzu. Folge dafür dieser Anleitung
-
go back to the main page of your F-Droid App and pull down on the screen, to refresh the page. Now the newly added repositories should be included
-
search for
Orbotfrom the “Guardian Project” and install it -
search for
Tor Browserfrom the “Guardian Project” and install it
[!technical] For high threat level
If you are at home in your personal WiFi and you would like to register your signal account anonymously, first activate Orbot, then start the registration.
The reason for that lies in the potential metadata. The only information signal store on it’s users are the timestamp of the registration of the account and the timestamp from when the account was logged in the last time.
Theoretically, if you one day will have do plausible deny to be the owner of this signal account and your network was tapped, while you created the account, one could “prove” that you connected to the signal servers just at that moment, when this account was created.
But this is, to be quit honest, a very theoretical threat scenario.
Recommended Settings
[!tip] Tip {static}
To see, why we recommended the following settings on GrapheneOS, go to our GrapheneOS recommendations
Device Unlock
In the settings app, go to: Security and Privacy > Device unlock. Here you find settings for:
- Screen lock: set your strong password here
- Fingerprint unlock and it’s strong 2FA feature
- also see the PIN scrambling feature
Duress PasswordPIN scrambling:- if you don’t use the fingerprint unlocking with it’s 2FA Pin:
Device unlock > Cog-Wheel iconto the right of Screen lock> Scramble PIN input layout - if you’re already using the 2FA method, than you have to go to:
Device unlock > fingerprint unlock >input your password> second factor PIN> toggleScramble PIN input layout
- if you don’t use the fingerprint unlocking with it’s 2FA Pin:
If you’re interested why this is in two different locations, see: https://discuss.grapheneos.org/d/18661-where-is-pin-scramble-feature/11
Exploit Protection
In the settings app, go to: Security and Privacy > Exploit protection. Here you find settings for:
auto rebootUSB-C PortTip:Charging onlyTurn off WiFi & Bluetooth automatically
More Security & Privacy
In the settings app, go to: Security and Privacy > More security & privacy. Here you find settings for:
- Allow Sensors permission to apps by default: Tip: turn this off
Notifications on lock screen: Tip: turn off: show sensitive content
Apps
In the settings under Apps > Special app access:
KeePassXC
[!toc] Table of Contents
- Key file
- Password entries
- Create strong password according to entropy
- Browser integration
- TOTP
- Backup
- Synchronization/backup in Nextcloud
[!info] Getting Started {static}
The official English-language KeePassXC documentation offers a very good and comprehensive “Getting Started” article. We recommend reading it to get an overview of the available features!
Im Folgenden werden die unserer Meinung nach wichtigsten Punkte aus der oben verlinkten Dokumentation von KeePassXC zusammengefasst. Dabei wird immer wieder auf die einzelnen Stellen in der Dokumentation von KeePassXC verwiesen. Falls es Dir schwer fällt, so viel Text zu folgen, gibt es z.B. dieses Video (auf YouTube), das die Kernfeatures von KeePassXC ganz gut erklärt. Daran anknüpfend gibt es auch eine Fortsetzung für fortgeschrittene Anwendungsfälle.
Datenbank anlegen
Die Datenbank ist im Grunde einfach nur eine Datei, in der die Passwörter verschlüsselt gespeichert werden. Sie endet immer mit .kdbx
KeePassXC ist das Program, um diese Datei dann entschlüsseln und benutzen zu können.
Wenn du noch keine Datenbank hast, musst du zu erst eine neue Datenbank anzulegen. Bevor du startest, könntest du dir aber noch die Empfehlungen zu Schlüsseldatei (Schlüsseldateien) anschauen. Falls dir das zusagt findest du im Folgenden eine Anleitung dazu.
Zum Anlegen einer neuen Datenbank ohne Schlüsseldatei kannst du dem Schritt in dieser Anleitung folgen: Neue Datenbank anlegen
Schlüsseldatei
Beim Anlegen der Datenbank gibt es an der Stelle, wo das Passwort für die Datenbank festgelegt wird, einen Button Zusätzlichen Schutz hinzufügen.
Danach unter dem Feld Schlüsseldatei auf den Button Schlüsseldatei hinzufügen.
Hier kann jetzt entweder:
- eine neue Schlüsseldatei angelegt werden.
Erzeugen: einen Namen und Ort zum Speichern festlegen
- eine existierende Schlüsseldatei angegeben werden, die zum Verschlüsseln dieser Datenbank benutzt werden soll:
Durchsuchen: Datei auswählen
Datenbank mit Schlüsseldatei und Passwort entschlüsseln
Hast du deine Datenbank mit einem Passwort und zusätzlichem Schlüsseldatei geschützt, brauchst du auch beides, um sie wieder zu entsperren:
- Datenbank mit KeePassXC öffnen
Ich habe eine Schlüsseldatei- Im Dateimanager die Schlüsseldatei auswählen
- Passwort eingeben
- bestätigen
Schlüsseldatei nachträglich hinzufügen
Falls du schon eine Passwortdatenbank hast, kannst du auch nachträglich noch ein Schlüsseldatei hinzufügen.
Wir empfehlen dringen vorher ein Backup deiner Datenbank zu machen. Damit verhindern wir den Verlust sämtlicher Passwörter, falls dabei etwas schief gehen sollte. (Dafür einfach eine Kopie der Datenbank mit einem neuen Namen machen. Heißt die Datenbank z.B. “Passwords.kbdx” erstelle eine Kopie namens “Passwords-keyfile.kbdx” oder so.)
- Öffne die (neue) Datenbank in KeePassXC
- Jetzt kann es sein, dass du beide Datenbanken gleichzeitig geöffnet hast:
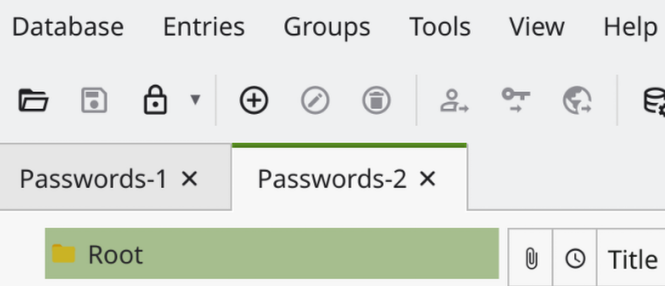
- Das ist nicht weiter schlimm, pass aber auf, dass du nicht durcheinander kommst und die falsche Datenbank bearbeitest. Schließe z.B die originale Datenbank, damit nichts schief geht.
- Jetzt kann es sein, dass du beide Datenbanken gleichzeitig geöffnet hast:
- in der oberen Leiste auf
Datenbank Datenbanksicherheit...- von hier an folge der Anleitung des Abschnitts hier drüber
- Achtung: hast du nun ein Schlüsseldatei erzeugt und gespeichert, geht KeePassXC davon aus, dass du nun nur diese Schlüsseldatei zum Entsperren der Datenbank benutzen willst. Solltest du schon auf
OKgeklickt haben, hast du auch eine solche Warnung gesehen.- Daher muss mit
Passwort änderndas Passwort nochmal gesetzt und bestätigt werden. OK
- Daher muss mit
Passworteinträge
Hier ist erklärt, wie du einen Eintrag anlegen kannst: Passworteintrag anlegen.
Du kannst existierende Einträge auch nachträglich bearbeiten (Doppelklick auf Eintrag).
Erstelle ein starkes Passwort mit hoher Entropie
Klicke auf das Würfel Icon oben in der Leiste. Hier gibt es zwei Optionen:
- Erstelle ein Passwort auf Basis der ausgewählten Zeichen
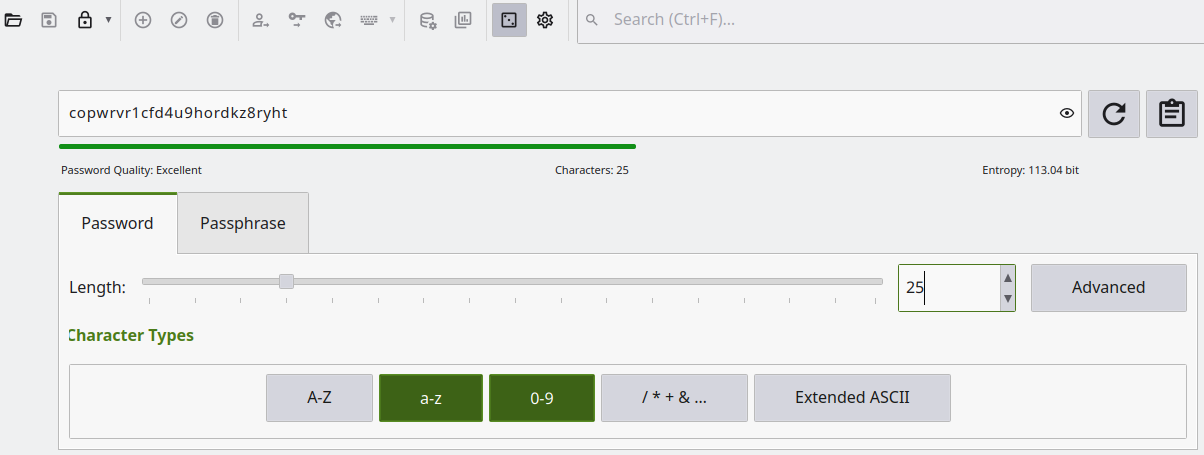
- Erstelle ein Passwort auf Grund der ausgewählten Wortliste
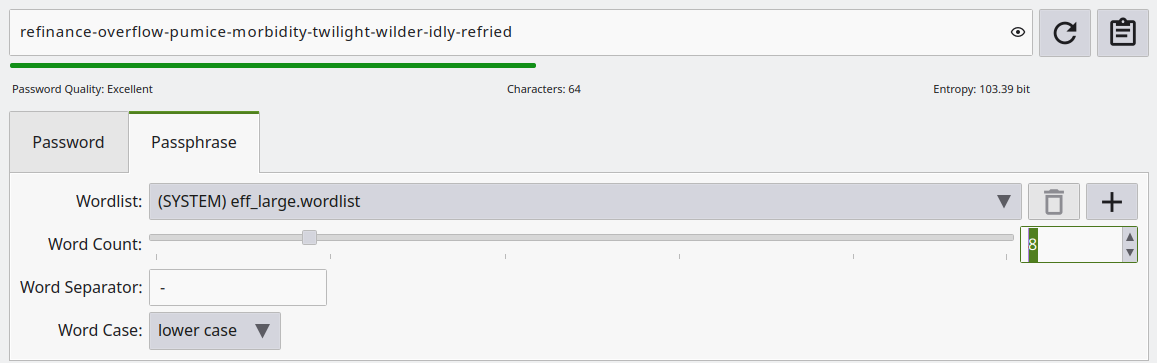
In beiden Screenshots ist die Höhe der Entropie für das generierte Passwort zu sehen. Wir empfehlen eine Entropie von 120 bits.
[!tip] You can download word lists for various languages
For example from here. You can also combine words from different languages, although you would have to do this manually, since KeePassXC only lets you select on word list at a time.
Browserintegration
KeePassXC kann in den Browser integriert werden. Durch diese Integration können Passwörter aus der Datenbank automatisch in die Anmeldefelder des Browsers eingefügt werden. Das vermeidet händischen Kopieren & Einfügen der Passwörter.
Es gibt eine offizielle Anleitung, um das Browser-Plugin zu installieren (außer für Safari).
TOTP
Offizielle KeePassXC Anleitung mit guten Screenshots.
TOTP ist eine Form der 2-Faktor-Authentifizierung, die viele Webdienste wie z.B. E-Mail oder Cloud Zugänge nutzen. Um für einen Dienst die 2FA einzurichten, braucht es zwei Dinge:
- Die entsprechende Einstellung im Webdienst, also z.B. in den E-Mail Einstellungen.
- Die Konfiguration des entsprechenden KeePassXC Eintrages für diesen Webdienst.
Die Einstellung der Webdienste sehen natürlich alle etwas unterschiedlich aus, aber in den meisten Fällen gibt es in den Konto Einstellungen:
- eine Sektion mit
SicherheitoderPrivatsphäre. - Hier sollten sich die
2FAbzw.TOTPEinstellungen finden. TOTP aktivierenoder ähnliches
Jetzt sollte ein QR-Code und im besten Fall eine zufällige Zeichenkette erschienen (Siehe KeePassXC Dokumentation). Der QR-Code ist praktisch, wenn du TOTP auf dem Handy einrichtest, da du mit den Handy-Apps einfach per Kamera das Secret auslesen kannst. Am PC brauchen wir dafür die Zeichenkette.
Sollte hier nur der QR-Code, ohne Zeichenkette auftauchen, müssen wir das Secret aus dem QR-Code heraus lesen.
[!info]
Read Secret from QR code This works with all common mobile phone cameras that can read QR codes. It is very likely that more than just the
Secretwill appear here, but rather a URL that is actually intended for mobile apps, e.g.:otpauth://totp/example.org:username?secret=PABRSLZNHFLAIENT&issuer=ExampleThesecretis hidden here betweensecret=and the next special character, in this case&issuer....Our
secretis therefore:PABRSLZNHFLAIENT.
Secret kopieren
Nun gehen wir in die KeePassXC Datenbank:
- Rechtsklick auf den entsprechenden Passworteintrag
TOTPTOTP einrichtenSecreteinfügenOK
Jetzt sollte neben dem Passworteintrag eine kleine Uhr zu sehen sein. Die symbolisiert den temporären Charakter der TOTP Codes. 
Wir müssen abschließend die TOTP-Einrichtung synchronisieren. Dafür muss der aktuelle TOTP-Token wieder in den Einstellungen des Webdienstes eingegeben werden. Der TOTP-Token kann auf zwei Arten kopiert werden:
Steuerung+T, oderRechtsklick>TOTP>TOTP kopieren
Wir gehen wieder in die Einstellungen des Webdienstes:
- TOTP-Token einfügen
- bestätigen
Jetzt solltest du angezeigt bekommen, dass die Einrichtung erfolgreich war.
Backup
KeePassXC bietet eine automatische Backup-Funktion. Damit ist sichergestellt, dass Du immer eine up-to-date Version deiner Passwortdatenbank an einem anderen “Ort” hast, als die, die du hauptsächlich benutzt.
Unter Einstellungen (Zahnrad) > Allgemein > Dateiverwaltung findet sich die Option Vor dem Speichern Backup der Datenbank erstellen. Dort kannst du einen Pfad festlegen, wo die Ersatz-Datei gespeichert werden soll.
Hier kann es sich anbieten, einen Cloud-Speicher anzugeben, wenn du die Datenbank nicht schon darüber synchronisierst: Empfehlungen
[!warning] Warning {static}
Although the database is always encrypted, even in the cloud, there are scenarios that need to be considered. Read the example scenario of a potential threat here!
Synchronisation/Backup in Nextcloud
Du kannst deine KeePassXC Datenbank auch via Cloud über mehrere Geräte hinweg synchronisieren. Schau dafür in unsere Nextcloud Anleitung.
Das Prinzip funktioniert auch mit iCloud, OneDrive, Dropbox, etc.
Monero wallets
[!toc] Table of Contents
There are two main applications for using the Monero cryptocurrency on desktop operating systems:
- The official, open-source Monero GUI wallet
- The open-source Feather wallet.
From our experience, Feather is the most easy to setup and interact with.
Install Feather
Feather can be installed on all desktop operating systems. See their documentation for specific instructions. Especially for Linux, we would recommend installing feather through flatpak and not as a standalone executable or AppImage, as this is more secure.
Use Feather
With feather, you can easily send and receive Monero. Although we would like to add some tips in the future, for now refer to the official feather documentation. Have a look at:
For sending and receiving Monero, you will always have to use an “address” which you can think of as an anonymous and (if you wish) temporary IBAN.
Nextcloud
[!toc] Table of Contents
Nextcloud is often used as a privacy-preserving alternative to Google Drive, iCloud or other commercial Cloud providers. Nextcloud is open-source software that can be installed (hosted) by anyone on their own server. Solidarity-based technology collectives sometimes operate their own “instances.” “Instances” are the individual Nextcloud installations, e.g., those of different groups/associations/companies, etc. Depending on the settings of the respective instance, the individual Nextcloud is completely “self-sufficient,” meaning it has nothing to do with other instances.
[!tip]
Nextcloud can be an attractive tool for political groups to organize their work with shared passwords, calendars, documentation, pads, etc.
We have two articles on how to use nextcloud with encrypted folders as a group and how to use KeePassXC as a group.
Account management
If you want to use the cloud as a group, the problem arises as to which user owns the shared data (documents, calendars, deck boards, etc.). In most cases, we recommend the use of teams for groups.
Teams
- Each member of your group gets a personal account.
- In addition, you create a group account as an admin, which is managed by several people.
- Use the group account in the Collectives app (if available) to create a collective for the group.
- Add all personal accounts under
Manage members. - If necessary, grant admin rights to individual accounts.
- Next to “Teams,” click on the “+” and add a description.
- Add all personal accounts under
[!note] Technical detail: Why not in Contacts?
You could also create the team under
Contacts, but then the team would belong to you, which we want to avoid, as described below. If the Collectives app is not available, create a team underContacts, but keep in mind the problems with this (see warning below)
Now you have created a collective “team” (with the group account). From now on, you can share pretty much everything you do in Nextcloud with this team: files, calendars, Kanban boards (Deck app), polls, etc.
However, there is one thing to keep in mind: Ownership. All files (including calendars, Kanban boards, etc) always belong to the account that created them! Even if these resources (technical term) are then shared with the entire team, they still belong to the creator account.
[!warning]
If the creator account of a resource is suddenly deleted, all files belonging to that account will also be deleted!
[!tip]
It is therefore highly advisable to create all shared resources with the group account and share them with the team from there.
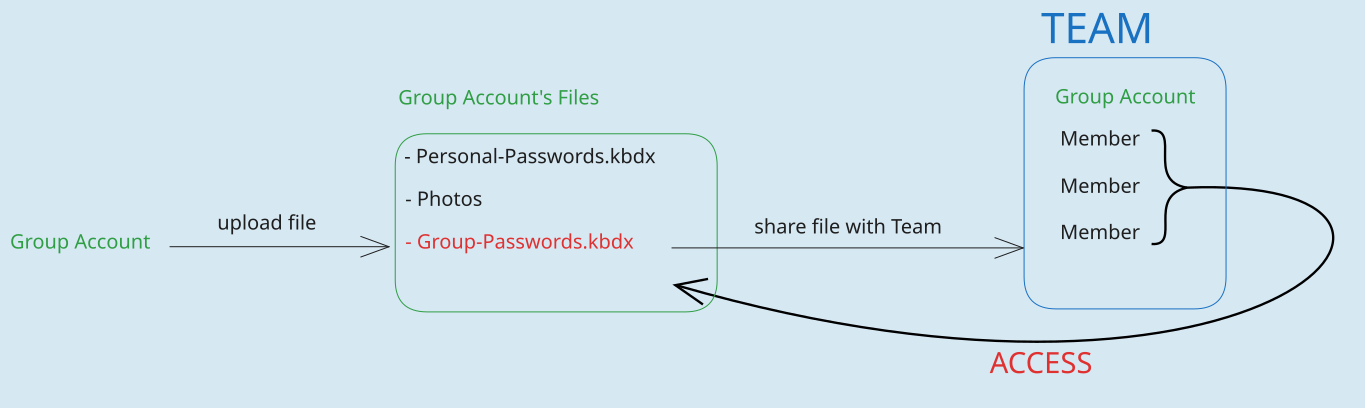
The graphic above shows that the group account uploads a password database to its files and then shares this file with the team. They can then access this file.
This makes it easy to add or remove people from your team/collective later on. You don’t have to share all resources again for each new person. You can also easily pass on the administration of the admin account, and it’s no problem if the original admins become inactive.
Conversely, individual accounts can be removed from the team with a single click, so that they no longer have access to group resources.
Transfer ownership
If you ever lose access to the group account, you can transfer ownership of a file created from your personal account to the group account. Nextcloud provides its own instructions for this.
- However, the transfer must always be confirmed by the group account (to which ownership is being transferred) before it takes effect.
- Experience has shown that it can take a few minutes for the group account to receive the confirmation notification. You may therefore have to wait a little while.
Credit: This article was partly influenced and copied from https://wiki.systemli.org/howto/nextcloud/gruppen
App passwords
[!toc] Table of Contents
Nextcloud allows you to create app passwords. This allows you to assign a different password to each device or app that you connect to your account. The advantage of this is that you can easily revoke access to your account for individual devices or apps from your account settings.
- Log in to the cloud and click on the avatar in the top right corner
![]()
- Select
Settings>Security
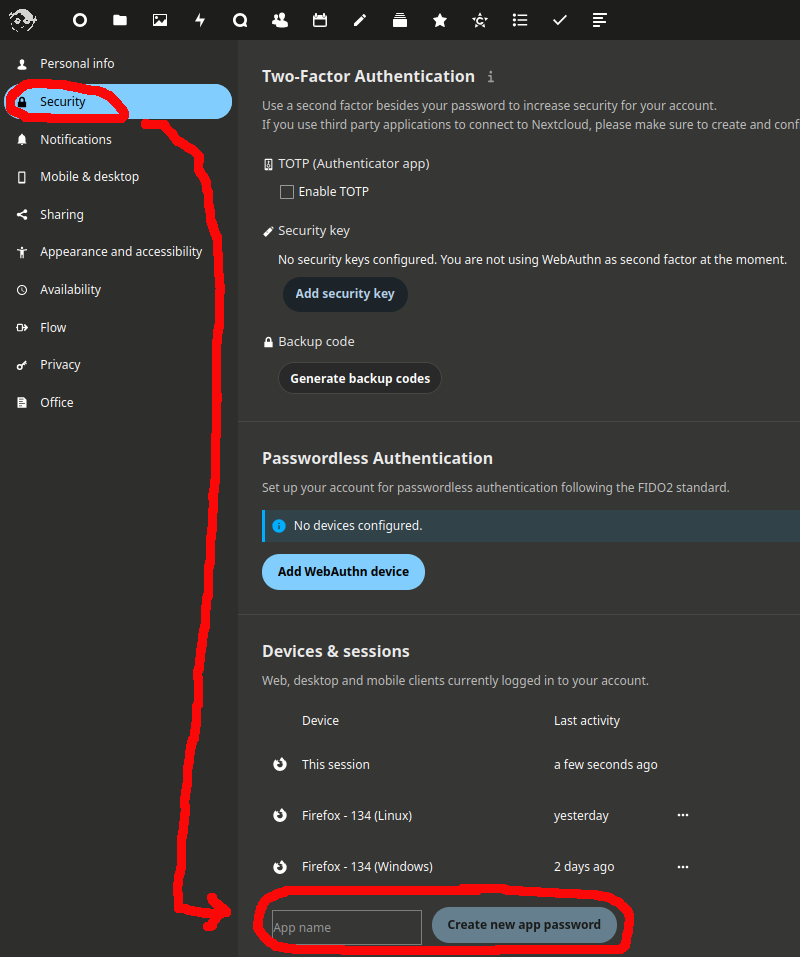
Here you can create a new app password:
- First, give the new password a name so that you know what it is used for later. Give each app password a unique name so you don’t accidentally revoke access to the wrong application. Here, we will call it “Sync Client.”
- Click
Create new app password
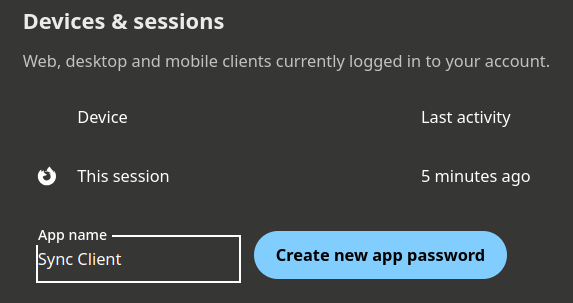
The password is now displayed for the first and last time! So make sure you copied the password to the application you want to connect with Nextcloud you before close the password window. In case you closed the password window too early, simply delete the lost password and create a new one instead.
The button Show GR code for mobile apps allows Nextcloud apps for mobile devices to log in once. In case you want to connect Nextcloud to a mobile application, this is more convenient then typing the password manually.

Here we can see the different “sessions” that can access our account.
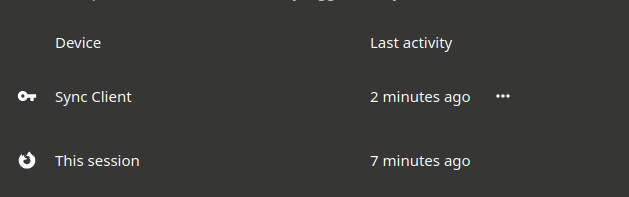
Delete old sessions
Here you will notice that every time we log in to the browser and do not log out later using the Logout button, this “session” remains valid. This is a bit annoying, as we quickly lose track of whether these are our own “sessions” or whether, for example, an attacker has logged in in the meantime.
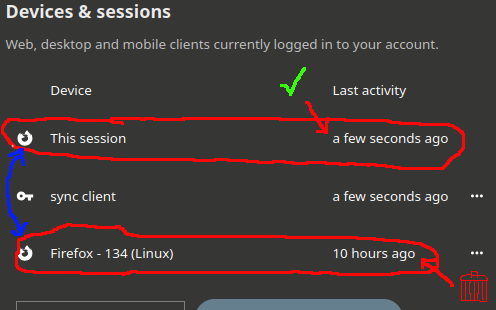
Here, for example, you can see that we did not log out properly 10 hours ago, but simply closed the browser window. The session is theoretically still valid, but no longer useful to us. So we delete the old session.
Synchronize Nextcloud on devices
[!toc] Table of Contents
Nextcloud Sync Client
The Nextcloud Sync Client is Nextcloud’s own software for synchronizing content in the cloud with your own devices (PC, mobile phone, tablet). Installation and setup is very easy in most cases.
Content synchronization means that Nextcloud creates a folder on the device where all files from the cloud are stored. If a file in this folder is changed, it is changed directly in the cloud and thus also on all other devices linked to it. An example for the practical use of synchronization is described in the module Using KeePassXC as a group
Installation
- Download and install the sync client: https://nextcloud.com/install/#desktop-files
Setup
Login- Enter the URL of your cloud instance (where you have an account)
- A browser window with the cloud login should then open
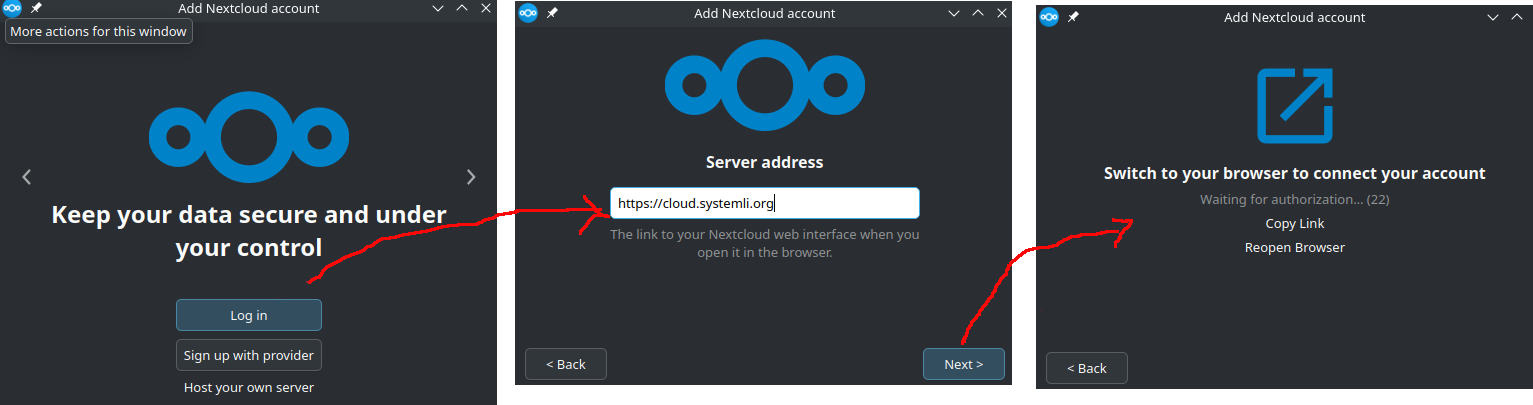
There are two options here:
- Log in with your normal login details
- For more security:
Alternative log in using app password. Quickly follow our instructions on how to set up an app password and come back here!
[!warning]
If you have 2FA enabled in your general settings, you won’t be able to log in with your main (normal) password here, since the client app does not support 2FA.
In this case you have to create an app password. We recommend using this anyway.
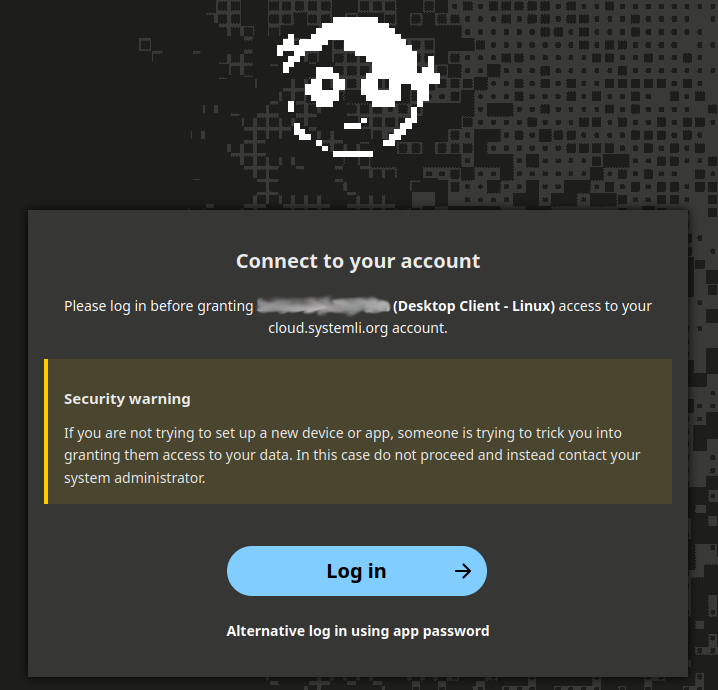
Once we have logged in, a configuration window appears where we can specify which folders from our cloud should be synchronized with our computer. We can either select specific folders (Choose what to sync) or simply select all. Under Choose different folder, we can also specify where the synchronized Nextcloud folder should be located on our computer.
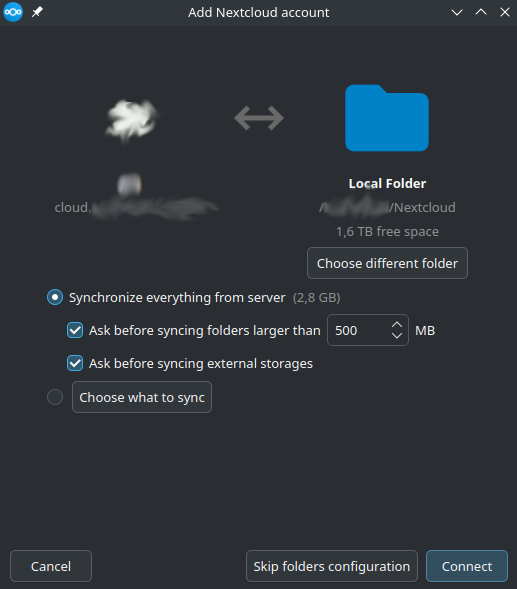
Depending on how much data we have in the cloud, the synchronization process may take a while. Once the synchronization is finished, we should have all our personal cloud files directly accessible on the computer in the specified Nextcloud folder.
Encrypt your files in Nextcloud
Per default, files in NextCloud are not end-to-end encrypted. While they could be stored on an encrypted server, end-to-end encryption has to be setup additionally. If you want to understand what end-to-end encryption means, have a look at the following article. Although it is on E2EE in email, the described example works here too, just without a second server involved.
[!tip] The easiest way to encrypt you files in Nextcloud (or any other cloud), is by using Cryptomator! Go ahead and checkout our short guide, or the official user manual!
You may later want to adjust which files you want to sync. So if you wonder, why you big folders are not present on you computer, you have to enable syncing them n the settings:
In the sync client, click on you profile name on the top left >> Settings >> Select
Create secure passwords with Diceware
[!toc] Table of Contents
Diceware is a method for generating passphrases/passwords using dice and a word list. These contain genuine randomness and, if sufficiently long, can be considered secure.
This tutorial briefly describes how you can create a secure password in just a few steps. Detailed instructions on Dice-Generated Passphrase can also be found on the EFF Website.
[!tip] Tip {static}
We recommend that you read the page on passwords first. There, we also explain how long your passphrase should be and why they should be generated randomly. In any case, it is not sufficient to think up ‘random’ words yourself or select them from a list. We also recommend that you use a password manager so that you only have to remember a few really secure passwords.
Concept
The idea is that you select different words for your password from a list of approximately 7,000 words. This gives you a password that is easy to remember and still contains real randomness. All you need is a dice.
Step 1
Select a word list in a language you are comfortable with. If your language is not in the list, you can find a word list by searching for “Diceware Wordlist” + “language.” Choose a list that is designed for at least five dice, i.e., contains at least 7776 words.
For this example, we will use the EFF Long Wordlist. However, you can also use any other list designed for five dice.
Step 2
Now roll the dice five times and write down the results in the order you rolled them. For example: 14314
Now look up the word that matches this number in the word list.
In the EFF’s Long Wordlist the word corresponding to 14314 is bucktooth.
Step 3
Repeat step 2 at least six times.
You should now have six words. For example:
battery tacker horses blow counter note
Congratulations! You just created a secure and truly random passphrase!
Step 4
If there is no immediate danger of repression, write the password on a piece of paper and enter it once or twice a day. After one to two weeks, most people can remember their new password well. Then destroy the piece of paper!
There are different techniques for better remembering random passphrases. For some people, making up a story to go with the words can help to remember them better.
[!technical] Technical
The recommendation to use six words comes from the official EFF Guide to Diceware
Signal
[!toc] Table of Contents
- Set up registration PIN
- Self-destructing messages
- Restrict push notifications
- Create usernames
- Disable
Find by phone number - Multiple Signal accounts on one device
Credit: Sämtliche Inhalte dieses Artikels wurden 1-zu-1 aus dem Signal Bereich des LG-Wikis übernommen.
[!tip] Tip {static}
In addition to the following practical guides, we have a general article, in which we discuss the advantages and disadvantages of Signal and other messengers.
Register an anonymous account
Since Signal requires a phone number for creating an account, you should evaluate whether it is necessary for you to use an anonymous phone number not linked to your name. If you can’t find a local shop selling anonymous SIM cards, you can also have a look at our article about online SIMs.
Registrations PIN einrichten
Es ist sehr wichtig, dass du in Signal eine PIN einrichtest. Diese schützt vor unberechtigter Neuregistrierung. Dein Netz-Provider muss auf richterlichen Beschluss hin SMS an die Polizei umleiten. Ohne PIN kann die Polizei Signal mitlesen - aber das merkst du, weil du dann selbst aus Signal raus fällst: es kann nur ein Handy bei Signal registriert sein.
So geht’s:
- iOS: tippe deinen Avatar an » Einstellungen » Konto
- Android: Einstellungen » Account (Konto) » Registration Lock (Registrierungssperre)
Verschwindende Nachrichten
In einzelnen Chats/Gruppen:
- Im Chat oben auf den Namen klicken
Disappearing messages
Es lässt sich auch ein default Zeitraum einstellen, dass das Feature für neue Chats automatisch aktiviert ist:
EinstellungenPrivatsphäreDisappearing messagesDefault timer for new chats: set a time interval, e.g. 1 week
Restrict push notifications
Here we explain, why we recommend this.
iOS
- Click on your profile picture and open
Settings NotificationsNotification Content- Select
No Name or Content
Android
- Click on your profile picture and open
Settings NotificationsShowand SelectNo name or message
Nutzernamen erstellen
Nutzernamen ermöglichen es dir, deinen Kontakt mit anderen zu teilen, ohne dabei deine Telefonnummer preis zu geben. Für mehr Informationen, schau in den Signal Blog.
Einstellungen- oben auf die eigene Handynummer klicken
- hinter dem
@einen Nutzernamen festlegen
Der Nutzername muss am Ende einen Punkt und mindestens zwei Ziffern beinhalten, zB: username.12. Es können aber auch mehr Ziffern hinter dem Punkt sein.
Deaktiviere Per Telefonnummer finden
Du kannst verhindern, dass dein Signal Account mit der Telefonnummer gefunden werden kann. Das macht es schwerer für Leute, die deine Telefonnummer kennen, herauszufinden, ob du Signal benutzt. Das ist vor allem wichtig, wenn du in einem Land lebst, in dem Signal verdachtserregend oder gar illegal ist.
EinstellungenPrivatsphäreTelefonnummer- Wer kann meine Nummer sehen“:
Niemand - “Wer kann mich per Nummer finden?”
Niemand
Mehrere Signal-Accounts auf einem Gerät
Du kannst mehrere Signal-Accounts auf einem Gerät nutzen. Die Möglichkeiten sind für jedes Betriebssystem unterschiedlich, siehe die entsprechende Anleitung für dein Gerät:
Multiple Signal Accounts auf PC
Am einfachsten ist es, wenn du dir das Tool signal-account-switcher herunter lädst. Damit kannst du vier zusätzliche Signal-Accounts gleichzeitig nutzen. Dazu
- auf diesen Link klicken: https://github.com/kmille/signal-account-switcher/releases/tag/v0.1.0
- das Tool für dein entsprechendes Betriebssystem herunterladen (unten auf der Seite,
signal-account-switcher.exefür Windows,signal-account-switcherfür Linux,signal-account-switcher-mac-{amd,arm}für Mac(je nach deiner CPU)). - das Tool starten (es kann sein, dass Windows erst mal meckert, weil das ja “unsicher” sei, einfach eine Datei aus dem Internet auszuführen) und einfach auf “Start Signal Account #1” klicken. Dann öffnet sich eine neue Signal-Desktop Instanz.
Wenn du keine Lust hast, ein extra Tool dafür zu installieren, kannst du das auch mit etwas manueller Konfiguration selbst machen:
- Anleitung für Windows: https://www.youtube.com/watch?v=TejhH80jktE
- Anleitung für Mac:
- dazu erst die Kommandozeile/Terminal öffnen
- Füge den folgenden Befehl in das Terminal ein und drücke
Enter
mkdir $HOME/Library/Application/Signal-Account-1
/Applications/Signal.app/Contents/MacOS/Signal --user-data-dir=“$HOME/Library/Application/Signal-Account-1”
Multiple Signal Accounts auf Android
Molly
Es gibt den Signal Fork Molly, der neben der normalen Signal App installiert und mit einem anderen Account eingerichtet werden kann.
[!technical] What is a fork?
In software development, a fork is an application that is created by duplicating an existing codebase, in this case the Signal codebase, and subsequently modifying it independently of the original. Molly modifies the Signal codebase to add functionality such as having multiple accounts.
- Falls noch nicht geschehen, installiere F-Droid, einen kostenlosen App Store für Open Source Apps:
- Lade die F-Droid.apk von der Webseite herunter.
- Installiere f-droid, indem du die .apk-Datei öffnest, die du heruntergeladen hast.
- Lasse “Installation von Apps aus unbekannten Quellen” zu, wenn du danach gefragt wirst.
- Erlaube ggf. “Apps aus dieser Quelle installieren”.
- Füge Molly’s Paketquelle zu deinem F-Droid hinzu (Anleitung) auf der F-Droid Webseite. Molly ist nicht im standart Repository von F-Droid enthalten, sondern muss gesondert hinzugefügt werden.
- Gehe auf https://molly.im/download/fdroid/ und wähle Molly (wenn du gerade am Handy liest), oder scanne den QR-Code, wenn du den Artikel am PC liesst. Wähle Molly, nicht Molly-FOSS, außer du weißt, was du tust (zB keine Google-Play Dienste).
- Öffne F-Droid und refresh einmal die Hauptseite, indem du vom oberen Rand nach unten wischst. Damit lädst du Infos über alle verfügbaren Apps, dies kann bis zu 2 Minuten dauern.
- Installiere Molly über F-Droid
- Suche in F-Droid nach Molly und installiere es. Lass dafür ggf. wieder “installieren aus dieser Quelle” für F-Droid zu.
Jetzt ist Molly bereit und du kannst die App ganz normal wie Signal einrichten.
Am Anfang wirst du jedoch gefragt, ob du eine zusätzliche Passwortverschlüsselung nutzen möchtest, deine Wahl kann später nicht mehr geändert werden. Für sensible Accounts ist das sinnvoll, ansonsten ist es wie bei der normalen Signal-App.
Erstelle eine Signal-PIN, die du dir wirklich sicher merken kannst, oder speichere sie in deinen sicheren password manager, aber schreib sie nicht auf einen Zettel! Dieser kann nach einer Hausdurchsuchung von der Polizei genutzt werden, um Nachrichten an dich abzufangen.
App Klone
Einige Hersteller bieten eine Dual-App-Funktion, um mehrere Accounts auf einem Handy zu betreiben. Suche im Netz, ob dein Gerät über diese Funktion verfügt. Ab Android 14 könnte diese Option standardmäßig auf vielen Geräten vorhanden sein.
Du kannst diese Funktion auch nutzen, um Signal und Molly zu klonen, so dass du dann 4 Accounts hast. Du könntest damit auch auf die Nutzung von Molly verzichten und 2x Signal nutzen, Molly ist aber sinnvoller, da Molly über eine leicht bessere Verschlüsselung und Sicherheitsmechanismen verfügt, die im Falle einer Hausdurchsuchung einen Vorteil bieten.
Du kannst die Funktion einfach in den Android-Einstellungen aktivieren:
Samsung: Einstellungen > Erweiterte Funktionen > Dual Messenger
Huawei: Einstellungen > Apps > App Twin
LG: Einstellungen > Allgemein > Dual App
Daraufhin sollte ein Menü mit allen klonbaren Apps angezeigt werden, dort kannst du Signal (und ggf. weitere zu klonende Apps) einfach auswählen und verdoppeln.
Weitere Android Profile
Android bietet die Möglichkeit, wie Linux MacOS und Windows auch, mehrere Benutzerprofile anzulegen. Für mehr Informationen, schau in die Android support page.
System updates
[!toc] Table of Contents
One of the first answers to questions about IT security is always: Install updates. Since apps and systems should always be up to date, it is advisable to set automatic updates.
Depending on your operating system, you may need to distinguish between system updates and app updates. Where relevant, we explain the differences and provide step-by-step instructions on this page.
macOS
System updates on macOS
This updates the macOS operating system to the latest version. System updates on macOS will also update all standard apps such as Mail and Safari. However, apps installed via the App Store need to be updated separately
- Click on the
Apple iconin the upper left corner of the screen. - Select
System Preferencesfrom the drop-down menu. - Click on
Software Update. - If updates are available, you can click on
Update Nowto download and install the updates.
App updates on macOS
- Open the App Store on your Mac.
- Click on the
Updatestab in the sidebar. - Here you will see a list of available updates for the apps you have installed. Click on “Update All” to install all available updates.
Automatic updates on macOS
Go to Software Update as described above and enable Automatic Updates to ensure that your system is always up to date. There is a small arrow next to Automatic Updates. Underneath it, Download new updates in the background and Install app updates from the App Store should be enabled.
Windows
In Windows, it is important to distinguish between system and app updates, mainly because all programs installed after the initial installation have their own individual update mechanisms. This means that in Windows, you must regularly check for updates for each program installed. This information can usually be found somewhere in the settings of the respective program.
System updates on Windows
- Click on the Start menu (Windows logo) and select the gear icon for Settings.
- Click on
Update & Security(Windows 10) orWindows Update(Windows 11). - Click on the
Check for updatesbutton. - If updates are available, click on
Install updates. - Click on
Restart nowif a restart is required to complete the installation.
Automatic system updates on Windows
- Go to the update settings as described above
- Click on
Advanced options - Enable
Download updates automatically
Linux
In most cases, system and app updates on Linux can be considered as the same thing. Depending on the Linux distribution, the individual settings may vary slightly, but the principle is the same everywhere.
Ubuntu (including: Debian, Mint, PopOS,…)
System updates can be performed in two ways: via desktop programs similar to the App Store, or directly with a command in the terminal. In fact, modern versions of Ubuntu should be preset to perform all updates automatically. However, this should be checked. If in doubt, take a look here.
Updates via the desktop app
- Search for
Software Updater
Updates via terminal (Ubuntu)
- Open the terminal (
Ctrl+Alt+T, or search for “Terminal” in the app menu) - Paste the following command into the terminal (
right-click,Paste)
sudo apt update && sudo apt upgrade -y && sudo snap refresh
[!technical] What does this command do?
Three commands are executed here, separated by
&&. The difference betweenaptandsnapwill not be explained here to avoid confusion. A good comparison is provided in the the following article.sudo: means “super-user do…” The following command is therefore executed with admin rights. This is necessary for updates, as programs are uninstalled and reinstalled.sudo apt update: This command basically “compares” the version numbers of your installed programs with the latest version numbers in the repository (App Store). This tells the PC which programs need to be updated in the next step.sudo apt upgrade: Based on the results of the previousupdatecommand, this command downloads the latest versions and installs them directly.-y: Theyesflag automatically confirms the upgrade process so that it does not have to be done manually.sudo snap refresh: snap is a different package manager. If you installed your apps using the graphical App Store in Ubuntu, most of them were installed usingsnap
Automatic updates (Ubuntu)
In GNOME:
- Open “Software & Updates”
- Open the
Updatestab - Under “When security updates are available,” select the “Automatically download and install” option
Fedora
System updates can be performed in two ways: via desktop programs similar to the App Store, or directly with a command in the terminal. Modern versions of Fedora usually enable automatic updates by default. However, It is best practice to check if this is the case.
Updates via the desktop app (Fedora)
See Ubuntu
Updates via terminal (Fedora)
- Open the terminal (
Ctrl+Alt+T, or search for “terminal” in the app menu) - Paste the following command into the terminal (
right-click,Paste)
sudo dnf update
Upgrade to new Fedora version (about once a year)
To update to a higher version of Fedora, refer to the official documentation from the Fedora Project.
Automatic updates (Fedora)
See above under Ubuntu.
Tails
Tails comes with its own Tails Upgrader, which automatically checks for updates and installs them. However, this requires that the system is running long enough to complete the updates. So check again before shutting down to see if any updates are available. (Open Tails Upgrader in the app menu)
It is recommended to manually upgrade your Tails installation every few months. This is slightly more secure, and will decrease the time needed for future updates. For concrete instructions, go the Tails documentation.
iOS
System updates on iOS
- Open the Settings app
GeneralSoftware Update: This will check for available updates.Download and Install. You may need to enter your password.- Accept the terms of use when prompted.
- The update will be downloaded and installed. Your device may restart during the installation process.
App updates
- Open the App Store
- Go to
Updates- Tap your profile picture or the
Updatesicon in the lower right corner.
- Tap your profile picture or the
- Tap
Update Allto update all apps.
Enabling automatic updates
For system updates
- General
- Software Update
- Here you will find the option Automatic Updates. Enable this option.
For app updates
- Open the Settings app
- Apps (usually at the bottom)
- App Store
- Enable App Updates
Android
The exact names of the menu items may vary depending on the manufacturer of your Android device, but the principle is the same across all devices.
System updates on Android
- Open the Settings app
- At the bottom, tap
About this phoneorSystem Software updateorSystem updatesDownloadorInstall. You may need to enter your PIN or password.
Automatic system updates on Android
Automatic system updates are usually enabled by default on Android. They are only accessible via the Developer Options, which should not be touched unless you know exactly what you are doing.
GrapheneOS
In theory, the above also applies to “normal” Android versions, but the following usually applies to GrapheneOS users:
If you don’t use your “Owner” profile regularly and are mostly in a user profile, the auto-updater (which only works in the Owner profile) may not always check for updates.
For all users: switch to the owner profile regularly and follow the manual method described above.
App updates on Android
Since different app stores are used here, we will simply list them all in order. While auto-updates are usually enabled by default for all of App Stores, it is best to confirm this manually.
Google Play Store
- Open the Google Play Store
- Go to “My apps and games”
- “Update all”
Automatic updates in Google Play Store
- Open the Google Play Store
- Under the user icon, tap
Settings - “Network settings”
- “Enable automatic app updates”
Automatic updates in Aurora Store
- Tap the gear icon in the top right corner
- Tap “Settings”
- Tap “Updates”
- Tap “Auto-update apps”
- Select “Install automatically.”
Automatic updates in F-Droid
EinstellungenAutomatic update interval- Here you can set how often to check for new updates. (e.g. daily)
- Activate
Install updates automatically
Automatic updates in Accrescent
Einstellungen- Activate
Automatic updates
Automatic updates in Obtainium
EinstellungenEnable background updates- For faster updates:
Allow parallel downloads
VeraCrypt
[!toc] Table of Contents
- Open VeraCrypt
- Encryption Options
- Option 1: Volume Size
- Set password
- File system settings
- Random generator
- Encryption process
- Change password later
The software VeraCrypt is required for all methods mentioned here. This means that this program must be installed on your PC in order to encrypt and decrypt (reopen) encrypted storage, such as folders or USB sticks.
Encrypt entire hard drives/USB sticks or folders with VeraCrypt
There are two main ways to encrypt an entire USB stick or hard drive:
- Create and encrypt a folder that is as large as the entire storage medium.
- Encrypt the file system of the hard drive itself.
Because a lot can go wrong with option 2, we generally recommend option 1. This should not have any disadvantages. This also means that with option 1, the process for encrypting individual folders or the entire USB stick/hard drive is identical.
However, if the device to be encrypted is formatted with FAT32 and is larger than 4 GB, this will not work, which is unfortunately often the case.
[!technical] Details about FAT32
New USB sticks are often delivered with FAT32 formatting. This is a problem since files larger than 4 GB cannot be stored on FAT32 and similar formats.
Since the USB stick is probably larger than 4 GB, option 1 would also require a file (in this case - the encrypted folder file) larger than 4 GB to be created on it, which will fail in this case.
If your storage medium has this type of formatting, it must either be reformatted for option 1, which requires other software, or option 2 must be selected.
[!technical] Reformat your drive
By formatting your drive, you will lose access to your data. However, authorities might still be able to recover it. The following are instructions for reformating your device to exFAT:
From now on, we will describe both options in parallel. If there are differences between the two options, they will be marked with the headings “Option 1” or “Option 2.” The rest applies to both options.
Open VeraCrypt
- Click on
Create Volume
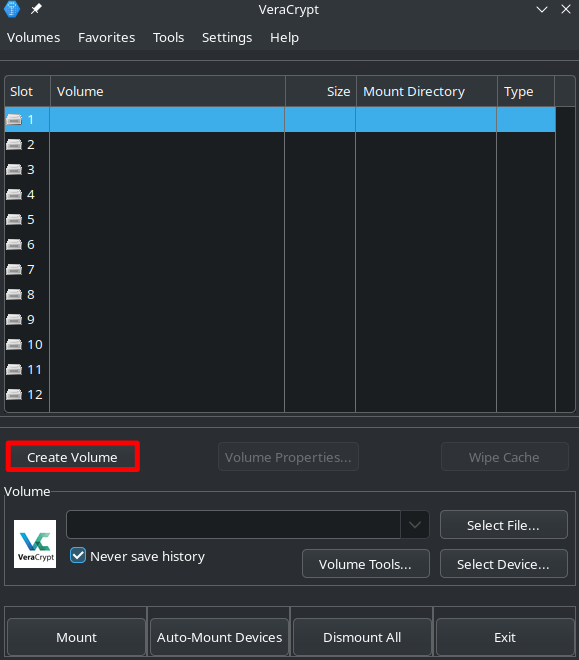
Option 1: Create file for encrypted container
The encrypted “folder” is actually just a file, called a container in VeraCrypt. We can only use it later as a normal folder when it is opened and decrypted via VeraCrypt.
[!info] Note {static}
- A VeraCrypt container is just a file for the PC
- For us, the container will look like a normal folder when decrypted
- Here, we select a “Encrypted file container”:
Next>
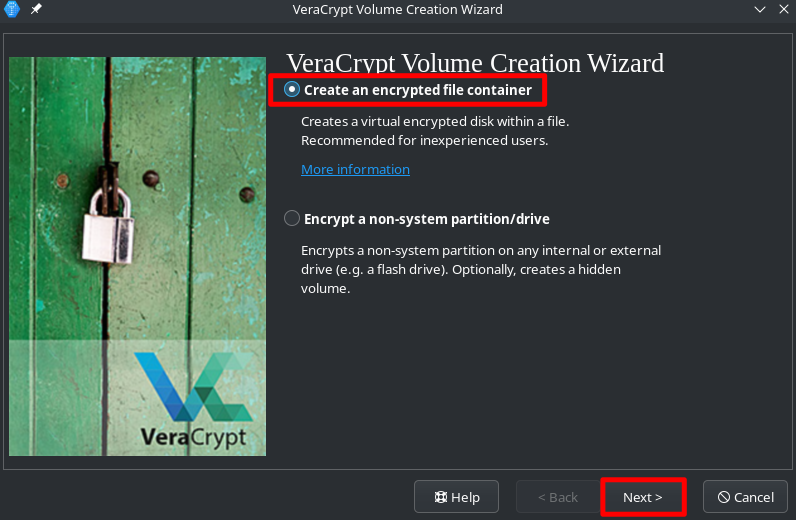
- Then select
Standard VeraCrypt VolumeandNext>
Under the Location menu, we now select the location where VeraCrypt should store the container for us. This should, as said, be our USB stick/hard drive.
- Fist click
Select File - This will open the file manager. Navigate to the USB stick/hard drive that you want to encrypt.
- Now we create the container, which will later become our encrypted folder. Enter a name for the file in the field provided. The name is technically irrelevant, but it will be the name of the file that you will see later when you simply insert the stick and open it.
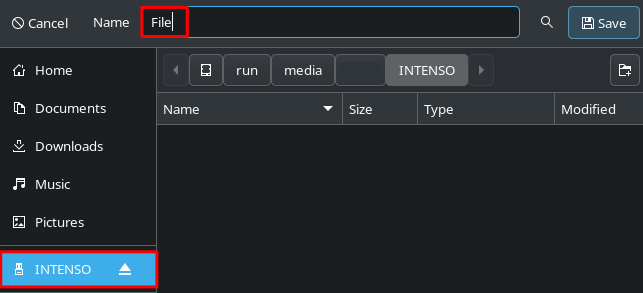
- Confirm with
Save
Option 2: Encrypt the entire file system
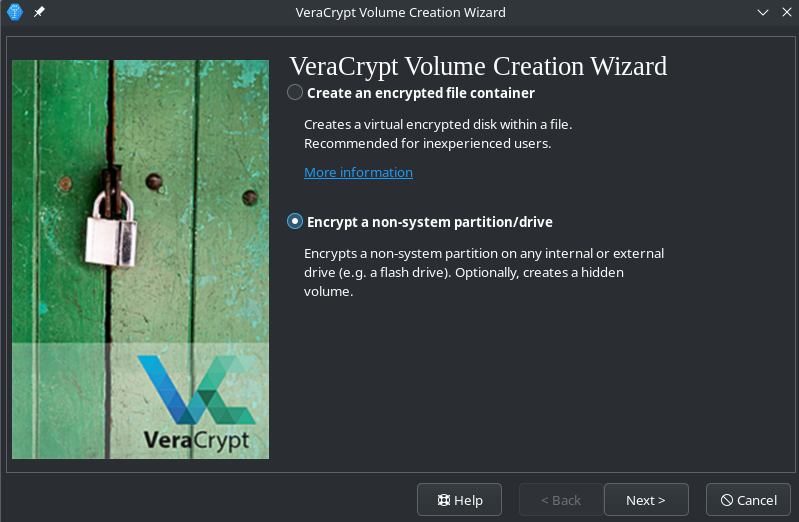
Standard VeraCrypt Volume>Next>
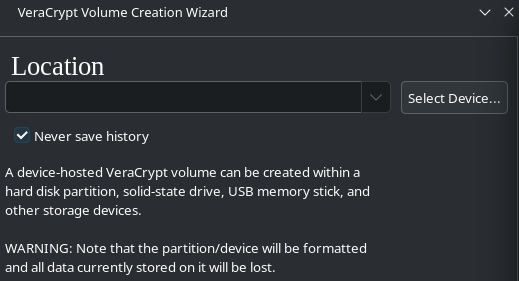
Now we have to select the storage medium.
[!warning] Attention {static}
The list now shows all available storage media connected to the computer, including other hard drives, USB sticks, SD cards, etc.
All files on the device selected here will be irretrievably deleted, so make sure you select the correct device!
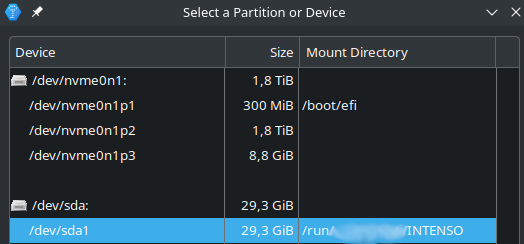
It is usually helpful to look at the storage size to identify the correct stick. If you want to encrypt a hard disk that may be the same size as other connected storage media, you must look at the path/mount points, which can include the name of the device. In the above screenshots you can see two devices with 3 and 1 partitions: nvme0n1* and sda*. The listings directly below them are their separate partitions.
For example here, the upper nvme0n1 device is a 1.8TB (~2TB) large SSD, while the lower sda one is a 29,3GB (~32GB) USB drive.
If you are still not sure which device or partitions is the correct one, remove the device you want to encrypt and check the list again. The ones that still show up, are not the right ones!
- Once you are sure which device should be encrypted, confirm the warning that all files on the selected device will be destroyed.
Encryption Options
The default settings should suffice. Explaining the technical details would go beyond the scope of this guide. If interested, you can read more about the different encryption algorithms here.
- Click
Next>
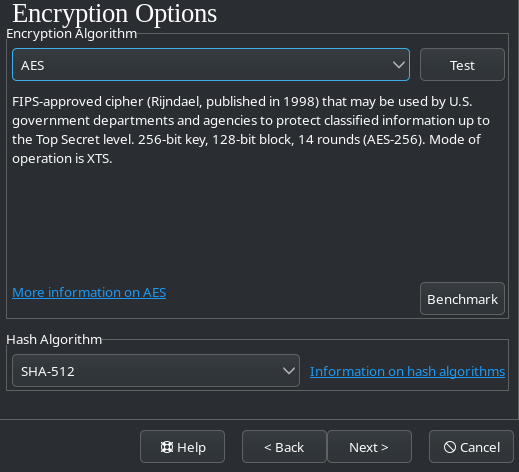
Option 1: Volume Size
Here we specify how large the container (folder) should be later. You can choose any size depending on the amount of free storage space available.
[!info] {notitle}
Just keep in mind that if you want to put a file that’s 100 MB in the folder later, you should choose a bit more space here, like 110 MB. That’s because the encryption itself takes up some space.
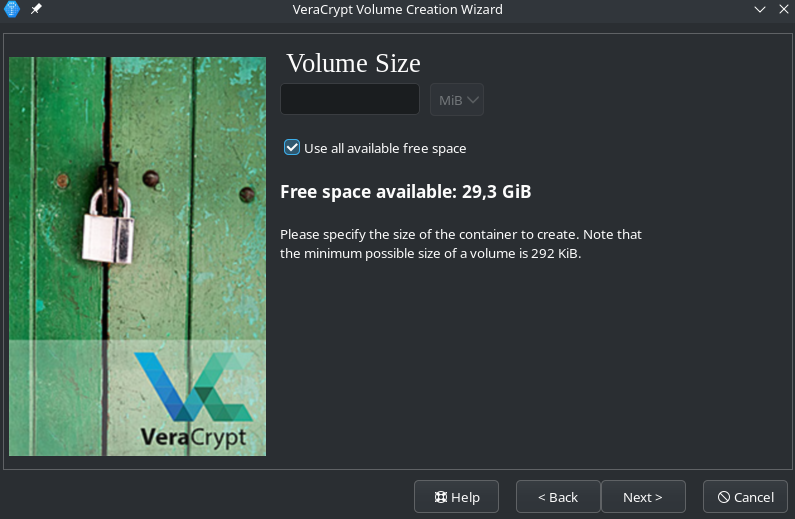
Option 1: Folder as large as the entire stick
As you can see in the image above, there is an extra checkbox to use all available space for creating the container (folder).
[!info] Example
So if there is already 1 GB of data on a 4 GB stick, the new container will be 3 GB with this option and the existing data will remain intact.
This is why we chose the first option at the very beginning, because with the second option, all data will be deleted if, for example, the wrong hard drive is selected.
A warning appears stating that files larger than 4 GB cannot be stored on FAT32. You can simply click OK here, if you made sure, that your drive is not formatted as FAT32.
Set password
Here you can set the password that will be used to encrypt the container. You should choose a strong password, otherwise it can be easily guessed.
It is best to generate and save a password using a password manager such as KeePass:
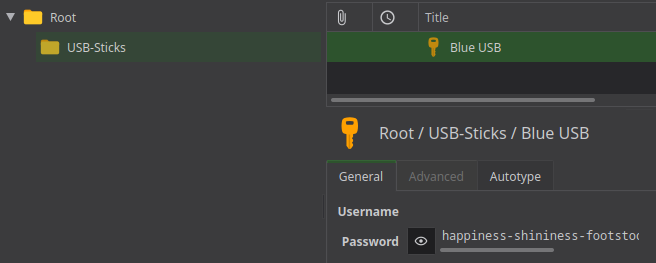
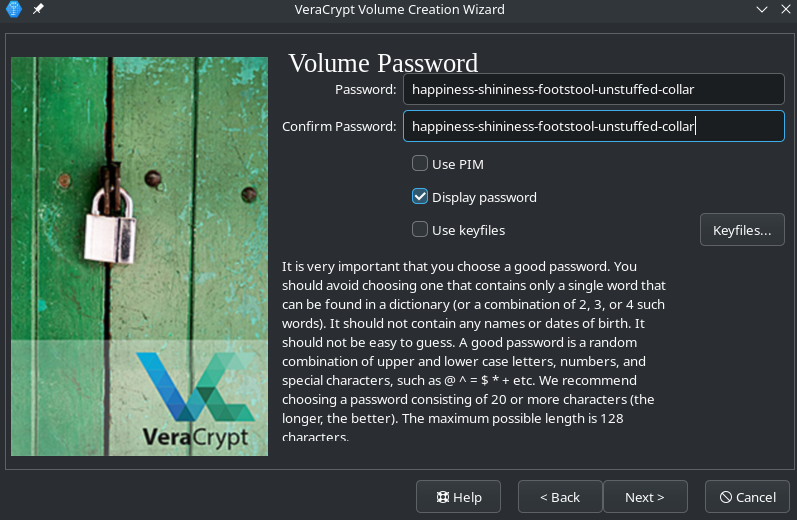
File system settings
Now we are asked whether we want to store files larger than 4GB in our folder.
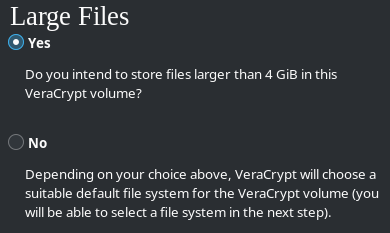
If you are sure that you do not want to do this, click no, otherwise click yes. Next, a file system must be specified.
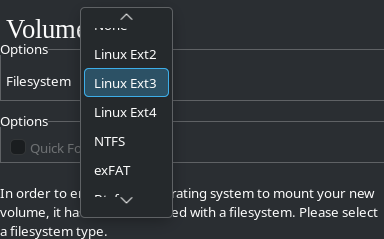
- Select
exFATif you want to use the storage on Windows computers. - Select
ext4if you only want to use the storage on Linux and MacOS. - Select
NTFSif you only want to use the storage on Windows and Linux. Although NTFS is not made for Linux itself, Linux can handle it fairly OK.
The respective platforms may be able to handle all formats, but these recommendations should work without any problems.
Quick Format
The checkbox next to Quick Format is usually only available for option 2. It means that the storage will not be overwritten with random bits during encryption. The advantage of this is that, especially for large data carriers, the encryption process is extremely shortened and only takes a few seconds.
However, this also brings uncertainties with regard to security, which is why we only select this option if:
- No sensitive data has ever been stored on this storage medium. (Never really means never, see Data hygiene), or
- The storage medium is already encrypted, its password is not known to any adversary, and it is only being encrypted “again” (for whatever reason).
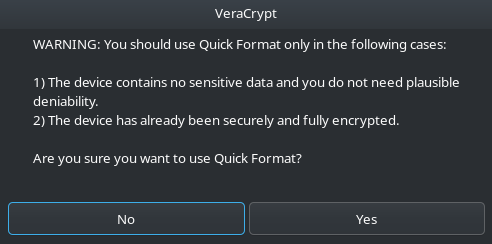
[!tip] {static}
The safest option is to use Quick Format only for brand new storage media!
Next, specify whether you want to use the storage medium on operating systems other than your current one (if in doubt, always select this option, just in case).
Random generator
The “Random generator” window will now open. Without going into further detail, it should be noted here that good encryption depends on randomly generated data being “mixed in” with the encryption.
Since computers are not perfect at this, VeraCrypt asks you to make random movements with your mouse in the window. This slowly fills the blue bar under “Randomness Collected From Mouse Movements.”
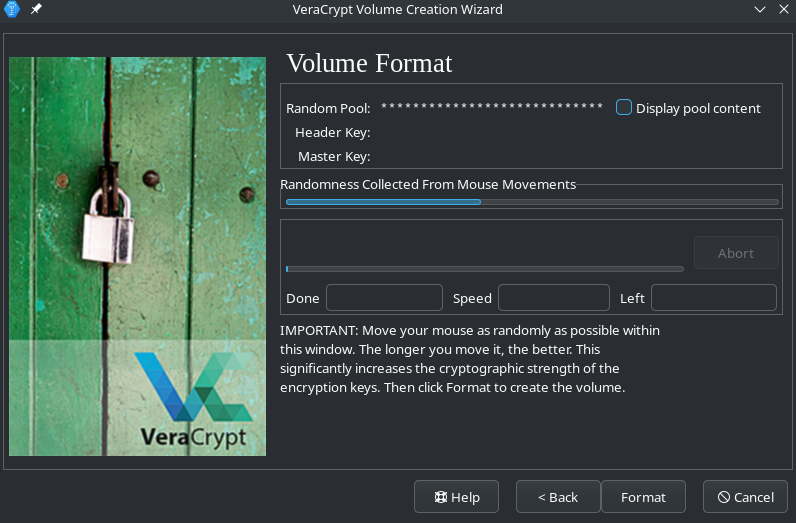
The bar should be at least half full. The more the better!
- Click
Next>once the bar is full enough
Encryption process
VeraCrypt now begins to encrypt the file in the specified size and with the selected settings. To do this, it first writes random “ones” and “zeros” to the entire container (unless Quick Format is selected). Depending on its size and speed, this can take from a few minutes to several hours.
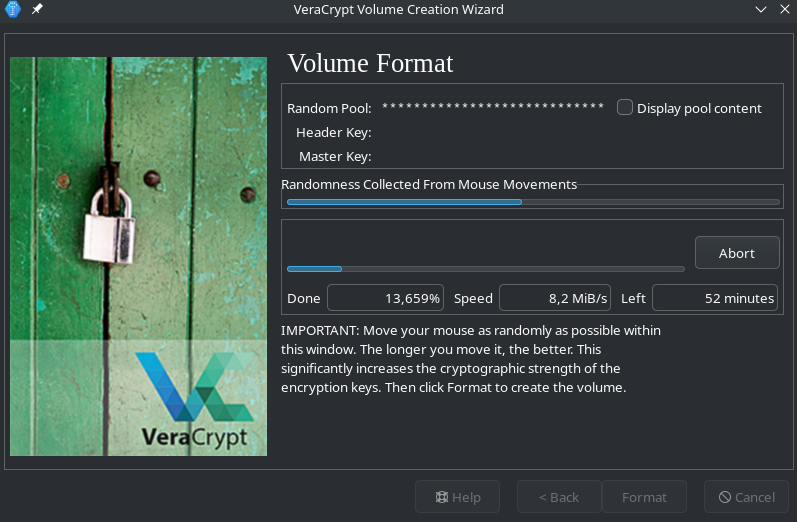
Change password later
You can also change the password of a VeraCrypt container later.
- Mount container
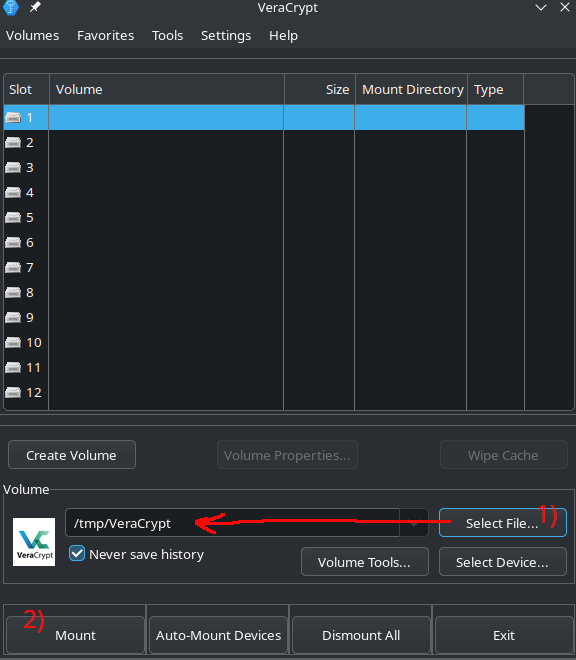
- Click
Change Volume Password
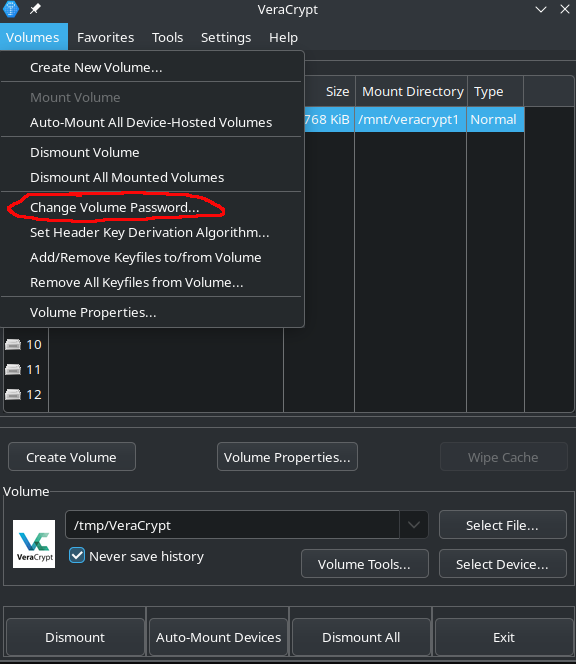
- Enter the old password at the top and the new password twice at the bottom. _(Tip: Generate and save passwords with a password manager)
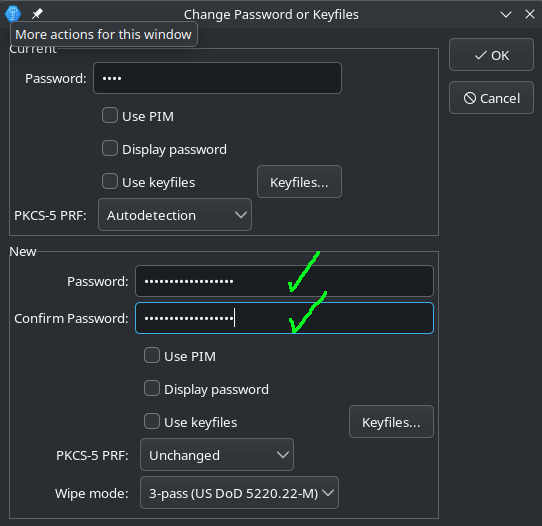
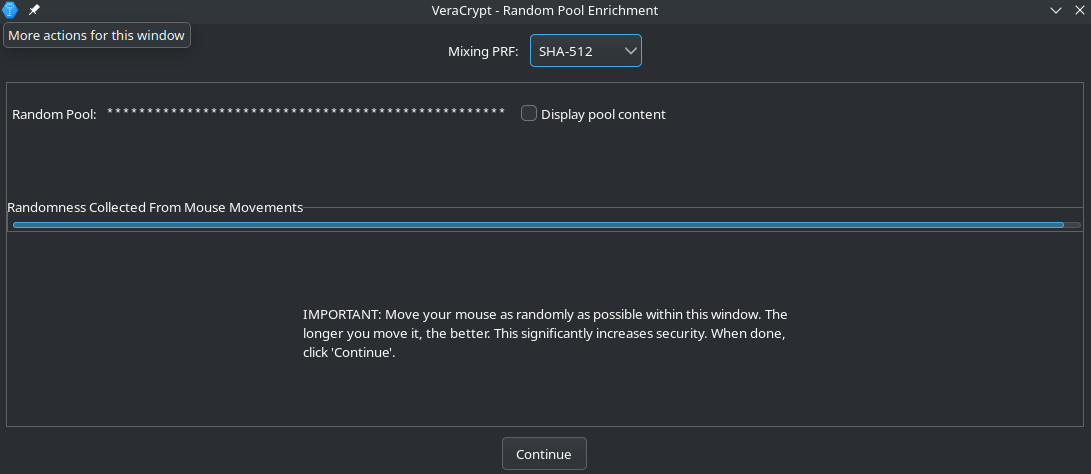
Installing VeraCrypt
[!toc] Table of Contents
Downloading the installer file
To install VeraCrypt, you must first download the appropriate installer file. Installer files for various operating systems are available on the VeraCrypt website.
Verifying the installer file
Before installing VeraCrypt, it is important to verify the authenticity and integrity of the downloaded installer file. Integrity means that the file has not been damaged or tampered with during the download. Authenticity means that we downloaded the file from the intended source and not from someone posing as VeraCrypt. The verification is done using two verification techniques: checksums and PGP/GPG signatures.
[!technical] How does the verification work?
The developers calculate a hash value from the file they make available for download. This quickly shows whether a file has been tampered with during download or is incomplete. The developers sign the hash value of the download file with their private PGP key. The result of this is called a signature. We can now verify the signature by trying to decrypt it with the appropriate public PGP key. A program usually helps us with this. The correct signature indicates that it was the developers themselves who provided the download file and the hash value.
Installing PGP
For the next steps, we need to install a program that can handle PGP signatures. This is already pre-installed on Linux. For Windows, it must be downloaded here and installed. For MacOS, homebrew can be downloaded and installed.
Downloading, verifying, and importing the developers’ public key
First, we need the developers’ public PGP key. This allows us to verify that the signature of the download file is correct. The public key can be downloaded here and saved under Downloads. Now you need to check that you have downloaded the correct key by comparing the public key fingerprint (a unique identifier for a key). To do this, open a CMD window in Windows or a terminal in Linux/macOS and enter the following:
cd Downloads
gpg VeraCrypt_PGP_public_key.asc
The fingerprint (36-digit number) that is displayed must match the one on the Veracrypt website. If it does, the key is correct and can be imported. To do this, go back to the CMD window in Windows or the terminal in Linux and enter the following:
gpg --import VeraCrypt_PGP_public_key.asc
Make sure that you are in the folder or directory in which the public key is stored, e.g. Downloads.
Download the signature from VeraCrypt
Now we need to download the signature matching the installer file from the VeraCrypt website and to save it in Downloads. It is important to download the signature that is directly behind the installer file you downloaded earlier.
Checking the signature of the installer file
Now we use the signature and the public key to check whether the installer file is complete and was actually downloaded from the VeraCrypt developers. To do this, open a CMD in Windows or a terminal in Linux/macOS and enter the following (replace the placeholders in [] with your actual file names):
gpg -verify [full name of the signature file] [full name of the installer file]
For example: gpg --verify veracrypt-1.26.20-Ubuntu-24.04-amd64.deb.sig veracrypt-1.26.20-Ubuntu-24.04-amd64.deb
The output should now read “Signature OK from 'VeraCrypt Team (2018 - Supersedes Key ID=0x54DDD393) <veracrypt@idrix.fr>' [unknown]”. The installer file is now trusted and can be installed. You can ignore the warning that the key does not have a trusted signature.
VeraCrypt Installation Process
Double-click on the installer file to install VeraCrypt.
Updating VeraCrypt
In some cases, VeraCrypt may prompt you to update automatically, which is the preferred update process since it is quick and simple.
If VeraCrypt does not ask to automatically update, a manual update works in the same way as the above. You need to download the installation file, verify it, and then install it again, replacing your outdated version. This should be done every time a new version is available.
Seizure of devices
[!toc] Table of Contents
After seizures, there is often a lot of speculation about what information could potentially be found on the devices. In these moments, we remember all the little “security sins” we have committed over the years: photos, chats, contacts, etc. that were not deleted.
The shock often hits hard and is mixed with concern about what the rest of the group will say when they find out that our mistakes could now cause problems for them too.
It is precisely at these moments that we ask ourselves:
[!quote] Why didn’t we prepare better for this?! {static}
That’s exactly what this module is about:
[!success] Goals {static}
- Here, we want to walk through the preparation and follow-up of a seizure of technical devices.
- In doing so, we want to help you take possible precautions and take the necessary measures to limit damage afterwards.
Prevention
We should think carefully about the following things in advance, as they can save us a lot of stress afterwards.
Encryption
- Are the devices encrypted?
- Are they encrypted with strong passwords?
- Are all storage media such as USB sticks, hard drives, and SD cards encrypted with strong passwords?
Passwörter
- Are all passwords stored securely in a password manager?
- Is there a current backup of the password database in a secure location, so that you can recover easily, when your daily password database get’s confiscated?
- Are there any passwords written down on paper lying around somewhere? If so, destroy them.
- Have you set up two-factor authentication on at least all important accounts? Especially email accounts, because they can often be used to reset passwords from other services, that you used this email for.
Datenhygiene
The less data you accumulate, the less data can be seized from you: Read the article on data hygiene:
[!tip] {static}
- When data is collected, ask yourself: “Do we really still need this data?”
- It is not always possible to encrypt unencrypted media drives afterwards without leaving traces. Encrypt your devices from the beginning on.
- Data that was unencrypted may still be recovered even after deletion
- Deleting encrypted data is not a problem
Signal
In Signal, you should definitely:
- Set disappearing messages be set (e.g. 1 week) so that as few chats as possible are stored on the device at any given time.
- Deactivate the option finding by phone number.
- Set the registration PIN.
Backups
Confiscation means: devices and data are gone. Can you “recover” from this loss as quickly as possible, i.e., restore your data to other devices?
Making backups is annoying, but without them, you and others could suffer significant damage. Sometimes, years of work are lost because essential data/results were confiscated and there was no backup strategy.
[!tip] {static} That’s why you should make backups!
Turn off devices
Devices are only properly encrypted when they are turned off, because after they are unlocked for the first time (immediately after booting up), the encryption key is stored in the device’s RAM.
Therefore, try to turn off your devices, before they get confiscated. House searches often happen at night, or very early in the morning. Setting up auto reboot for all you devices ensures that they will be secure at every morning!
[!tip] {static}
- Switch off devices before seizure!
- Set up Auto Reboot
Follow-up
Now the devices have been seized and are out of reach. Have all of the above points been taken into account? If yes - Good job! But what if not?
In any case, you should contact a lawyer as soon as possible and tell them about what happened. We are not lawyers and therefore cannot give legal advice. You should also discuss the following points with them if possible.
Evaluation
[!failure] What information could have been compromised by this seizure? {static}
- Who should you report this to?
- Has your account been removed from all chat groups by your comrades so that the authorities cannot read your messages.
- Change problematic group names in Signal as quickly as possible. Only that the name has been changed will be visible, but not what the group was called before. This may be useless for other messengers.
- The above last two points will only work as long as the device still has a network connection, but it doesn’t hurt to try.
[!failure] Have passwords/accounts been compromised? {static}
- Change the relevant passwords - If you haven’t already done so, set up two-factor authentication to prevent the authorities from accessing your accounts with your password.
Restore backups
Now you will want to get your data back, which will be no problem, if you’ve made your backups regularly.
Encrypt Your Group Files in the Cloud
[!toc] Table of Contents
Using a cloud to synchronize your files over devices or to collaboratively work on them as a group is very useful. The main downside is that no cloud solution offers secure, working end-to-end encryption per default, at least until know (2026).
Therefore, the easiest and safest method is to synchronize your cloud files with your device and to put your sensitive files inside an encrypted container inside the synced folder.
[!tip]
- Setup the Nextcloud Sync-Client
- Setup group permissions in Nextcloud
- Setup a Cryptomator vault inside your Nextcloud folder
Now that everyone of you has access to the encrypted folder you will have to share the password through a secure channel.
Potential issues
There may be issues, when two or more of you try to open, edit and save a file at the same time. If that happens so called “conflicts” appear, because the server doesn’t know which changes to accept first, or in which order.
[!technical] Technical
When you open a file in LibreOffice for example, there will be a file with the ending
.lockright next to the file you just opened. This small file will get synced to the cloud and from there to your friends devices. When they try to open the same file now, their programm sees the.lockfile and knows, that another program (on you device) is currently editing this file and therefore “locked” it up. The actual problems may arise, when the first person opens the file and before the.lockfile is being synced to you friends device, they open the file, too. So now both of you opened the file in editing mode. While this is completely fine in the browser, when using encrypted folders this can become part the issue described above.
Using KeePassXC as a group
[!toc] Table of Contents
KeePassXC is not actually cloud software, which is one of the reasons it is so popular - none of your passwords ever leave your own computer. However, this makes it impractical for managing different logins as a group. Every time a change is made to the database, (new password added, password changed, etc.) everyone has to be notified of the changes so that they can apply them locally.
However, similar to cloud-based password managers such as Bitwarden, we can also keep a KeePassXC database automatically synchronized across different computers, while still opening and editing the database as usual with KeePassXC.
This requires a working cloud environment for your group to be set up. We would recommend Nextcloud, as it’s not only open source, but is also hosted by various very nice tech collectives, meaning you don’t have to set NextCloud up yourself. See our instructions on Nextcloud groups and device synchronization for more information on using NextCloud.
After successful installation and setup, each member of your group should have direct access to all of your cloud files locally, i.e. directly on the computer.
Sharing the password database (and other files)
Now, the group password database, hereinafter referred to as “the database”, is uploaded from the group account to your own files:

Share file
- Click on the
Shareicon (or onDetailsunder the three dots):
![]()
- Enter the name of the team in the search field and select the team (the name may need to be written out in full):
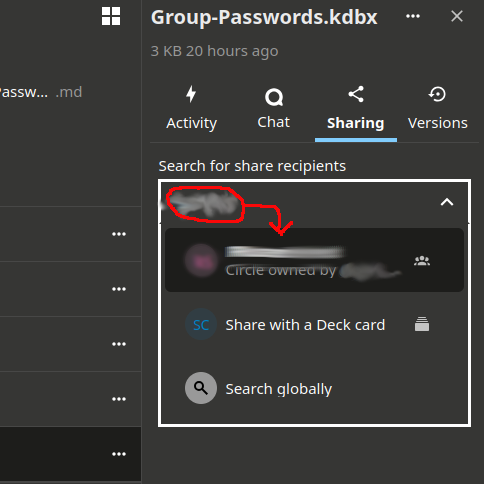
- Give the group editing rights (otherwise the team members will not be able to edit the file, which is necessary, if they should be able to add, or change passwords e.g.):
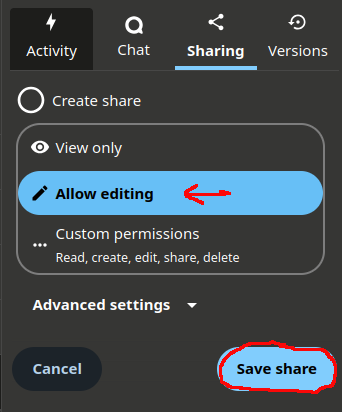
Here you can now see who has access to this resource:
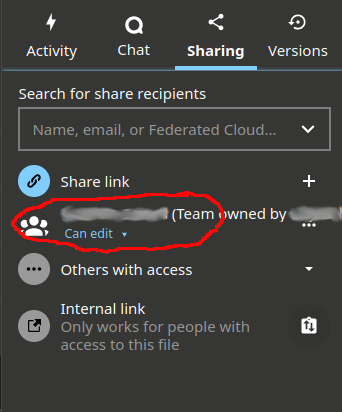
All team members should now have access to this database in the files of their own accounts. (See this graphic, that explains how shared files are accessed from different accounts)
Open shared database
- In KeePassXC, select
Open databasein the bar at the top left.
- In the window that opens, select the shared database from the Cloud folder.
Role-playing game about transport and E2E encryption and MITM
[!toc] Table of Contents
This game aims to illustrate the process, but not the functionality, of network communication using the example of emails without encryption, with transport encryption, and with end-to-end encryption. It is not really a game that is meant to be fun, but rather a means of explaining the topic without having to use a network diagram, thus making it more accessible to less technical people.
Roles
- 2x servers (systemli.org & gmail.com)
- 2x communication parties (Alice & Bob)
- 1x (or more) police officers (Eve)
- 3x “The Internet” (optional)
Materials
- 1x sheet of paper for text
- 1x sheet of paper with email metadata
- 3x sheets of paper with IP metadata for the routes between the nodes
- 2x signs with the names of the servers
- 2x signs with the email and IP addresses of the communication parties
- 1x small box that can be locked with a padlock (large enough to hold the sheet of paper with the text)
- 3x large boxes with lids (large enough to hold the other box)
- 2x padlocks
- 3x chairs
Ideally, the sheets should be laminated and written on with whiteboard markers. This way, they can be easily reused.
Procedure
In preparation, the Internet metadata information is stuck on each of the large boxes.
Then the roles are assigned. The role of the police should preferably be played by someone without much technical knowledge, so that creativity is required for the attacks. The rest of the people watch.
The two servers and two communication parties stand in a square. The servers and communication parties are given the signs with their information.
One chair is placed between each of the four people, on which one person playing the internet sits. They are also given the box with the corresponding internet metadata.
Alice writes a message to Bob on the sheet for the text and fills in the metadata that is not already filled in on the sheet with the metadata.
Now the various scenarios are played out. Each scenario is shown once without MITM and once with MITM (in our case by the police). The role of the police is to come up with their own ideas on how to attack the scenario. The only exceptions are attacks on Alice and Bob, which are not the aim of this game. Furthermore, the legality of the attacks or whether the parties would hand over the data to the authorities is not discussed; all technically possible attacks can be considered. The police can only attack the internet and the servers.
If the police cannot think of any way to attack, the audience can help. If they also have no ideas, the moderator can help.
The audience should then explain what happened, whether the attack worked, and what data the police obtained.
Unencrypted
Anna gives the sheets with the text and the email metadata to the Internet, which gives them to the first server, which sends them back to the Internet, which sends them to the second server, which sends them back to the Internet, which finally sends them to Bob. At each node, the sheets are placed in the box with the corresponding IP metadata.
Unencrypted - MITM
Possible targets of attack are:
- The internet
- The servers
All data can be intercepted at both points.
Transport encrypted
This time, the boxes are “locked” with lids. Although these boxes are not locked in the game, it is pointed out that they should still be considered secure. However, they only provide protection during transport; the nodes must be able to open the corresponding boxes.
Otherwise, it works the same as in the unencrypted scenario. It is important to ensure that both sheets are taken out of the box at each node and then placed in the appropriate other box. This is necessary because the servers need the metadata to know where to forward the mail.
Transport encrypted - MITM
Possible targets for attack are:
- The servers
All data can be intercepted there.
Ende-zu-Ende Verschlüsselung
First, it is explained that end-to-end encryption involves a public key and a private key. We represent the public key as a padlock and the private key as the key for the lock. It is briefly pointed out that this public key must be exchanged in such a way that it is certain that it belongs to the person. For this scenario, we do this by having Bob go to Alice in person and give her the padlock.
Alice puts the piece of paper with the text in the small box, locks it with the padlock, and puts this box together with the sheet containing the metadata in the large box. She then sends it to the Internet. After that, the process is the same as before: the large box is unpacked and repacked at each node, and the small box is finally opened at Bob’s end.
End-to-end encryption - MITM
Possible targets for attack are:
- The servers
Only the metadata can be accessed there.
End-to-end encryption with TOFU
This time, the public key is exchanged as usual by email without being verified.
- Alice writes to Bob, “Send me the key.”
- Bob sends the key.
- Alice writes end-to-end encrypted as above.
End-to-end encryption with TOFU - MITM
Possible targets of attack are:
- The servers
All data can be intercepted there.
The attack proceeds as follows:
- Alice writes to Bob, “Send me the key.”
- Bob sends Alice the key.
- The police intercept the key and replace it with their own.
- Alice encrypts the message with the police key.
- The police intercept the message and read it.
- The police re-encrypt the message with Bob’s actual key and send it on.
Neither Alice nor Bob are aware of the attack, but the police can read everything. Because the key was replaced by the police, a second padlock is required here.